Mastering WordPress User Roles: A Complete Guide
Key Points at a Glance
- WordPress user roles define user permissions and actions on the site.
- There are five default user roles: Super Admin, Administrator, Editor, Author, Contributor, and Subscriber.
- Custom roles can be created using plugins or code for more flexibility.
- Assign capabilities to roles for fine-tuned control over site access.
- Security best practices include using unique usernames and strong passwords.
- Custom user roles can improve workflow, security, and user experience.
- WooCommerce adds specific roles like Shop Manager and Customer.
- Membership sites can leverage custom roles to restrict content based on access levels.
- Role-based content restrictions can be implemented with plugins or custom code.
- Regularly audit and update user roles for optimal security and functionality.
Table of Contents
Introduction
User roles in WordPress define what actions each user on your site can perform, whether it's publishing content, managing themes, or moderating comments. By understanding and managing user roles effectively, you can secure your site, create streamlined workflows, and even customize user experiences based on their roles.
This article will explore WordPress user roles in detail, from the default roles available to advanced customization techniques for developers. Whether you're running a simple blog or a complex eCommerce site, mastering user roles is key to managing permissions, security, and user access.
Understanding WordPress User Roles: A Beginner's Guide
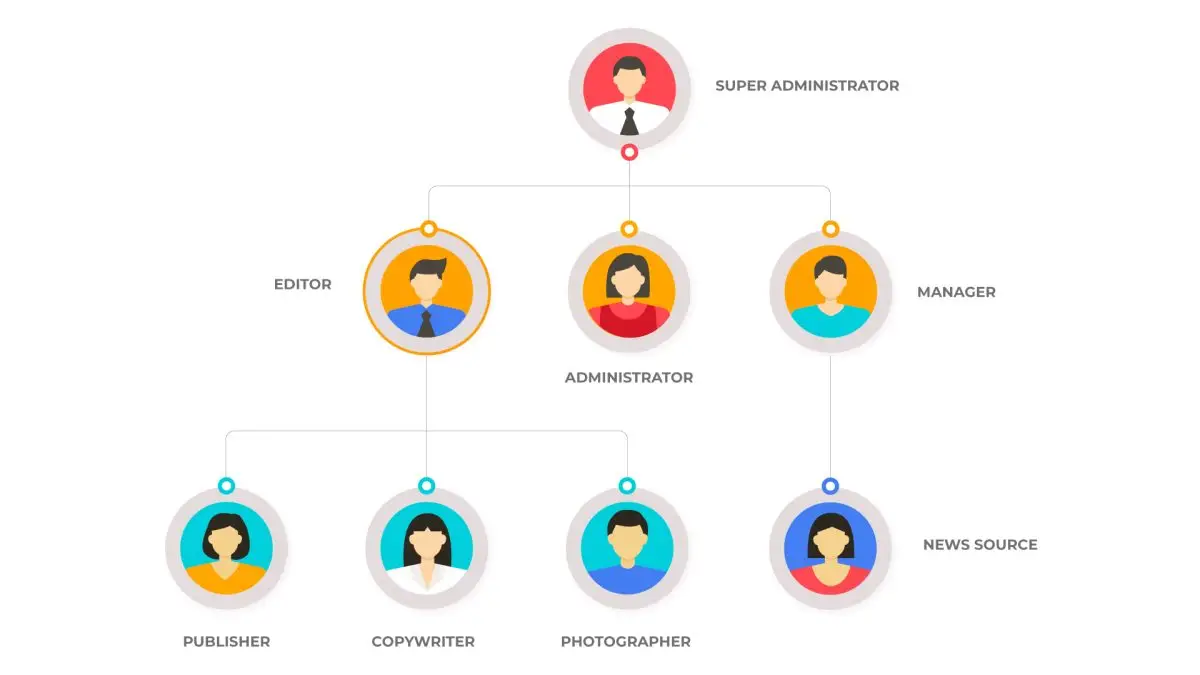
WordPress comes with five default user roles, each with a set of capabilities. Here's a breakdown:
- Super Admin – somebody with access to the site network administration features and all other features.
- Administrator – The top role with access to all administration features within a single site, including theme settings, plugins, user management, and content. This role should be assigned sparingly.
- Editor – Editors can publish and manage posts, including those created by other users. This role is ideal for content managers.
- Author – Authors can write, edit, and publish their own posts, but they cannot manage others' content.
- Contributor – Contributors can write and edit their own posts, but they cannot publish them. Someone with a higher role, like an editor or admin, must approve and publish the post.
- Subscriber: Subscribers have the most limited access, typically restricted to reading content and managing their own profile. This is common for membership sites.
These roles provide a good starting point, but depending on your site's needs, you may require more flexibility, or renaming for clarity.
Security pro tips
- Avoid Using 'Admin' as the Username
The default admin username for many WordPress installations used to be “admin.” Hackers often target this username in brute-force attacks, so it's best to create a unique, non-obvious username during installation.
Tip: Instead of “admin” or “administrator,” opt for something more personalized and difficult to guess, like a combination of words, initials, or numbers. - Use a Strong Password
A weak password is one of the most common vulnerabilities. Ensure the admin password is:
Long: At least 12-16 characters.
Complex: Include a mix of upper and lowercase letters, numbers, and special characters (e.g., !@#$%^&*).
Unique: Avoid reusing passwords from other services. Using a password manager can help generate and store secure passwords.
For example, instead of a simple password like "admin123", choose something like Cr0wnJ@ck!2024.
There are many ways to secure your site, such as Limit Login Attempts, Changing the Admin Login URL, Disabling Logins hints and much more, which isn't covered in today's article.
Create Custom User Roles in WordPress
In some cases, the default WordPress roles may not fit your needs. For example, you might want a "Content Reviewer" who can approve posts but not change settings, or a "VIP Member" with special access to premium content.
Creating Custom Roles Using a Plugin
- Install the User Role Editor plugin.
- Navigate to "Users" > "User Role Editor" in your WordPress dashboard.
- Click "Add Role" on the right side menu to create a new role. Name it and assign specific capabilities (e.g., "edit_posts" or "manage_categories").
- Save the new role, and it will now appear in the list of roles for assigning users.
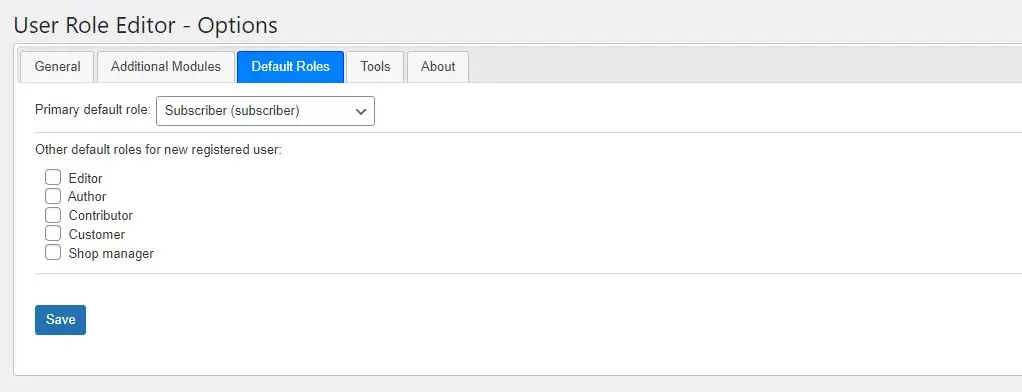
See Settings > User Role Editor, Default Roles to set the Primary default role and Other default roles for new registered users.
Creating Custom Roles with Code
If you prefer coding, you can add custom roles directly via your theme’s functions.php file:
Pro Tip: Use the Code Snippets plugin to keep your snippets organised.
function add_custom_role() {
    add_role('content_reviewer', 'Content Reviewer', array(
        'read' => true,
        'edit_posts' => true,
        'delete_posts' => false,
        'publish_posts' => false,
        'edit_others_posts' => true,
    ));
}
add_action('init', 'add_custom_role');
This code creates a "Content Reviewer" role with limited publishing abilities.
Set Role Capabilities
When creating a custom user role with the add_role() function in WordPress (which is what I referred to above in the add_custom_role), you can define capabilities for the role. Capabilities are specific permissions that allow users with that role to perform certain actions on your WordPress site.
WordPress comes with a wide range of built-in capabilities, and you can either assign these capabilities to a custom role or create custom capabilities. Below is a breakdown of the common capabilities you can set when creating a user role using add_role().
Common Capabilities You Can Set
Core Capabilities
- General Capabilities:
- read: Allows a user to view content on the site.
- edit_posts: Allows a user to edit their own posts.
- edit_others_posts: Allows a user to edit posts created by other users.
- publish_posts: Allows a user to publish posts.
- delete_posts: Allows a user to delete their own posts.
- delete_others_posts: Allows a user to delete posts created by other users.
- manage_categories: Allows a user to manage categories.
- Administrative Capabilities:
- manage_options: Allows a user to manage WordPress settings.
- update_core: Allows a user to update WordPress to the latest version.
- install_plugins: Allows a user to install plugins.
- activate_plugins: Allows a user to activate plugins.
- delete_plugins: Allows a user to delete plugins.
- install_themes: Allows a user to install themes.
- switch_themes: Allows a user to switch themes.
- User Management Capabilities:
- list_users: Allows a user to view the user list.
- create_users: Allows a user to create new users.
- edit_users: Allows a user to edit other users.
- delete_users: Allows a user to delete other users.
- promote_users: Allows a user to promote users (change their role).
- Content Moderation:
- moderate_comments: Allows a user to moderate comments.
- edit_comment: Allows a user to edit comments.
- delete_comment: Allows a user to delete comments.
- Media Capabilities:
- upload_files: Allows a user to upload files to the media library.
- edit_files: Allows a user to edit files within the media library.
- delete_files: Allows a user to delete media files.
- Custom Post Types Capabilities: If you have custom post types, you can also create custom capabilities for them:
- edit_custom_post_type: Allows a user to edit custom post type entries.
- delete_custom_post_type: Allows a user to delete custom post type entries.
- publish_custom_post_type: Allows a user to publish custom post type entries.
- read_custom_post_type: Allows a user to read custom post type entries.
Creating a Custom Role with Capabilities
Let's look at an example of how you might use the add_role() function to create a new role with specific capabilities:
add_role(
    'custom_editor',
    'Custom Editor', // Display name for the role
    array(
        'read' => true, // Basic reading access
        'edit_posts' => true, // Can edit own posts
        'edit_others_posts' => true, // Can edit others' posts
        'publish_posts' => true, // Can publish posts
        'delete_posts' => true, // Can delete own posts
        'manage_categories' => true, // Can manage categories
        'moderate_comments' => true, // Can moderate comments
        'upload_files' => true, // Can upload media files
    )
);
In this example, the custom role "Custom Editor" is similar to the standard Editor role but tailored with a specific set of capabilities.
Some Additional Capabilities:
- edit_pages: Allows editing pages.
- delete_pages: Allows deleting pages.
- edit_private_posts: Allows editing private posts.
- delete_private_posts: Allows deleting private posts.
- edit_private_pages: Allows editing private pages.
- delete_private_pages: Allows deleting private pages.
- read_private_posts: Allows reading private posts.
- read_private_pages: Allows reading private pages.
Create Custom Capabilities
You can also register your own capabilities if you're developing custom functionality. This is useful if you want to control access to specific features within a custom plugin or theme.
add_role(
    'custom_manager',
    'Custom Manager',
    array(
        'manage_custom_functionality' => true, // Custom capability
        'read' => true,
        'edit_posts' => true,
    )
);
Modifying an Existing Role
You can also add or remove capabilities from existing roles using add_cap() or remove_cap() functions. For example, adding the capability to publish pages to an existing role:
$role = get_role('editor');
$role->add_cap('publish_pages'); // Adds the ability to publish pages
Removing a Role
To remove a role, use:
remove_role('premium_member');Pro Tips:
- Use least privilege: Always assign the minimal capabilities necessary for a role. Only give access to sensitive permissions (like install_plugins or manage_options) to trusted roles.
- Test custom roles: After creating a custom role, test it by logging in with a user assigned to that role to ensure the capabilities work as expected or use the User Switching plugin to quickly swap between user accounts.
Best Practices for Managing User Permissions in WordPress
Managing permissions is critical for maintaining security and ensuring a smooth workflow. Here are some tips:
- Principle of Least Privilege: Assign the minimum permissions necessary. For example, don't make content creators administrators unless they need full control over the site.
- Regularly Audit Roles: Review user roles periodically to ensure no one has unnecessary access. This is especially important when staff changes.
- Fine-Tuning Permissions: Use a plugin like Members or Capability Manager Enhanced to assign specific capabilities. For example, you might want certain users to be able to moderate comments but not edit posts.
- Custom Permissions for Contributors: On multi-author blogs, set up contributors with limited rights to create drafts. Editors can then approve and publish the content, ensuring quality control.
WordPress User Roles for eCommerce Websites
When running an eCommerce site using WooCommerce, user roles play a crucial role in managing your store's operations, maintaining service quality and enhancing your company's internal workflow.
WooCommerce-Specific Roles
- Shop Manager: This role has access to WooCommerce reports, orders, and inventory but cannot change settings like themes or plugins.
- Customer: After making a purchase, users are automatically assigned the "Customer" role. They can view their orders and manage their profiles but not change site settings.
Creating Custom Roles for eCommerce with Plugin
For more control, you can create roles like “Wholesale Customer” or “VIP Shopper” with special discounts or access to hidden product categories. Here's an example:
- Create a new role using the User Role Editor plugin.
- Assign capabilities such as viewing restricted products or applying special pricing rules.
- Use the WooCommerce role-based pricing plugin (Paid for pro) to offer special deals based on the user's role.
Limit Access to WordPress Content Based on User Roles
Restricting content based on user roles is critical for membership sites, eLearning platforms, and premium content models.
Using Plugins
Plugins like Restrict Content or MemberPress allow you to easily manage role-based content restrictions. Which means you can:
- Create different access levels (e.g., free vs paid).
- Hide premium content from users without the necessary role.
- Display role specific messages.
Plugins like Advanced Views have shortcode arguments that restrict access to content too.
Using Code
For developers, you can restrict content programmatically. Here's an example of how you can restrict content to users with the "Premium Member" role using PHP:
if ( current_user_can('premium_member') ) {
    // Display premium content
    echo "<h2>Welcome to the Premium Content Area!</h2>";
    echo "<p>This content is exclusive to premium members.</p>";
} else {
    // Display message to non-premium users
    echo "<h2>Premium Content</h2>";
    echo "<p>Sorry, this content is only available for premium members. <a href='/membership'>Upgrade now</a>.</p>";
}
What’s Happening in the Code snippet:
If the user does not have the required role, they see a message encouraging them to upgrade or subscribe.
current_user_can('premium_member'): This function checks if the currently logged-in user has the "premium_member" role.
If the user has this role, they see the premium content.
Custom Capabilities Instead of Roles
Sometimes, you might want to check for a specific capability rather than a role. For instance, you could assign the same capability (like view_premium_content) to multiple roles (e.g., both "Premium Member" and "VIP Member").
Here’s how to check for a custom capability:
if ( current_user_can('view_premium_content') ) {
    // Display premium content
    echo "<h2>Exclusive Premium Content</h2>";
    echo "<p>You're viewing this because you have the premium access capability.</p>";
} else {
    // Display a restricted message
    echo "<h2>Restricted Content</h2>";
    echo "<p>Only users with premium access can view this content. <a href='/membership'>Sign up now</a> to get full access!</p>";
}
Steps to Add a Custom Capability:
You might need to add this custom capability to a specific role when creating a membership system. This can be done using the add_cap() function (as mentioned earlier):
function add_premium_capabilities() {
    $role = get_role('premium_member'); // Get the Premium Member role
    $role->add_cap('view_premium_content'); // Add the capability to view premium content
}
add_action('admin_init', 'add_premium_capabilities');
With this function, users assigned the "Premium Member" role will automatically have the view_premium_content capability.
Restricting Content by Post Type
You might also want to restrict access to entire post types or categories. For example, you could limit access to posts within the "premium-content" category or custom post types that only premium users can view.
Example: Restrict Access to a Custom Post Type
function restrict_custom_post_type_content( $content ) {
    if ( is_singular( 'premium_post' ) && ! current_user_can( 'premium_member' ) ) {
        return '<p>This content is for Premium Members only. Please <a href="/membership">sign up</a> to access.</p>';
    }
    return $content;
}
add_filter( 'the_content', 'restrict_custom_post_type_content' );
In this example:
- We're checking if the post belongs to a custom post type called premium_post.
- If the user does not have the "Premium Member" role, they’ll see a message instead of the content.
Combining with a Membership Plugin
If you’re building a membership site using plugins like MemberPress or Restrict Content Pro, you can extend this code to work with the plugin’s functionality, managing access to different tiers or subscription levels easily.
Other Use Cases for Role-Based Content Restriction:
- Premium Downloads: Restrict access to downloadable content (e.g., PDF files, videos) only for users with the right role.
- VIP Forums: If you're running a forum (using plugins like bbPress), you can limit specific discussion boards to certain roles.
- Personalized Dashboards: Show custom content or dashboards to users based on their roles (e.g., authors vs. subscribers).
- Online Courses: Offer course materials or quizzes exclusively to enrolled students or users with a “Course Access” role.
Why Use Custom Code for Role-Based Restrictions?
- Fine-Grained Control: You can tailor access to specific parts of your content rather than relying on plugin-defined rules.
- Performance: For smaller sites, custom code can be faster and lighter than some membership plugins.
- Flexibility: You can integrate role-based restrictions with other custom functionalities on your site (e.g., eCommerce, learning management systems).
In Summary:
By using current_user_can() and custom capabilities or roles, you can control who can see what on your WordPress site. Whether it's premium content, entire post types, or downloads, programmatically restricting access gives you fine-grained control over user access and improves the user experience for different membership tiers.
Top plugins for managing user roles
- User Role Editor: Allows you to modify, create, and delete roles and capabilities.
- Members: A simple and user-friendly plugin for managing roles and permissions, with built-in content restriction options.
- WPFront User Role Editor: Provides granular control over user roles and capabilities, allowing custom permissions for each role.
Each plugin caters to different needs. If you’re managing a membership site, Members might be ideal, while User Role Editor is great for advanced custom roles and permissions.
User Role Security: How to Prevent Unauthorized Access in WordPress
Securing your WordPress roles is essential to prevent unauthorized users from accessing sensitive areas of your site. Here are some tips:
- Use Strong Passwords: Enforce strong passwords for all users, especially admins and editors.
- Enable Two-Factor Authentication: Use a plugin like Wordfence or Two-Factor Authentication to add an extra layer of security.
- Limit Login Attempts: Install a plugin like Limit Login Attempts Reloaded to prevent brute-force attacks on your login page.
- Role-Based Restrictions: Only grant administrator access to trusted users. Avoid giving this role to casual contributors or customers.
Lastly it's worth mentioning that there are some plugins for e.g. Wordfence as stated above that add extra layers of security, what they also often do is control other parts, such as limit login attempts and block user accounts after x many failed attempts, so the point is to read through the list of features offered and avoid additionally plugins that'll slow down your site, likely counteracting what the similar plugin does already. Use only what you need and keep your site as fast as possible.
Creating a Membership Site with WordPress User Roles
Membership sites rely heavily on user roles to control access to different tiers of content. Here’s how to set it up:
Using Membership Plugins
By now we know that MemberPress or Restrict Content Pro allow you to easily create multiple membership levels. Each level can be associated with a different user role.
You can restrict content, offer role-specific pricing, and display exclusive content to premium members.
Custom Roles for Membership Levels
Creating custom roles such as “Free Member,” “Silver Member,” and “Gold Member” allows you to segment your users and offer a more tailored experience. Many membership plugins make this process simple, and these tiered roles can help you manage access to different content levels.

While it might be tempting to get creative with your membership level names, remember that using familiar, intuitive labels can help users quickly understand the benefits of each tier. For example, traditional names like “Gold” or “Silver” imply value, and users are often more inclined to upgrade when they can easily see how each level differs.
Each custom role can unlock different levels of access—higher-paying members could receive exclusive content, premium downloads, or access to special forums. These tiered incentives can drive engagement by motivating users to aspire to higher levels, especially if the benefits are clearly defined. Whether you aim to boost revenue or build a more engaged community, strategically designed membership levels can enhance user satisfaction and improve site loyalty.
Managing Multi-Author WordPress Blogs with User Roles
For multi-author blogs, it's important to structure your user roles properly to manage content creation and approval:
- Author: Authors should be responsible for drafting and publishing their own posts, but not editing others' content.
- Editor: Editors can review and approve content created by authors and contributors. They have the final say on what gets published.
- Contributor: Contributors can submit posts for review but not publish them directly.
Using plugins like Edit Flow helps create a more streamlined workflow by adding editorial calendars and content approval systems based on roles.
Conclusion
WordPress user roles are a powerful tool that can be used to secure your site, manage workflows, and customize user experiences. By following best practices for role management, you’ll ensure that every user on your site has the right level of access, and you’ll avoid common pitfalls like over-privileging users. Whether you’re a beginner or a developer, mastering user roles in WordPress will make managing your site easier, more secure, and highly efficient.
Now go for it Admin!
Thank you for reading! to our monthly newsletter to stay updated on the latest WordPress news and useful tips.

Stuck with development or facing an issue?
WPLake offers affordable on-demand website development and design.
No matter the size of your project - contact us now, and we'll get it done for you!
Frequently Asked Questions Test Your Knowledge
FAQ mode
/
Learning mode
- What are the default user roles in WordPress?
WordPress comes with five default roles: Super Admin, Administrator, Editor, Author, Contributor, and Subscriber. Each role has specific capabilities that determine what actions users can perform on your site.
- Can I create custom user roles in WordPress?
Yes, you can create custom user roles using plugins like User Role Editor or by adding code to your theme’s functions.php file. Custom roles allow you to define specific capabilities based on your needs.
- How do user roles affect website security?
User roles help control access to sensitive areas of your site. Assigning the right roles and permissions prevents unauthorized access, reducing the risk of security breaches.
- How can I restrict content based on user roles in WordPress?
You can restrict content using plugins like MemberPress or Restrict Content Pro, or by adding custom code to display specific content only to users with the right roles or capabilities.
- What is the role of WooCommerce-specific roles like Shop Manager?
WooCommerce adds roles like Shop Manager, which gives users access to manage orders, inventory, and reports without full admin privileges. Customers are assigned the role of "Customer" to manage their orders and profile.
- How can I manage permissions for multiple authors on a WordPress blog?
Assign roles like Author for content creators, Contributor for writers who need approval to publish, and Editor for managing and approving posts. This helps streamline the editorial process.
- Is it safe to use the default 'Admin' username?
No, it is not recommended to use "Admin" as the username, as it’s a common target for hackers. Create a unique username during installation to improve security.
- What are the best plugins for managing WordPress user roles?
Popular plugins include User Role Editor, Members, and WPFront User Role Editor. These plugins allow you to create, modify, and assign user roles and permissions with ease.
- How often should I audit user roles and permissions?
It's a good practice to audit user roles regularly, especially after staff changes or when your website grows. This ensures no user has unnecessary access to sensitive areas.
- Can I modify existing roles and their capabilities?
Yes, you can modify existing roles using the add_cap() or remove_cap() functions in WordPress, or with plugins that allow you to adjust capabilities for each role.
Course navigation: WordPress Beginner

Lesson #8
Time to read: 15 mins
Updated 22 Aug, 2024
Lesson #10
Time to read: 5 mins
Updated 13 Mar, 2026
Content links (14)
12.
wordfence.comAbout the Author