WordPress Taxonomies How-to: Display Attached Terms and Query Posts by Term

Key Points at a Glance
- What custom taxonomies are and why they matter in WordPress.
- How to display attached taxonomy terms using plugins like ACF and Advanced Views.
- Step-by-step instructions for creating and showing taxonomies with code.
- How to build custom taxonomy archive templates for better organisation.
- Ways to query posts by taxonomy terms for flexible content displays.
Table of Contents
Custom taxonomies are a powerful way to organize and categorize your WordPress content beyond the default categories and tags. Whether you're building a portfolio, an eCommerce site, or a blog, custom taxonomies give you more control over how your content is structured.
In this guide, we'll cover two methods to display custom taxonomies in WordPress and we're also going to be talking about displaying the posts in the custom taxonomies.
1. About Custom Taxonomies
A custom taxonomy allows you to group content in WordPress beyond the default categories and tags. For example, if you're running a book review site, you could create taxonomies like "Genre" or "Author" to categorize the books more effectively.
2. Displaying attached terms
2.1) Using plugins
If you’re not comfortable with code, you can use a plugin to create and display custom taxonomies. One popular option for creating custom taxonomies is the Advanced Custom Fields plugin, with other options including Secure Custom Fields, CPT UI, Pods or Meta Box and to display them there is Advanced Views.
For this example we'll use the Advanced Custom Fields plugin to create a new taxonomy.
Step 1: Install the ACF Plugin
- Go to your WordPress admin panel.
- Navigate to Plugins > Add New.
- Search for "ACF"
- Install and activate the plugin.
Step 2: Create a Custom Taxonomy
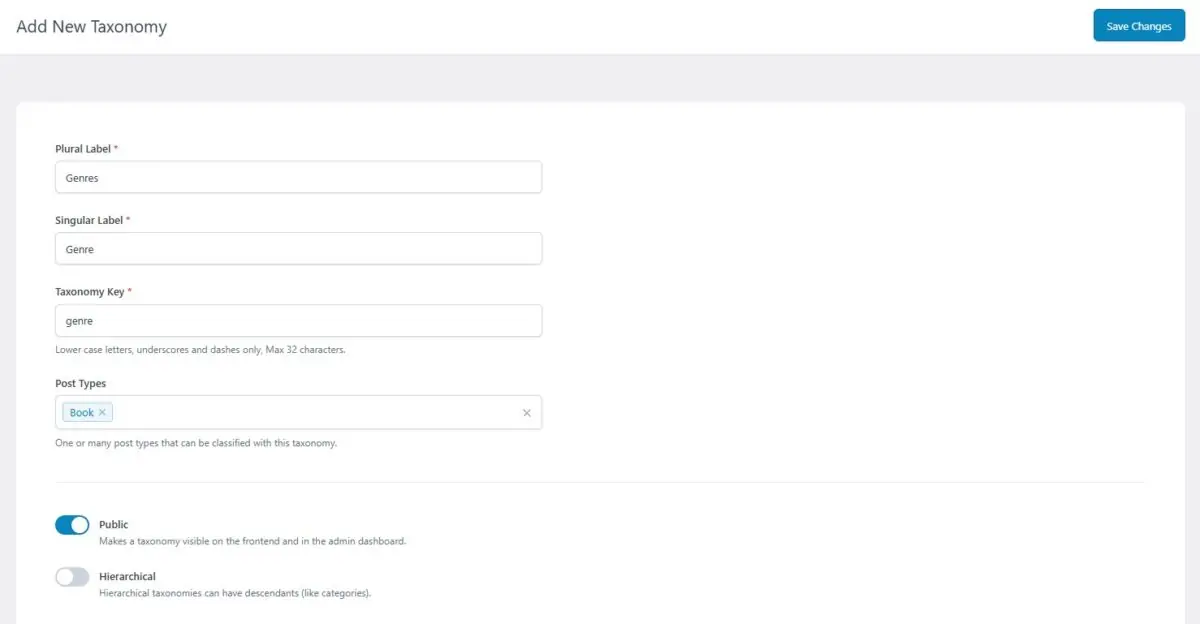
- After activation, go to ACF > Taxonomies > Add New.
- Fill out the details for your custom taxonomy. For example:
- Plural Label: Genres
- Singular Label: Genre
- Taxonomy key: genre
- Assign it to your desired post type, e.g., "Books." and Save Changes.

Step 3: Display Custom Taxonomy Terms
Once your taxonomy is created, you can easily display the post taxonomy terms using a shortcode.
Display List of Post terms
For this step we'll be displaying the terms for items from the Book CPT.
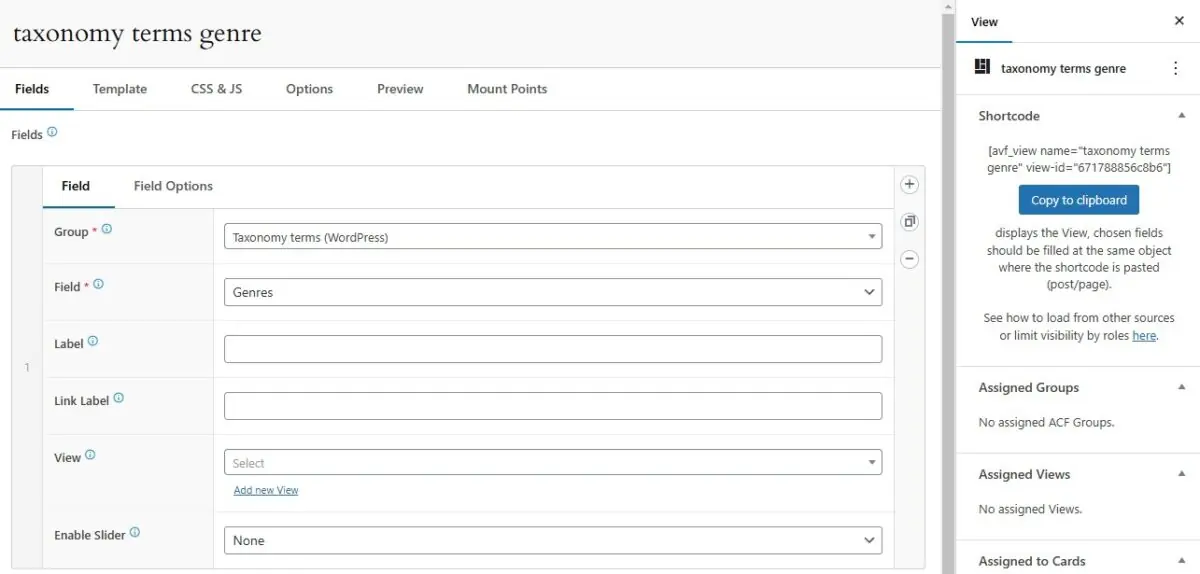
Head over to the Advanced Views Framework in the left admin menu, Add New View item, and give it a good name, e.g. "taxonomy terms genre", click on Add Field and Select 'Taxonomy terms (WordPress)' Group, and the "Genres" field, then publish your View and Copy the Shortcode.

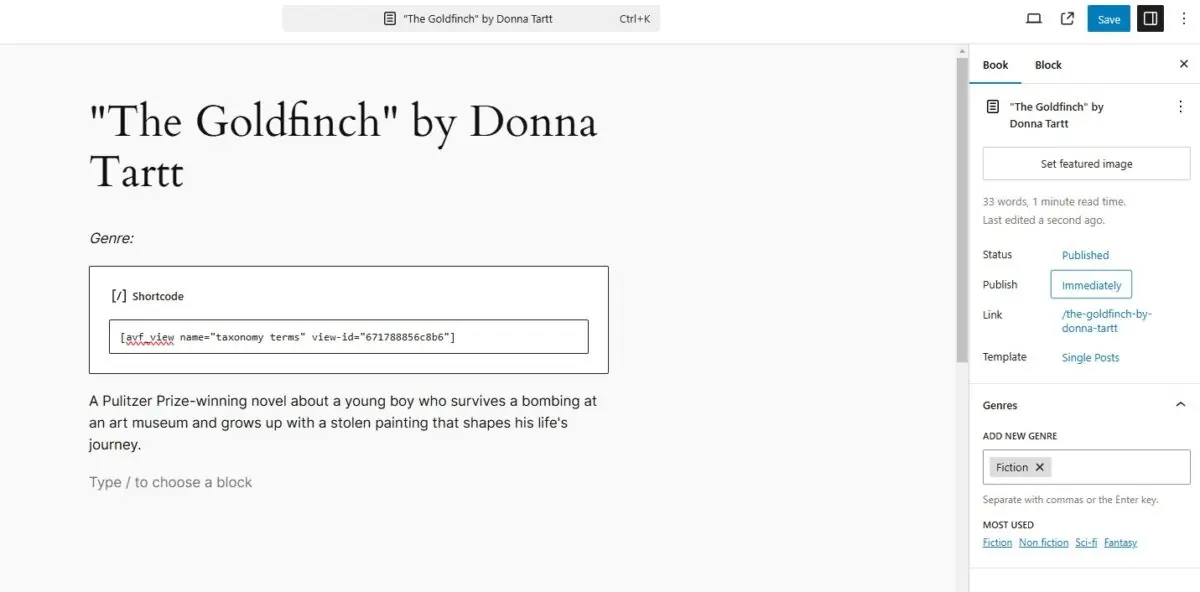
Create a Book post, and paste the copied shortcode in place.

That's it, now view your page to see the results. You'll notice it'll even have a link to the term archive page.
2.2): Using PHP code
This method requires some coding knowledge but gives you complete flexibility. You'll need to add custom code to your theme’s functions.php file or using a plugin like Code Snippets.
Step 1: Register the Custom Taxonomy
First, you need to register your custom taxonomy. This is done using the register_taxonomy() function.
In the example below, we are registering a taxonomy called "Genre" for the "book" custom post type.
function create_book_genre_taxonomy() {
    $labels = array(
        'name'              => _x( 'Genres', 'taxonomy general name' ),
        'singular_name'     => _x( 'Genre', 'taxonomy singular name' ),
        'search_items'      => __( 'Search Genres' ),
        'all_items'         => __( 'All Genres' ),
        'parent_item'       => __( 'Parent Genre' ),
        'parent_item_colon' => __( 'Parent Genre:' ),
        'edit_item'         => __( 'Edit Genre' ),
        'update_item'       => __( 'Update Genre' ),
        'add_new_item'      => __( 'Add New Genre' ),
        'new_item_name'     => __( 'New Genre Name' ),
        'menu_name'         => __( 'Genre' ),
    );

    $args = array(
        'hierarchical'      => true, // Set to false for non-hierarchical taxonomies like tags
        'labels'            => $labels,
        'show_ui'           => true,
        'show_admin_column' => true,
        'query_var'         => true,
        'rewrite'           => array( 'slug' => 'genre' ),
    );

    register_taxonomy( 'genre', array( 'book' ), $args );
}

add_action( 'init', 'create_book_genre_taxonomy', 0 );
Step 2: Display Custom Taxonomy in Your Theme
Once the taxonomy is registered, you can display it in your theme’s template files. For example, if you want to show the taxonomy terms on the single post page, you can use the following code inside single.php or content-single.php:
<?php
$terms = get_the_terms( $post->ID, 'genre' );
if ( $terms && ! is_wp_error( $terms ) ) :
    $genres = array();
    foreach ( $terms as $term ) {
        $genres[] = $term->name;
    }
    echo '<p><strong>Genre:</strong> ' . implode( ', ', $genres ) . '</p>';
endif;
?>
This code fetches the genres associated with the current post and displays them as a comma-separated list.
Step 3: Create a Custom Taxonomy Archive Template (Optional)
To create a custom taxonomy archive page (e.g., listing all books in a specific genre), you can create a template file called taxonomy-genre.php in your theme’s directory.
Example content for taxonomy-genre.php:
<?php get_header(); ?>
<div class="taxonomy-content">
    <h1><?php single_term_title(); ?></h1>

    <?php if ( have_posts() ) : while ( have_posts() ) : the_post(); ?>
        <div class="post-excerpt">
            <h2><a href="<?php the_permalink(); ?>"><?php the_title(); ?></a></h2>
            <p><?php the_excerpt(); ?></p>
        </div>
    <?php endwhile; else : ?>
        <p>No posts found under this genre.</p>
    <?php endif; ?>

</div>
<?php get_footer(); ?>
This template will automatically be used when you visit the URL /genre/[term-slug].
3. Querying Posts by Term
For this we'll want to display a list of all the Books with terms from the Taxonomy 'Genres'.
Here's an example when using the Advanced Views plugin:
Create a View item, Add Field, select the Taxonomy terms (WordPress) Group, select the Custom Taxonomy from the Field dropdown (this will display the title of the term), click Publish and head over to the Cards tab and Create a Card item, add new, Select your View from the list, filter by post type Book and click Publish.

You'll then get a shortcode like this, which you can paste on a page:
[avf_card name="posts by custom taxonomy" card-id="67178b125e9ae"]This shortcode is a lot more flexible, and in AVF Pro you can even decide what information about terms to be displayed. Another bonus is once you have your shortcode you can edit the template of your View and you don't need to use a new Card shortcode each time.

Conclusion
Custom taxonomies in WordPress give you the flexibility to organize your content in creative ways. Whether you prefer a code-based approach or a plugin for ease of use, you can implement taxonomies that suit your project’s needs.
- If you’re comfortable coding, the custom approach offers more control over the design and functionality.
- For non-developers or those who prefer a quick solution, plugins like Custom Post Type UI and Advanced Views make it easy to create and display taxonomies without touching code.
By following either of the methods above, you'll be able to manage and display custom taxonomies on your WordPress site like a pro!
Thank you for reading! to our monthly newsletter to stay updated on the latest WordPress news and useful tips.

Stuck with development or facing an issue?
WPLake offers affordable on-demand website development and design.
No matter the size of your project - contact us now, and we'll get it done for you!
Frequently Asked Questions Test Your Knowledge
FAQ mode
/
Learning mode
- What is a custom taxonomy in WordPress?
A custom taxonomy is a way to organise content beyond the default categories and tags. For example, you might create “Genre” or “Author” taxonomies for a book review site.
- Do I need to code to use custom taxonomies?
No, you can create and display taxonomies with plugins like ACF, CPT UI, Pods, or Advanced Views — no coding required.
- How do I display taxonomy terms on a post?
You can use shortcodes with the Advanced Views plugin to automatically show attached terms, or add PHP code to your theme templates.
- Can I show posts from a specific taxonomy term?
Yes, you can query posts by taxonomy terms using Advanced Views or WP_Query in PHP. Both methods let you display grouped content based on terms.
- What’s the difference between a taxonomy and a custom post type?
A custom post type defines what kind of content you create (e.g., books, products), while a taxonomy defines how that content is grouped (e.g., by genre, by brand).


