Mastering Custom Post Types with ACF: The Ultimate Guide

Key Points at a Glance
- About Custom Post Types (CPTs): CPTs allow you to go beyond default content types, creating custom structures tailored to your needs.
- Public vs. Private CPTs: Custom Post Types can be public, allowing visibility to all users and inclusion in site maps, or private, hiding them from public view without generating URLs.
- Hierarchical CPTs: Hierarchical post types (like Pages) allow for parent-child relationships, useful for nested content structures.
- Categorizing Custom Post Types: WordPress taxonomies enable you to categorize Custom Post Types, enhancing content organization and management.
- Building Post Type Relations: ACF enables you to establish relationships between Custom Post Types using Relationship and Post Object fields, which store IDs as pointers, facilitating easy retrieval and efficient management of connected content.
Table of Contents
In WordPress, post types are a core feature that transforms it from a simple blogging platform into a dynamic content management system. Custom Post Types (CPTs) allow you to go beyond the default content types and create custom structures that align with your unique requirements.
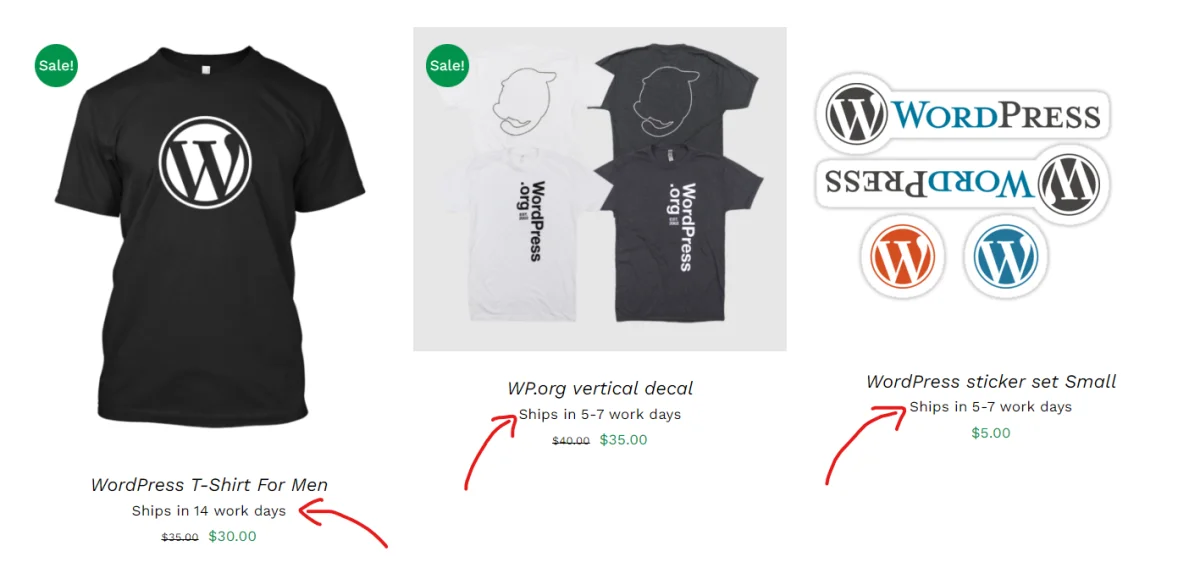
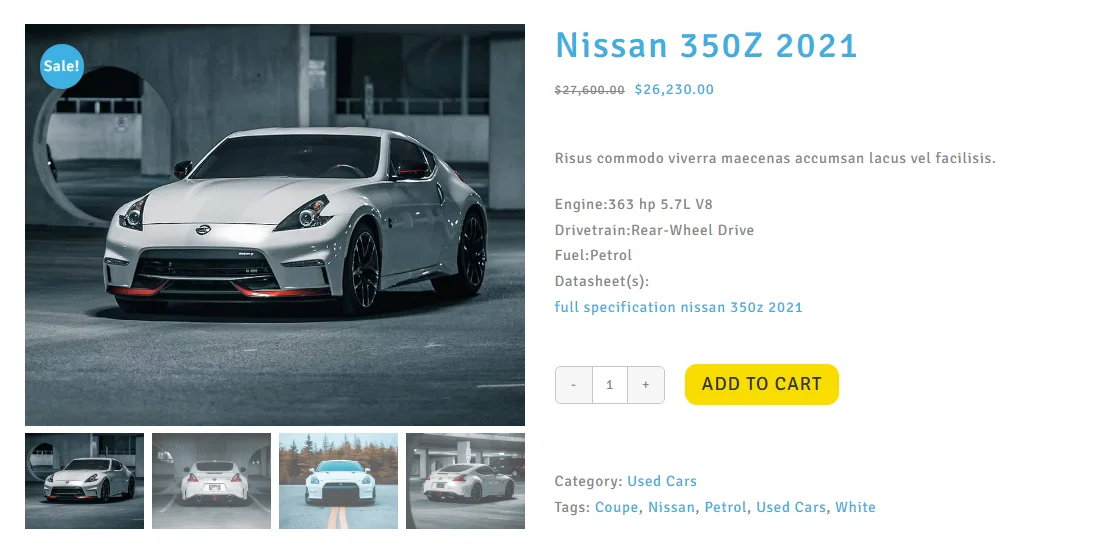
Take WooCommerce, for example - it powers most WordPress shops by introducing the Products custom post type, allowing you to manage and display products, a task that wouldn't be possible without the core post type functionality.
Out of the box, WordPress includes several default post types, such as Posts, Pages, and Attachments. However, the real power lies in creating your own CPTs to suit specific needs. For instance, you might create an Events post type for managing event listings, a Properties post type for real estate, or a Portfolio post type to showcase creative work.
While creating custom post types manually using code is possible, the process involves handling numerous arguments, which can be tedious. Advanced Custom Fields (ACF) simplifies this by letting you configure everything through an easy-to-use interface.
The free version of ACF is enough for managing custom post types, and that's what we’ll be using in this article. However, if you prefer tools like Meta Box or Pods, feel free to use them, as they also offer custom post types management features.
1. Introduction to Post Types in WordPress
Before we dive into the practical steps, it's crucial to understand the structure of custom post types (CPTs) in WordPress. This foundation will help you apply CPTs more effectively.
Fortunately, the concept is quite straightforward:
WordPress uses a single database table called wp_posts to store all entities, regardless of their post type. The key field that distinguishes between different post types is the post_type column, which exists in every row. Despite this, all post types share the same set of fields, including post title, excerpt, content, author, and published date.
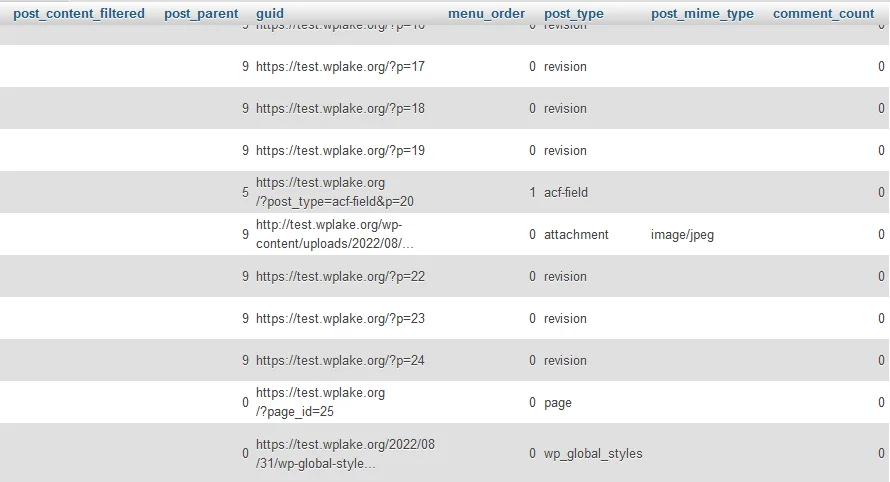
Think of it like storing all vegetables in the same refrigerator but organizing them on different shelves based on their type. Similarly, WordPress keeps all posts in the same table but differentiates them by their post_type.
However, it’s important to note that there isn’t a separate list of post types stored in the database. Post types are declared dynamically in the code, while only the post records themselves are stored in the database.
The advantage of this unified structure goes beyond just how data is stored. Once a custom post type is registered, WordPress automatically handles many management aspects, including:
- Adding a menu in the admin dashboard
- Providing a table-based interface for managing entries
- Generating unique URLs for each post type and its entries
In other words, you simply declare the post type, and WordPress takes care of the heavy lifting. Sounds great, right? But you might wonder - what about further customization?
Meta Data
It’s handy to be able to sort records by their post type, but since all post types share the same set of fields, how do we make them unique? Won’t they be too similar?
Thankfully, WordPress has this covered with meta fields. Meta fields allow you to attach additional information to any post record. Think of them like stickers on your vegetables in the refrigerator, where you can add extra details.
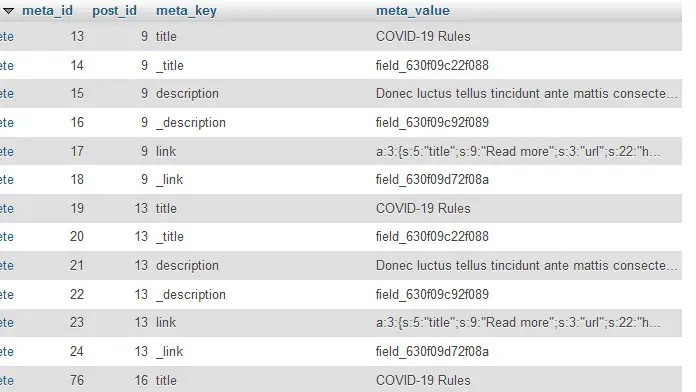
Using meta fields, you can go beyond just adding text or numbers. You can also attach media like images, files, and even videos or PDFs.
What’s more, you can define unique sets of fields for your custom post types. Once attached to a specific CPT, every entry under that post type will have its own custom field set, giving you complete control over how your content is structured.
Use cases for Custom Post Types (CPTs)
Custom Post Types are highly versatile and can be used in many ways, depending on your needs. Since a CPT can be either public or private, you can use them for both internal purposes or to showcase content externally.
Here are some common use cases:
- Information Websites:
Manage content like events, team members, or an inventory of products or services. - eCommerce Sites:
Use CPTs to manage additional product-related lists, such as vendors, suppliers, or even brands. - Portals:
Handle restricted content, such as documents, that are only accessible to specific users, like members of a company that the document is related to.
2. How to add a Custom Post Type using ACF
ACF offers a user-friendly UI to register and manage Custom Post Types. While it’s possible to create custom post types manually using code, the process involves many arguments that can be tedious to manage. ACF simplifies this by allowing you to configure everything through the interface.
Tip: For those who prefer to work with code, ACF can act as a snippet generator, fine-tuning all the necessary settings and providing you with a clean snippet to add to your theme's functions.php file.
Step-by-step guide:
- Install the Advanced Custom Fields plugin.
- Navigate to Custom Post Types:
Go to your WordPress dashboard.
In the ACF menu, click on "Custom Post Types". - Add a New Custom Post Type:
Click the "Add New" button at the top of the Custom Post Types screen. - Enter Basic Details:
Fill in the Singular Label and Plural Label fields to define the name of your post type.
For example, “Event” (singular) and “Events” (plural). (See the detailed settings description below). - Set Public Visibility:
Ensure that the Public checkbox is selected if you want the post type to be publicly accessible. - Save the Custom Post Type:
After configuring the basic settings, click "Publish" to save your new post type. - View and Create New Items:
Once the new Custom Post Type is created, it will appear in the left-hand menu.
You can now visit the post type and start creating new items by clicking "Add New". - Advanced Settings (Optional):
After checking the basic functionality of your post type, you can return to the CPT settings to configure Advanced Settings and fine-tune the setup. (See the detailed settings description below).
Primary CPT settings description
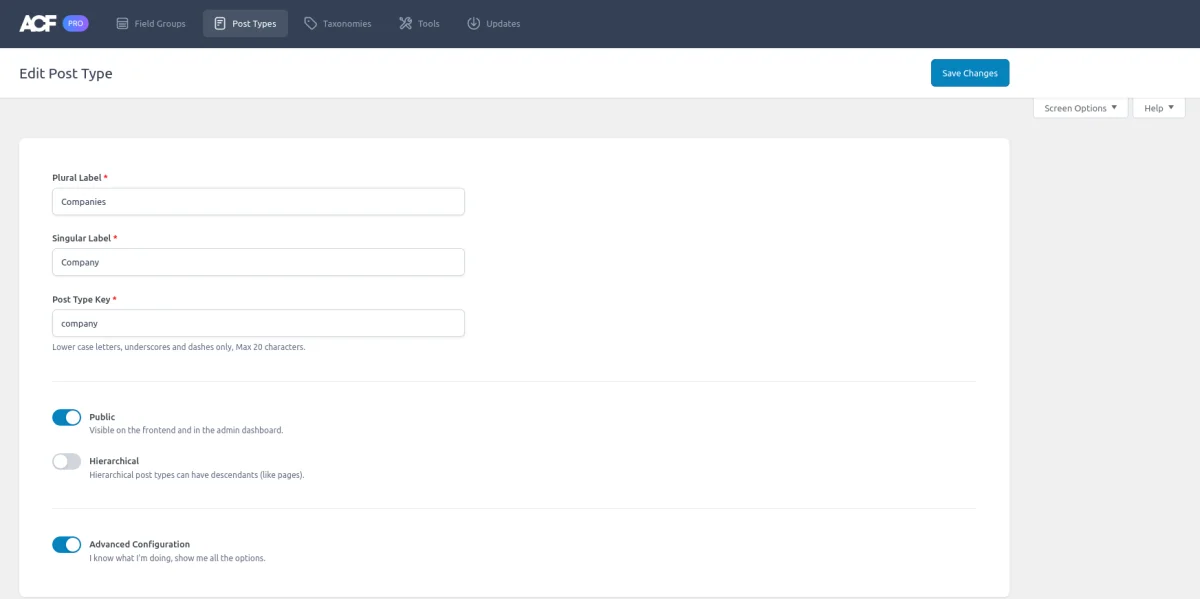
- Plural Label:
The name used when referring to multiple entries of your post type.
Example: "Events" for an event-based post type. - Singular Label:
The label for a single entry of your post type.
Example: "Event" for individual event listings. - Post Type Key:
A unique identifier for your custom post type, often auto-generated from the singular label but can be customized.
Example: event for an events post type. This key will be used in queries and URLs. - Taxonomies:
Associate existing or new taxonomies (like Categories or Tags) with your post type. This makes it easier to group and filter your content. Taxonomies can be assigned from here or later in the Taxonomy settings.
Example: Assigning a custom taxonomy like “Event Types” to your Events CPT. - Public:
Determines whether this post type is publicly visible and accessible on the front end of your website. If selected, users will be able to view, search, and query this post type via the front end. - Hierarchical:
Set whether your post type should have a parent-child structure similar to Pages (hierarchical) or act like Posts, where each entry stands alone (non-hierarchical).
Useful for content that needs a nested structure, like property listings where specific houses can be children of locations.
Advanced CPT settings description (optional)
General
- Supports:
Select the features your post type supports, such as title, editor, thumbnail, or custom fields.
By default, the editor is set to Gutenberg, but you have the option to install the Classic Editor or disable it altogether if needed. - Description:
Add a brief description of what this post type is for. This is mainly for internal reference. - Active:
Determines whether this post type is active or inactive.
Labels
Provides custom labels for different elements of your post type, such as menu names, button labels, and singular/plural entry names. Customize how this post type appears in the WordPress admin menu and UI buttons like "Add New" or "View All."
Visibility
- Show in UI:
Enables or disables the visibility of the post type in the admin area. - Show in Admin Menu:
Controls whether the post type appears in the main WordPress admin menu. - Admin Menu Parent:
If set, the post type will be nested under a different menu item in the admin sidebar (like under "Settings"). - Menu Position:
Sets the order where your post type appears in the WordPress admin sidebar. - Menu Icon:
Choose or upload an icon that will appear next to your post type in the admin menu. - Exclude from Search:
Prevents the post type from being included in the site's search results.
URL
- Front URL Prefix:
Sets a custom slug to be used in the URLs of this post type. Example: "event" for an Events post type will appear as yourdomain.com/event/event-name. - Pagination:
Enable or disable pagination for post type archives. - Archive:
Determines whether this post type has an archive page where all entries are listed. - Publicly Queryable:
Sets whether this post type can be queried on the front end by users.
Permissions
- Rename Capabilities:
Customize the permissions for editing, publishing, and deleting this post type for different user roles. - Can Export:
Enables the post type to be exported as part of a WordPress export. - Delete with User:
Automatically deletes the user's posts of this type when the user is deleted.
REST API
- Show in REST API:
Makes this post type available in WordPress' REST API, allowing for external access and interaction. - Base URL:
Sets the base slug for this post type when accessed through the REST API. - Namespace Route:
Define a custom route in the REST API, which can be used to handle this post type's data.
Getting a CPT code snippet
As we mentioned earlier, ACF can be used as a snippet generator. It's an advanced and optional feature, so you can continue using Custom Post Types (CPTs) through the interface if you prefer. However, if you'd like to work with code, ACF provides an easy way to generate the necessary snippets.
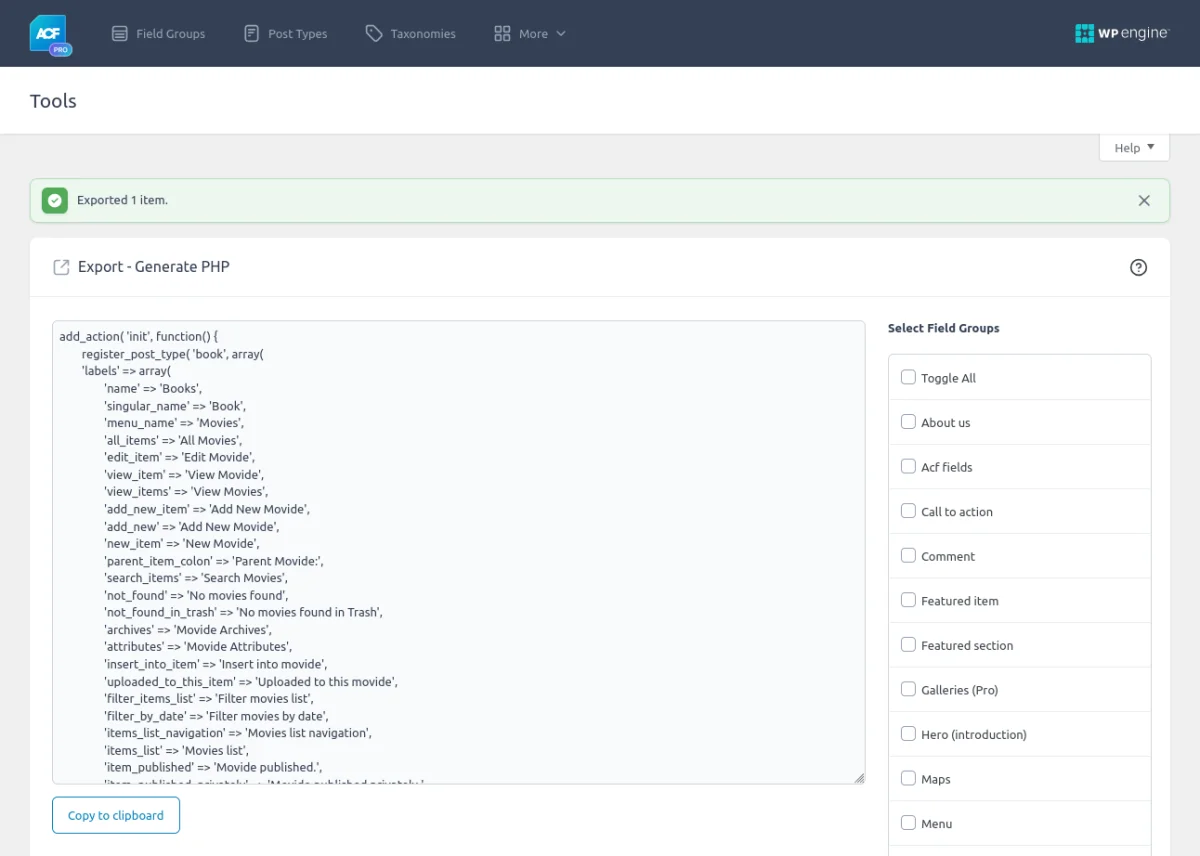
- Access the Tools Page:
Go to your WordPress dashboard. Navigate to the ACF menu and select Tools. - Select the Post Type:
On the Tools page, find the CPT you want to generate code for. Mark the checkbox next to the target Post Type. - Generate PHP Snippet:
Click the Generate PHP button. ACF will convert all the settings of the selected CPT into a clean PHP code snippet. - Add the Snippet to Your Theme:
Copy the generated code and paste it into your theme's functions.php file or a custom plugin. - Remove the CPT from the Interface:
After adding the code, you can remove the CPT from the ACF interface. The CPT will continue to work through the native code, allowing you to manage it independently of the ACF plugin.
3. Alternative methods to create Custom Post Types
Custom Post Types are rarely used without meta fields, and in most cases, the simplest way to create a CPT is to use the same tool you'll be using for managing meta fields.
While ACF is an excellent plugin for handling both meta fields and custom post types, there are several other strong alternatives that can also manage CPTs effectively.
Two of the most notable options are Meta Box and Pods. Both plugins have a long-standing history and are packed with features, allowing you to manage custom post types, taxonomies, and even offer options pages for global settings.
Each plugin has its own strengths:
- Pods is completely free, offering all of its features without any limitations, which makes it a popular choice for those working without a budget.
- Meta Box is known for its extensive flexibility and modular approach, making it ideal for more complex setups.
Choosing between these tools depends on your workflow and project needs. For a deeper comparison, check out our article on the Best Meta Field Plugins in WordPress, where we break down the pros and cons of each.
For those who prefer working with code, you can use a custom post-type snippet generator or refer to the WordPress documentation to manually define your CPTs.
4. Hierarchical vs. non-hierarchical CPTs
Now that we’ve covered how to create Custom Post Types, let’s clarify some of their primary characteristics. While there are many arguments to consider, we'll focus on the most essential aspects.
The first key aspect is the hierarchical setting.
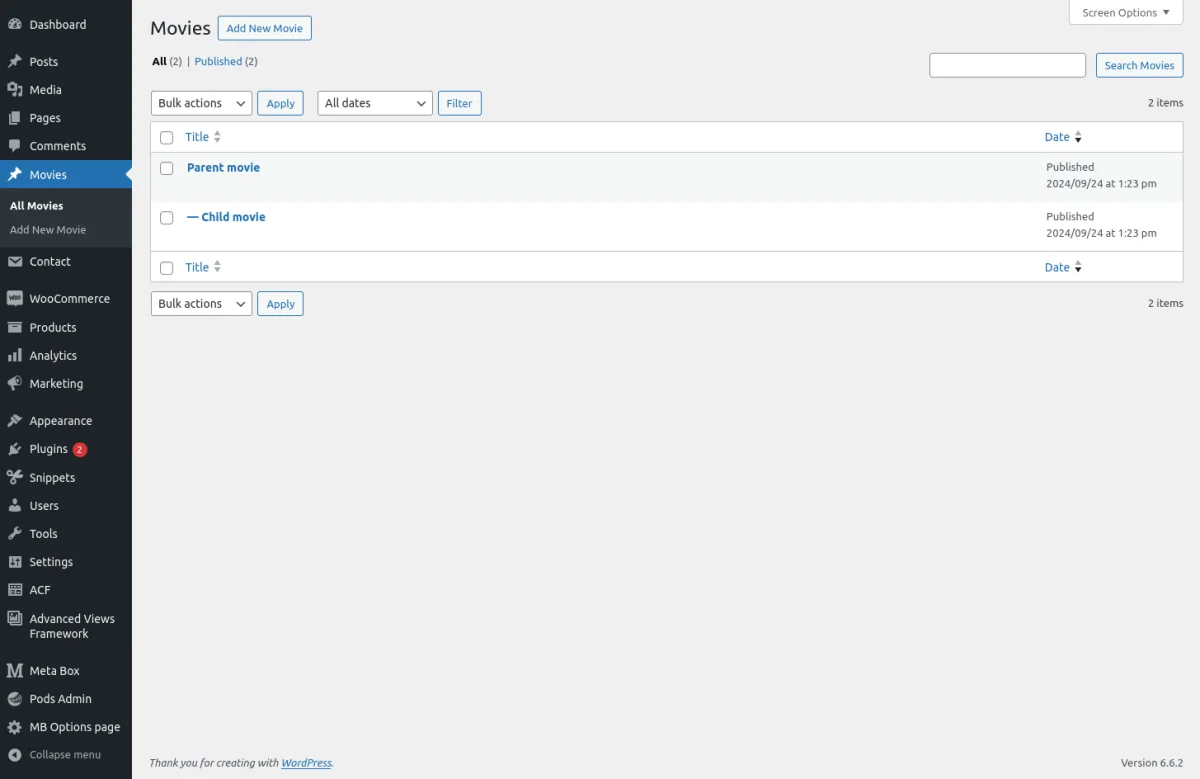
This setting determines whether your post type should have a parent-child structure, similar to Pages (hierarchical), or function like Posts, where each entry stands alone (non-hierarchical). This is particularly useful for content that benefits from a nested structure, such as property listings where specific houses can be children of locations.
Enabling the hierarchical setting affects several parts of your site:
- Entity Management:
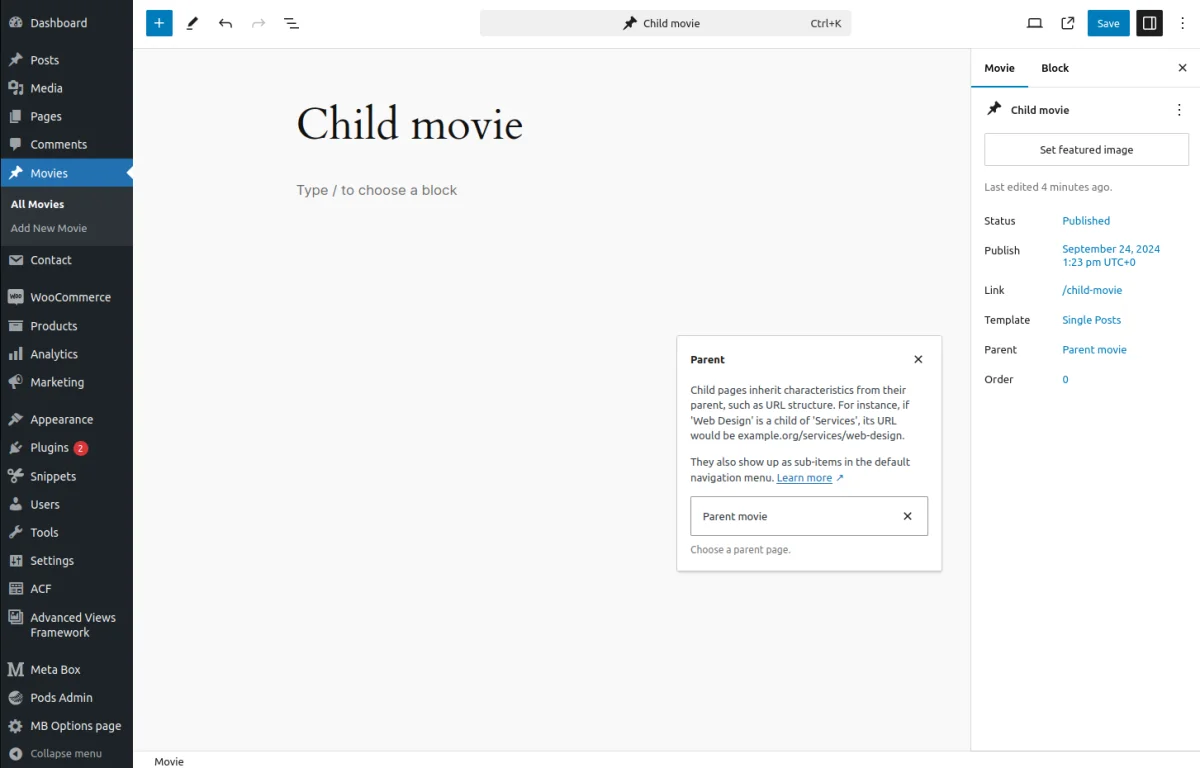
When enabled, WordPress provides a select dropdown, allowing you to define parent-child relationships. This relationship is visually represented in the list table, making it easy to manage hierarchies. - Database Storage:
When a parent is defined, WordPress fills out the post_parent column in the wp_posts table. This allows you to perform queries, such as finding the parent of the current post, the child of the current post, or siblings of the current post. - URL Structure:
The parent-child relationship also influences the URL structure. By default, a CPT follows the {cpt-name}/{entity} format. When a parent is defined, the URL changes to {cpt-name}/{parent}/{child}, reflecting the hierarchy.
It's important to note that the parent-child relationship is optional. Even if hierarchical settings are enabled, editors can choose whether to use them.
You can have items without parent/child relationships, and there's also the flexibility to create multi-level hierarchies, allowing for parent, child, and sub-child relationships.
Note: If you opt for a hierarchical CPT, ensure that you enable the 'Page Attributes' support in the Advanced settings CPT settings. Otherwise, editors will not be able to define parent-child relationships.
5. Public vs. private Custom Post Types
An important consideration when working with Custom Post Types is their visibility. CPTs can be either public or private, making them highly versatile for managing both internal and external content.
By default, CPTs are public, meaning they are displayed to visitors, assigned URLs, and appear in site maps. However, you can make a CPT private, which hides it from public view and restricts access to only specific users or teams.
When a CPT is set to private, WordPress won't generate public URLs for the records, and they will not be accessible to visitors or appear in REST API queries. This is useful when you need to manage internal data, such as company documents or team reports, without exposing them to the public.
Differences between public and private CPTs
Let's summarize the difference:
| Item | Default for Public CPT | Default for Private CPT |
|---|---|---|
| Has publicly available URLs | Yes | No |
| Can be queried via REST API | Yes | No |
| Appears in sitemap | Yes | No |
| Can be managed via UI | Yes | Yes |
How to:
- Make a CPT Private
Uncheck the 'Public' setting when creating the CPT, or modify this setting later in the general options. - Make a CPT accessible only to specific roles
Change the capabilities for the CPT by setting its permissions. Use your CPT name in place of 'post' in the capability structure. Then you can assign the CPT-related capabilities to specific roles, either by creating new roles or adjusting existing ones. - Hide a CPT from the UI
In the Advanced settings, under the Visibility tab, uncheck the 'Show in UI' option to hide it from the admin panel. Alternatively, you can uncheck only 'Show in admin menu' to keep it accessible but not visible in the admin sidebar.
About CPT-related capabilities
WordPress uses a set of capabilities to control what actions users can take with posts and custom post types. These capabilities define the level of access each user role has. Below is a quick rundown of the main capabilities that apply to any post type:
- edit_{posts}
Allows users to edit existing posts (or CPT items). Users with this capability can access the edit screen and modify content. - delete_{posts}
Lets users delete posts or items in the CPT. - publish_{posts}
Grants permission to publish new posts or items. - edit_published_{posts}
Allows users to modify posts that have already been published. - delete_published_{posts}
Enables users to delete posts that have already been published. - read_private_{posts}
Provides access to read posts that are marked as private.
Note: By default, all CPTs follow the same access policy as standard posts. To customize this, you’ll need to modify the capability type of your CPT to match its name. After that, assign capabilities specific to your CPT for the target role by replacing 'post' in the capability names with your custom post type name.
For example, if your CPT is named product, the capability names would change from edit_posts, delete_posts, and publish_posts to edit_products, delete_products, and publish_products.
WordPress includes a set of predefined roles (such as Administrator, Editor, Author, etc.) with different combinations of these capabilities. However, for CPTs, you can customize these permissions for more granular control. For example, you could grant a specific role the ability to edit but not delete items within a CPT.
To manage capabilities and roles, consider using a plugin like Members or managing them programmatically with custom code.
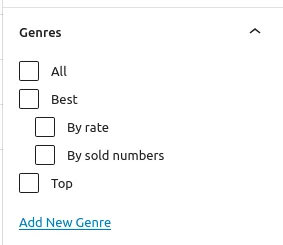
6. How to categorize Custom Post Types
Another cornerstone feature in WordPress is Taxonomies, which allows you to categorize any post type - built-in (like Posts and Pages) or Custom Post Types (like WooCommerce Products).
You might wonder, if Custom Post Types act as a form of categorization, why would you need taxonomies? Let’s break it down with an example.
Suppose you've created a CPT for "Partner Companies" to list your business partners. If you have dozens of partners, navigating through them can become confusing. By using taxonomies, you can improve this by categorizing partners into sectors like Agro, Transport, IT, etc.
Taxonomies in WordPress allow you to create custom categories within your Custom Post Types. The good news is that, although taxonomies are stored in their own table, they follow the same principles as post types - they can be public or private, hierarchical or not, and accessible to visitors.
Each taxonomy is made up of terms, and the same taxonomy can be assigned to multiple post types. For example, a "Sector" taxonomy could be applied to both "Partner Companies" and "Projects."
ACF not only allows you to manage custom post types, but you can also create and assign custom taxonomies, and even add custom fields to taxonomies!
Once a taxonomy is assigned to a CPT, WordPress provides an intuitive UI where you can easily assign terms to each item. Additionally, you can query and display posts filtered by specific terms (taxonomy items) for more refined control over content.
For more details on taxonomies, check out the ACF Taxonomy documentation.
Note: Be sure not to confuse Taxonomies with the ACF Taxonomy field. The former is a built-in categorization system in WordPress, while the latter is a field type provided by ACF to help manage these relationships (essentially offering an alternative or enhanced version of the native WordPress widget).
7. How to build Post Type relations
7.1) Relations between Post Types
While Post Types and Taxonomies are excellent for structuring data, they don't inherently support relationships between different post types.
For example, imagine you have a "Company" CPT and an "Employee" CPT. Each employee works for a company, and each company has employees, but by default, these post types remain independent with no way to link them.
To create relationships between post types, you can use meta fields, which act as pointers to related items.
ACF offers two powerful fields for this: Relationship and Post Object fields. These allow you to build complex connections between your post types.
Let’s break it down with an example:
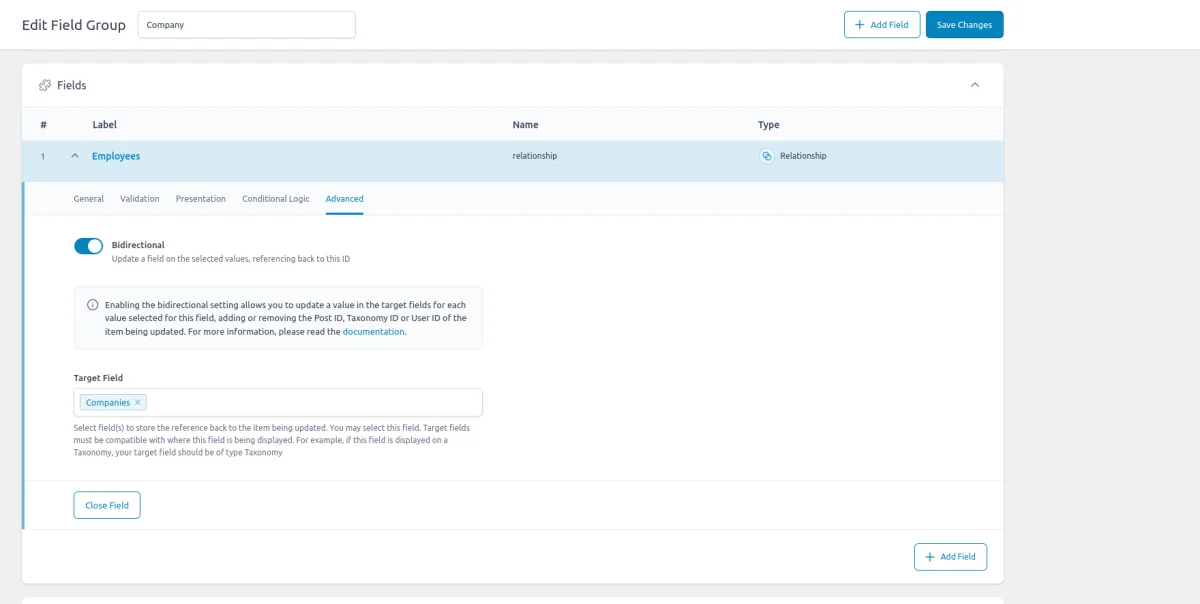
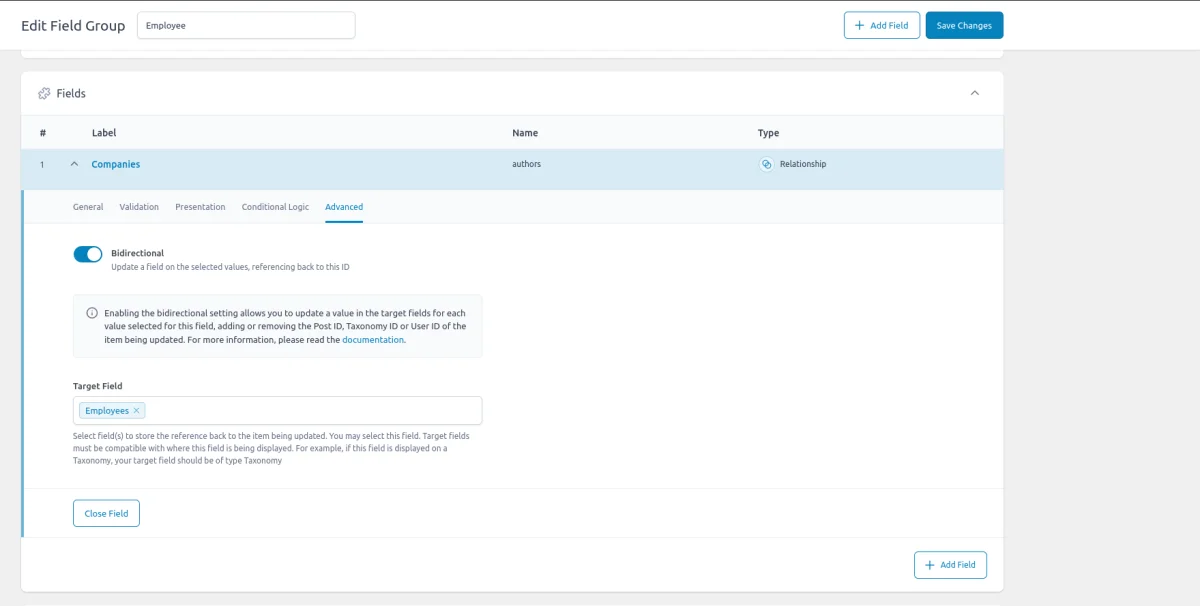
- You've created a "Company" post for "Agro" and two "Employee" posts for "Nick" and "Matt".
- To establish a relationship, you add a Relationship field called "Employees" to the Company CPT.
- Then, you add a Post Object field called "Company" to the Employee CPT.
Now, when you edit the Agro company post, you can select Nick and Matt from the "Employees" field, while on their individual Employee posts, you can assign them to the "Agro" company using the "Company" field.

Behind the scene
What happens behind the scenes? ACF stores the IDs of the selected employees (which are post types) in the metadata of the "Agro" company. Similarly, it stores the company ID in the metadata of each employee. These stored IDs act as pointers that let you retrieve all related data.
This way, you can build a Company Employees section on the company page to display all employees working for that company. Conversely, on an employee's page, you can show a "My Company" section displaying not just the company's name but other information like its founding year, industry, etc.
By using Relationship and Post Object fields, you can create various types of relationships: one-to-one (e.g., linking an author to a biography), one-to-many (e.g., Company to Employees), and many-to-many (e.g., Projects to Employees working on them).
While this example focuses on relationships between different post types, you can also use the same approach to create connections within the same post type. For instance, you could build relationships between employees by designating roles like "manager" and "employee", allowing you to link managers to their respective teams.
Pro tip: One of ACF's standout features is the bidirectional setting, which automatically keeps relationships in sync. For instance, when you add or remove an employee in the company's relationship field, it updates the employee's post as well, reflecting the correct company.
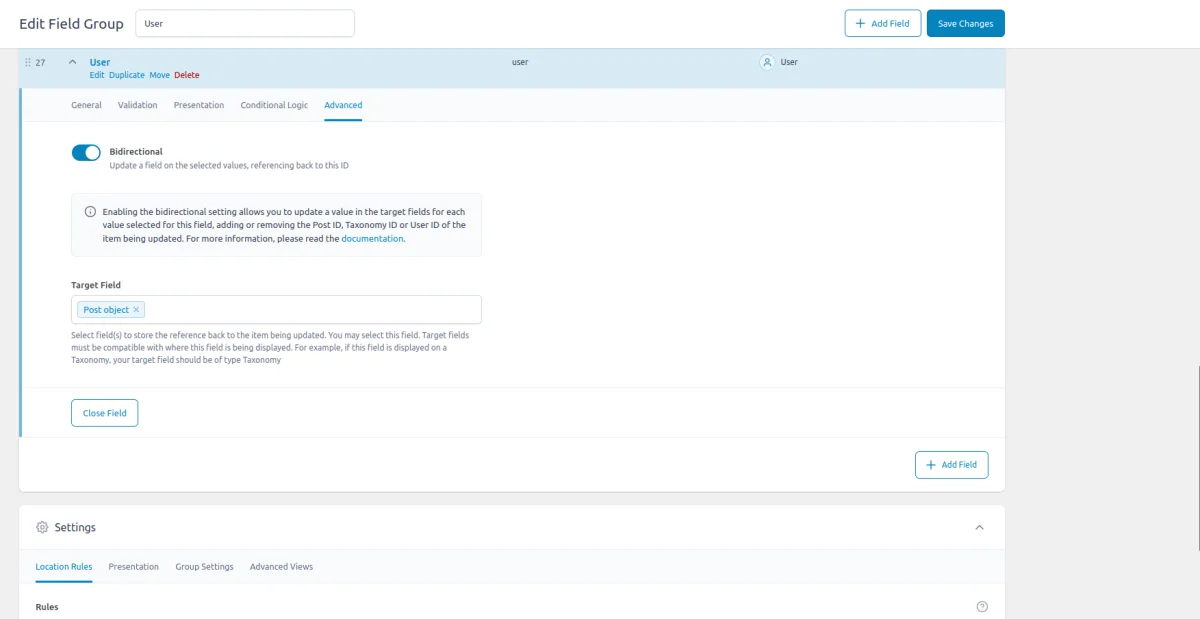
7.2) Relations between Post Type and Users
In addition to creating relationships between post types, ACF also allows you to relate WordPress Users. For example, in a WooCommerce shop, you might have Products. By adding an ACF User field to the Product CPT, you can assign a manager to each product. Similarly, you can display a list of managed products in that user’s account.
You can also apply the bidirectional feature here, ensuring the data stays up to date - when a product is assigned or removed from a manager, it will reflect in both the product and the manager's profile.
This is a powerful and flexible setup that lets you create advanced relationships and workflows. For instance, you can automate sending an email to the product manager when the stock is low, ensuring proactive management.
8. Multilingual Custom Post Types
We've covered the essential aspects of Custom Post Types (CPTs), but let's now dive into multilingual support for CPTs. Imagine you're running an eCommerce shop with customers from various countries. Naturally, you'd want to offer product descriptions in the language of your target customers and even have country-specific products.
While WordPress is multilingual at its core, allowing each registered user to have their own language for the dashboard, the content itself (posts, pages, and CPTs) is not. By default, WordPress installations are single-language, meaning all content, such as pages and media, is created in one language.
However, WordPress’s true strength lies in its extensibility. With the help of plugins like WPML and Polylang, you can add full multilingual capabilities to your site, making it possible to offer content in different languages all within the same installation. These plugins not only translate content but also ensure that the look and feel remain consistent across languages.
How it works
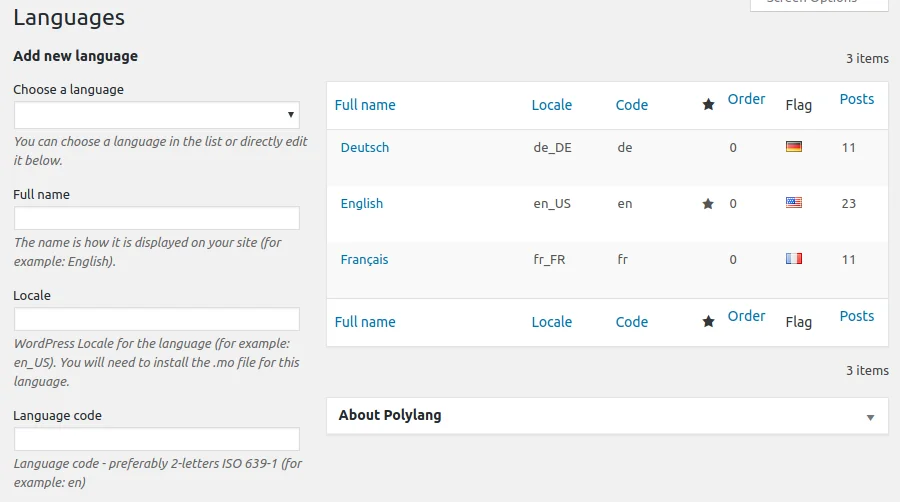
Though multilingual plugins provide complex functionality, the core principle is relatively straightforward - they use WordPress Taxonomies to categorize posts, CPT items, and even taxonomies by language. So, when you add a new language, the plugin creates a language-specific taxonomy that tags each piece of content accordingly.
While the system seems simple, the magic happens behind the scenes, as these plugins hook into WordPress processes to filter posts, adjust labels, and serve the right content based on the user's language preferences or locale settings.
Translation management for CPTs
These multilingual plugins offer smart translation management, tailored specifically for CPTs. For example, media attachments like images can either be shared across all languages or made language-specific. Similarly, with tools like ACF, you can decide if field groups and labels should be language-specific or consistent across translations.
This flexibility allows for a wide range of use cases, from maintaining a single inventory for products sold globally to customizing content for each market or language region.
Note: For a step-by-step guide on setting up WPML or Polylang for multilingual CPT support, refer to their official documentation. Each plugin offers different approaches, but the core concept - using taxonomies to categorize content by language - remains consistent.
This was a brief overview of how multilingual support can be applied to CPTs, enabling you to craft personalized, region-specific experiences for your audience.
9. Custom Post Type templates
In this section, we’ll explore how to manage the front-end presentation of Custom Post Types. While WordPress automatically provides a user interface for editors by adding a CPT list table and item editor in the dashboard, the front-end presentation requires more customization to reflect the unique nature of each CPT.
It's important to note that only public CPTs have a front-end presentation. WordPress offers standardized templates for displaying CPTs: single and archive templates. The single template is used to display individual CPT items, while the archive template shows a collection of all available items for that CPT.
Key points to consider:
- Common Templates:
Although each CPT item contains unique content, all items of the same CPT share the same template. This means that while each item may have different data, they will maintain a consistent look and feel dictated by the template. - Unique URLs:
WordPress assigns a unique URL to each CPT item, automatically detecting the corresponding template to load and display the relevant information.
Flexibility in template development
WordPress is an incredibly flexible platform, allowing for multiple ways to develop and manage templates. The method you choose may depend on how you’re building your website:
- Classic Themes: Use single-{slug}.php and archive-{slug}.php files.
- Block Themes: Use single-{slug}.html and archive-{slug}.html files, which can be edited in the Site Editor.
- Page Builders: Many page builders offer their own vendor-specific templates for managing CPTs.
Summary table
| Type | Files | Editing method |
|---|---|---|
| Classic Theme | single-{slug}.php and archive-{slug}.php | As code |
| Block Theme | single-{slug}.html and archive-{slug}.html | As code or via WP Site Editor |
| Page Builder | Vendor-specific templates | Vendor-specific methods |
10. How to display ACF fields for Custom Post Type entries
Custom Post Types are almost always paired with custom meta fields. Now that we've covered the templates, let’s explore how to display ACF fields within these templates.
Tip: If you’re new to ACF, check out the How to Display ACF Fields chapter in our ACF review for a detailed overview.
The method you choose to display ACF fields will depend on your setup and preferences. The ACF get_field() function is suitable for classic themes but not directly applicable to block themes or page builders.
This is where Advanced Views (AVF) comes in. It’s a specialized WordPress framework designed to enhance and customize content display and functionality. AVF is universal and works seamlessly across all setups, from classic themes to page builders.
This framework offers smart templates for the front end, simplifying post queries and template creation. It generates default markup and automatically loads escaped data into the template, allowing you to focus on layout rather than code.
Unlike drag-and-drop page builders, the smart templates in Advanced Views are modular and based on a template engine (Twig or Blade). This provides full control over the markup and helps you avoid issues with global CSS and JavaScript files. The framework natively supports all ACF field types, along with various other data sources.
Displaying ACF fields
Let’s review the different methods to display ACF fields. Keep in mind that for CPT-wide changes, you should modify the single CPT template as described earlier. However, you can also make item-specific adjustments to display certain ACF fields for just one or a few items.
Displaying using Advanced Views Framework
Since it’s the simplest method, let's start with this:
- Install the Advanced Views plugin.
- Navigate to the Views section and create a new Layout.
- In the Fields tab, select the target WordPress and ACF fields you want to display.
- Save the Layout; a template will be automatically generated, which you can modify as needed.
- To integrate it into your page, paste the generated shortcode into the CPT template (or inside the target item content).
Displaying using the ACF get_field() function
Given ACF's wide range of field types, the response from the get_field() function will vary depending on the specific field type, and each type will require a distinct approach for display. For example, images require an <img> tag, while links need an <a> tag. Refer to the list of ACF field-related guides for specific instructions.
Displaying using page builder integrations
If you’re using a popular page builder, check for built-in ACF support. Due to ACF’s popularity, many builders offer some level of integration. However, keep in mind that most of these integrations are basic, providing limited control over layout, and may lack support for advanced field types like Gallery or Repeater.
Here’s a snapshot of the built-in features offered by some of the most popular WordPress themes and page builders for displaying ACF field values:
| Theme/Builder | ACF-related feature |
|---|---|
| Astra | - |
| Avada | Dynamic Content |
| Beaver | ACF Module |
| Bricks | Dynamic data |
| Divi | ACF Module |
| Elementor | Dynamic Tags |
| GeneratePress | - |
| Gutenberg | - |
| Kadence | Dynamic Content |
| OceanWP | - |
| Visual Composer | Dynamic Content |
| WPBackery | - |
11. How to query Custom Post Type entries
Now that we’ve covered the CPT templates and how to display item details, let’s turn our attention to querying Custom Post Type entries.
While WordPress handles this automatically on the Archive CPT template, allowing us to loop through results easily, there may be instances where we need to display a set of posts elsewhere - like showcasing the five most recent WooCommerce products on the homepage or displaying all documents related to the current user.
To achieve this, we need to perform a database query to retrieve the desired CPT items. In WordPress, we have several methods for querying CPT entries. Here’s a quick overview:
| Name | Supported theme types | Description |
|---|---|---|
| Advanced Views Framework | All themes | Use the Post Selection element to master any CPT queries, including meta and taxonomy filters. |
| WP_Query Class | All themes | A powerful class that allows you to perform complex queries on CPTs, including filters for meta and taxonomy. |
| Gutenberg Query Loop Block | Block-based themes | Enables basic CPT queries directly within the Gutenberg editor. |
| Page Builder Tools | Vendor-specific | Depending on the vendor, your page builder may offer dedicated tools for querying and displaying items. |
Regardless of the method you choose, it’s essential to consider the storage format when querying by meta fields, such as those created by ACF.
For instance, a file field stores an attachment ID, so you should query by the corresponding numeric string, while a relationship field stores a serialized array, necessitating the use of 'LIKE' in your comparisons. For more detailed guidance, refer to the field-related guide in this list.
Pro tip: While this chapter focuses on querying CPT items, remember that you can also perform queries based on user and taxonomy metadata in WordPress. Check the mentioned field-related guides for detailed information on all the query types.
12. How to export and import Custom Post Types and entities
First, it’s important to note that Custom Post Types are registered programmatically, while CPT entries are stored in the database. To export and import CPTs and their corresponding entries, you can utilize a combination of ACF tools and built-in WordPress functionalities, along with various plugins.
12.1) How to use the ACF export and import tool
The ACF export and import tools enable you to migrate Custom Post Type definitions from one website to another. It's important to note that these tools do not include any CPT records themselves.
- Visit the ACF Tools Page:
Navigate to the ACF - Tools page on the source website. - Select the Target Post Types:
Identify and check the Custom Post Types you wish to export. - Export the Data:
Click on the Export as JSON button (if you prefer a user-friendly interface) or choose to Generate PHP if you’re comfortable with the code. - Access the ACF Tools Page on the Target Website:
Switch to the target website and go to the ACF - Tools page. - Import the File:
Select the previously generated JSON file and click the Import JSON button. If you exported it as a PHP code snippet, copy it into the functions.php file of your theme instead.
12.2) How to use WordPress export and import tools
Unlike ACF, WordPress export and import tools focus on moving the content itself, specifically Custom Post Type entries. Keep in mind, that WordPress uses an XML format for export, which works best for text-based data.
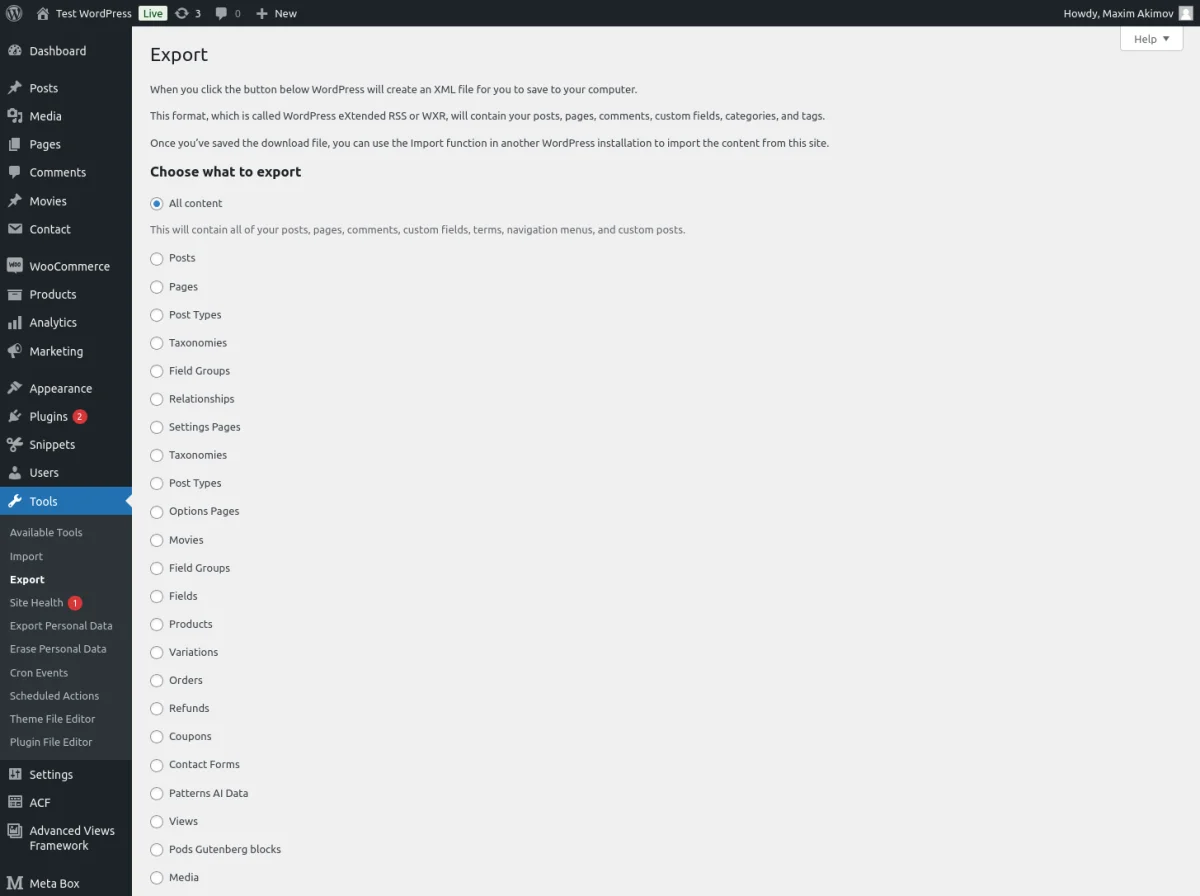
If your CPT relies solely on data types like Post Objects or Repeaters (which are stored as text), WordPress’s export tools will work well. However, attachments like images or files won't be included.
Exporting CPT Entries:
- Go to Tools - Export in the WordPress admin panel.
- Select Custom Post Types from the options, and tick the specific CPTs you wish to export.
- Click Download Export File to generate and download the XML file.
Importing CPT Entries:
- Navigate to Tools - Import on the target website.
- Find WordPress in the list of import options, then click Install Now under the WordPress importer if it’s not already installed.
- After installation, click Run Importer.
- Select the XML file you downloaded and follow the prompts to finish the import.
12.3) Plugins for export and import
The built-in WordPress and ACF tools are great for simple setups, but they fall short when dealing with complex setups, especially if your site involves large volumes of data or attachments, like images and files.
For these cases, it’s best to migrate the entire WordPress installation or use dedicated migration plugins, like like All-in-One WP Migration or WordPress Migrate Guru. These free plugins can handle larger datasets, attachments, and complex relationships.
Thank you for reading! to our monthly newsletter to stay updated on the latest WordPress news and useful tips.

Stuck with development or facing an issue?
WPLake offers affordable on-demand website development and design.
No matter the size of your project - contact us now, and we'll get it done for you!
Frequently Asked Questions Test Your Knowledge
FAQ mode
/
Learning mode
- Can I change the CPT name or slug after creation?
Yes, you can change both the name and the slug at any time. However, note that changing the slug will only apply to new items created thereafter; previously created items will retain the old slug, causing them to become inaccessible.
- Why do my CPT items give a '404 Not Found' error on the front end?
This issue often occurs due to permalink settings. To resolve it, visit Settings > Permalinks in your WordPress dashboard and simply click Save Changes. This action will refresh your permalink structure and reset the .htaccess file, fixing the 404 errors for your Custom Post Type items.
- Are Custom Post Types SEO-friendly?
Yes, public Custom Post Type items have URLs and can be indexed by search engines. Additionally, you can enhance their SEO by using plugins like Yoast to manage meta descriptions and keywords, just as you would for regular posts.
Course navigation: WordPress Beginner

Lesson #3
Time to read: 2 mins
Updated 19 Apr, 2024

Lesson #5
Time to read: 6 mins
Updated 19 Apr, 2024
Content links (93)
46.
wpml.orgAbout the Author