How To Add Custom Fields to WooCommerce Shop Page
Key Points at a Glance
- Custom Fields for Enhanced User Experience: WooCommerce custom fields provide a solution for displaying essential product information, such as delivery times, to users during the shopping experience, improving transparency and managing expectations effectively.
- Understanding WooCommerce Product Data: Products in WooCommerce are essentially posts, each with default information displayed on the shop page, including titles, descriptions, prices, and images.
- Using Advanced Custom Fields (ACF): ACF is a powerful plugin for adding and managing custom fields in WordPress, including WooCommerce products, allowing for the storage and display of additional product data.
- Creating ACF Text Fields: A step-by-step guide demonstrates creating an ACF Text field to store delivery time information for products, enhancing user understanding and experience.
- Displaying ACF Fields with PHP: Users can manually edit WooCommerce template files to display ACF field values using PHP code snippets, providing flexibility but requiring technical knowledge.
- Alternative: Displaying ACF Fields with Plugins: Plugins like Advanced Views offer a user-friendly alternative to PHP coding, allowing for the creation of smart templates and shortcode-based field display without manual coding.
- Customizing WooCommerce Templates: Overriding WooCommerce template files enables users to customize the presentation of product elements, including ACF field values, to suit their specific needs and preferences.
Table of Contents
Overview
We all know the frustration of shopping online: after adding items to your cart, you discover during the final step your product would only be delivered a lot later than expected. It's a terrible user experience, but we can avoid it by utilizing WooCommerce custom fields. With custom fields, you can add messaging so users see the lead time of delivery for products, enhancing transparency and managing expectations effectively.
The custom WooCommerce fields
Regardless of how you use Woocommerce, for a classic online shop, or as a WooCommerce POS (Point of Sale) for your physical store, the custom fields are a great way to store extra data about a product.
Product is technically a post, just a different type.
But let’s take a look at what is already shown about the product on the shop page.
Each product has a title, description, short description, product image, gallery images, categories, and tags. And of course the all important product price, shipping weights and dimensions, and shipping class. We’ll call this the default product information as it’s commonly known.
From this default product info, the only fields shown on the shop page are the product image, title with the link, and price. Of course, this may vary slightly from theme to theme. But any good WordPress developer must know how to amend the Woo shop page template. So, let's dive in.
Helpful Product information
In our example, we’ll create an ACF Text field for the products and then display that field value on the shop landing page.
Most likely you'll want to display your new field on a single product page too. Read this article to know how to do it easily.
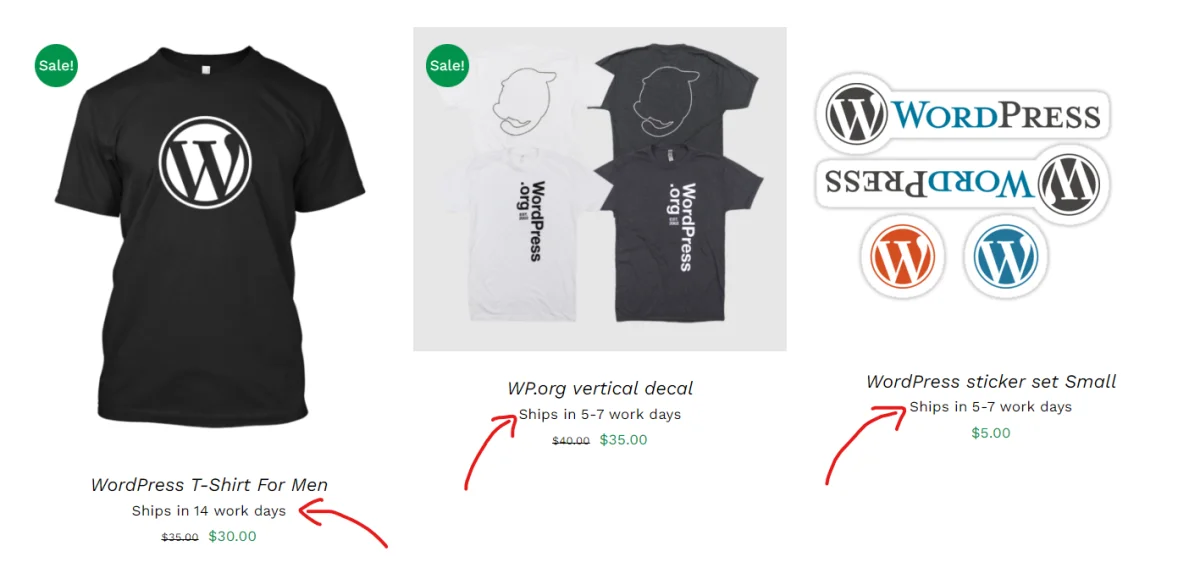
The information that’s most relevant in our case is delivery times. Some products have the same standard delivery time of 5-7 work days. And some products have a much longer delivery time of up to 14 work days. So we'll use custom fields to show this information to the user on our WooCommerce shop page.
Advanced Custom Fields for WooCommerce product(s)
If you’d like to follow the steps and show your own ACF fields on your shop page then before you continue, please install the Advanced Custom Fields (ACF) free plugin, which is one of the best plugins for meta fields. As well as the WooCommerce plugin, which also must to be active on your site.
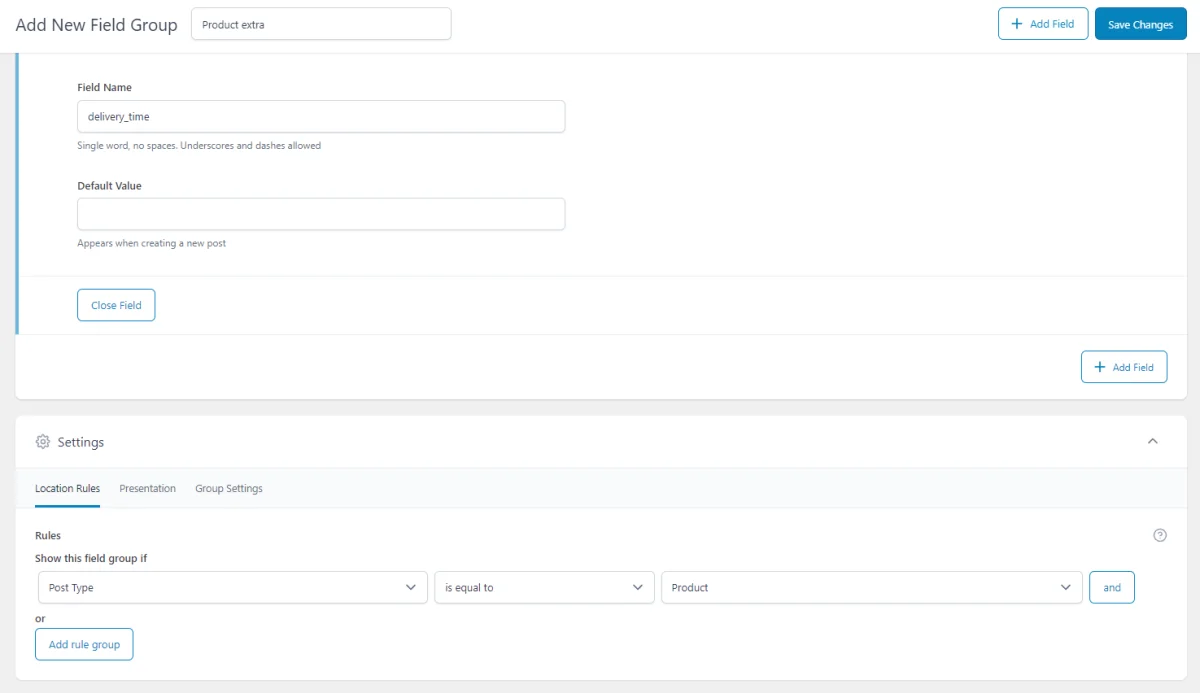
Visit the ‘Custom Fields’ tab in the WordPress backend, then Click on ‘Add New’ to add a new Field Group.
You’re now presented with the ‘Add New Field Group’ screen where you can add fields. Use the ‘Add Field’ button to add a field, select “Text” for Field Type. Enter a Field Label, in my case I’ll add “Delivery time”. Now click on “close field” or simply scroll to Settings and in the ‘Location Rules’, select Post Type is equal to Product. Click on "Save Changes" to save and publish your field group.
That's it! You’ve created the ACF text field, located it to a product post type, ready to be filled and displayed in some way.
Now visit the product items in the backend and edit each product and fill the text field with text. In my case, I’ll insert “Ships in 5-7 work days” for all products and “Ships in 14 work days” for some.
Display ACF field with coding
Unfortunately, WooCommerce doesn’t come out with a way to display the field values to users. There are however two ways to solve this and both work well, although it may be a little tricky for new users.
Let’s dig in.
You’ll need to edit the template file that contains the product loop which fortunately comes packaged with the WooCommerce plugin.
Pro tip: It’s often very complex to try and pinpoint which template file or part a product or page is using, so we can recommend the What The File plugin, as it really helps with that.
But not to worry, I’ll show you where and how to do it.
Connect to your server via FTP and go to the wp-content/plugins/woocommerce/templates folder, look for a file called content-product.php and copy it to your local disk for uploading in a minute.
Open the content-product.php file in a text editor and add this snippet below, to line 50.
<?php
$value = get_field('YOUR_FIELD_NAME_HERE');
echo $value;
Replace the above YOUR_FIELD_NAME_HERE in the get_field() function with your field name. Save the file and upload it to your theme located at /wp-content/themes/YOUR-THEME/woocommerce/templates/*
As you can see the code method is quite time consuming and often takes even longer when it’s a different field type.
Display ACF field with plugin
If you’re not comfortable with writing PHP and you’d like to spare yourself some headaches in the future then often a solution is to find a plugin that will do the heavy lifting for you.
For this case, we recommend using the Advanced Views framework. It introduces smart templates, which generate the necessary markup and provides a shortcode to display the ACF field values. Read how to display ACF fields without coding to know all benefits of the shortcode approach.
So please download and install the Advanced Views framework and remember to activate it. Then go to your WordPress backend and click on the Advanced Views tab. Click ‘Add New’ to add a new View. Give your View a title and short description, so you can easily find it later.
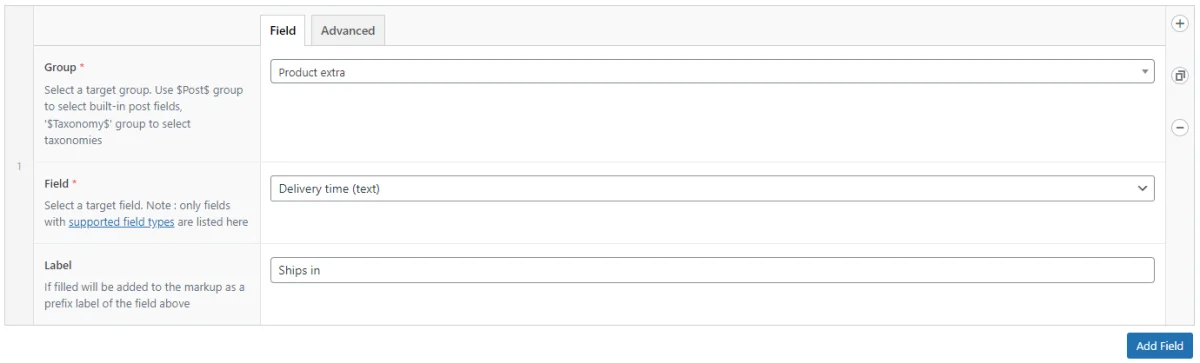
Now add your fields in the ‘Fields’ section, choose your Group, select the field group that you created earlier, then select the field. In my case it’s “delivery time”, I've also entered a field label of “Ships in” as then I would only need to add the trailing info. I.e. 5-7 work days.
Pro tip: switch to the Advanced tab in the field row and add a ‘Default Value’. I’ve added “5-7 work days” which applies to all products. Then you won’t need to add the text for every product, only the exceptions to the standard delivery time. Also, remember to switch on “Show When Empty”.
Finally, click “Publish” to save and publish your View. In the right panel take note of your view-id, we’ll use it in a minute.
Updating the Woo template
Connect to your server via FTP and go to the wp-content/plugins/woocommerce/templates folder. Then look for a file called content-product.php and copy it to your local disk. Now go to your theme folder located at /wp-content/themes/YOUR-THEME/ and create a folder "woocommerce". Then inside create another folder "templates" and upload your content-product.php template there.
Tip: Overriding the WooCommerce templates allows you to customize the presentation of any product elements, including the price section. For example, you can display special information for customers who already have funds in their account added via the WooCommerce Wallet plugin.
In your WordPress admin backend, visit Appearance > Theme File Editor and navigate to /YOUR-THEME/woocommerce/templates/content-product.php to view it for editing. Or keep using the FTP connection from earlier, whichever you prefer.
Let’s modify the shortcode so it’ll pull the ID of the current page;
Copy this code and replace the view-id with your View ID. But keep %s for object-id as it’s this that will ensure the current product id is referenced not the page on which all the products are shown.
$shortcode = sprintf('[acf_views view-id="3514" object-id="%s"]', $post->ID);
echo do_shortcode($shortcode );
Paste your shortcode on line 50 of the file content-product.php file. Click "Update file" button to save.
As you see we still need to amend the template manually. So you may have a thought, what's a goal of using the plugin here? The key difference that one View may contain multiple fields, and using the View's shortcode you can not worry about displaying each field. So you paste the shortcode once and forget. In future you can easily change the field or add others without editing the template.
The final result
View your shop landing page to see the result.
Note: if you don’t see the Text from your ACF field on the frontend, then go back to edit your View, and in the field row switch to the ‘advanced’ tab and insert “Default Value”, switch on “Display When Empty” or edit a product and fill the ACF field.
You can style the output by using CSS. To do this you need to edit your View and switch to the "Advanced" tab in 'View settings' and paste or write the CSS in the CSS code field. In my case I’ve defined display: flex; to show my field and its label on one line. And added the right padding to the field label. The great thing about using the CSS code field is that it’ll only load the CSS of the View on which it’s displayed. Nice huh!?
Final thoughts
Today you’ve learnt how to display WooCommerce custom fields on your shop page, where the fields are specific to each product. There was the code method and the plugin method, of which the plugin method offers a quicker solution without PHP coding.
We hope you’ve found the article useful and that you’re empowered to try other ideas and more complex solutions. Make your shop page better by displaying relevant information about the product to users.
Thank you for reading! to our monthly newsletter to stay updated on the latest WordPress news and useful tips.

Stuck with development or facing an issue?
WPLake offers affordable on-demand website development and design.
No matter the size of your project - contact us now, and we'll get it done for you!
Frequently Asked Questions Test Your Knowledge
FAQ mode
/
Learning mode
- What are WooCommerce custom fields?
WooCommerce custom fields are additional data fields that can be added to product pages to provide users with more information about the products, such as delivery times, specifications, or unique features.
- How can custom fields improve the shopping experience?
Custom fields can enhance the shopping experience by providing transparency and managing user expectations. For example, displaying delivery times helps users understand when they can expect to receive their purchases.
- What types of information can be displayed using custom fields?
Custom fields can display a wide range of information, including delivery times, product specifications, special features, warranty details, and more.
- What is Advanced Custom Fields (ACF) and how does it relate to WooCommerce?
Advanced Custom Fields (ACF) is a WordPress plugin that allows users to easily add and manage custom fields. It can be integrated with WooCommerce to add custom fields to product pages.
- How can I create custom fields for my WooCommerce products?
Custom fields for WooCommerce products can be created using plugins like Advanced Custom Fields. Users can define the type of field (e.g., text, checkbox, select) and specify where it should appear on the product page.
- Is it possible to display different custom fields for different products?
Yes, custom fields can be tailored to each individual product, allowing for unique information to be displayed based on the specific attributes of each product.
Course navigation: WooCommerce Plugin

Lesson #2
Time to read: 5 mins
Updated 02 Dec, 2025

Lesson #3
Time to read: 11 mins
Updated 13 Mar, 2026
Content links (13)
About the Author