How To Add Custom Fields to WooCommerce Product Page

Key Points at a Glance
- Product Page Essentials: The WooCommerce product page typically displays essential data like title, image, description, price, etc., but not custom fields.
- Customizing Product Pages: Adding extra information to product pages is crucial for various purposes like affiliate programs or enhancing visitor engagement.
- Using Custom Fields: Custom fields serve as a means to store additional data about products, and they're pivotal in enhancing product pages.
- Plugin Choice: Advanced Custom Fields (ACF) is a popular choice for managing custom fields, offering flexibility and ease of use.
- Displaying Fields: Displaying custom field values on the product page requires either PHP coding or utilizing plugins like Advanced Views for shortcode-based solutions.
- Concluding Remarks: Leveraging plugins like ACF and Advanced Views makes adding and displaying custom data on WooCommerce product pages hassle-free and extends their utility beyond just WooCommerce tasks.
Table of Contents
This article was created to help beginners that are new to WooCommerce and product templates. We'll show how to customize the product template and add custom fields to your WooCommerce products.
Overview
The WooCommerce product page usually displays the product data such as title, image, image gallery, short description, long description, price, and discount. And if there are attributes and variations. But not custom fields.
Crafting the product page by adding extra information is essential, whether you're running an affiliate program using a WooCommerce affiliate plugin or attracting visitors solely by yourself.
There are a few ways to accomplish this goal, and you’ll see that displaying custom field values on a product single page is quite straightforward, and doing it without editing too much code.
This article covers adding custom fields only to the WooCommerce Product page. If you're also interested in adding fields to the Shop overview page, read how to display ACF fields on the Woo shop page.
Below we attached a video tutorial that will show how to reach it. But feel free to skip the video, as in the article below we provide a full step-by-step tutorial in the text version.

Tutorial
What is a custom field?
Custom fields are a great way to store extra data about a Post or Product. By the way, the Product technically is also a post, just with a different type.
Choose a plugin for WooCommerce custom fields
As you may already know, finding the right plugin is often an arduous journey. But don’t let this stop you from building your plugin tool kit.
Advanced Custom Fields (ACF) is one of the most popular meta field plugins available on the market. So in this tutorial, we’ll use ACF, but if you've opted for another one, don't worry, as the steps are quite similar for all of them.
Creating Custom Fields
- Download and install the Advanced Custom Fields plugin.
- Visit the 'Custom Fields' tab in the backend Admin menu.
- Click on ‘Add New’ to add a new Field Group.
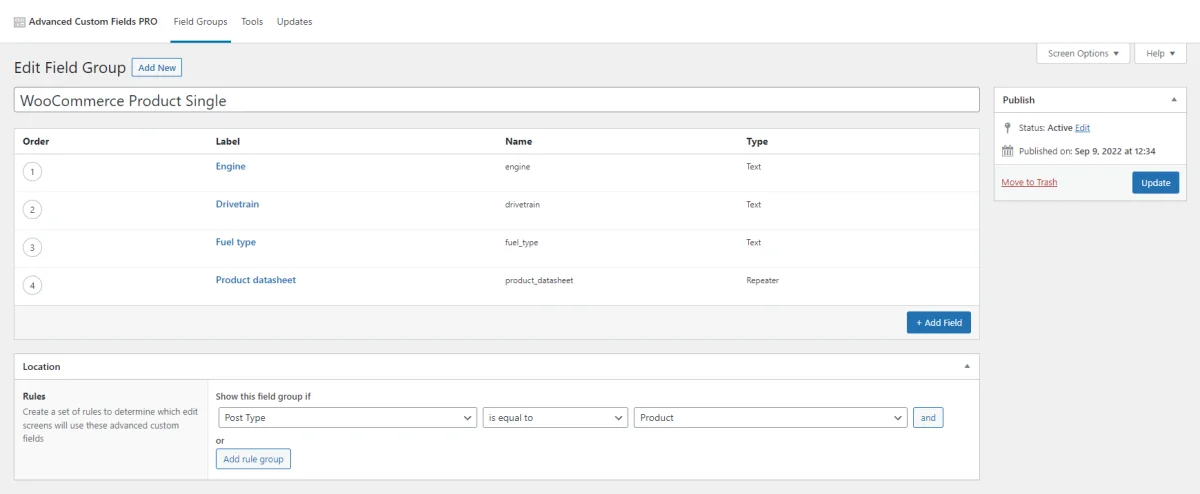
Note: Field groups are there to help you organize your fields into groups. - You’re now presented with the ‘Add New Field Group’ screen where you can add fields.
- Use the ‘Add Field’ button to add a field, then fill in the label and a lowercase field name and select type ‘Text’ from the dropdown.
- Location, select Show this field group if Post Type is equal to Product.
- Select other ‘Settings’ you may want. Click ‘Publish’.
- For more fields just keep using the ‘Add Field’ button.
Pro tip: using the ACF Relationship field you can create a 'connection' between the specific product and any other posts or CPT items. E.g. you can assign a company CPT item, and later display company's data on the product page.
That’s all you need to do to create the fields. So as the next step, you need to add custom field values to your product(s).
Setting up field values
- Visit the ‘Products’ tab in the backend Admin menu.
- In the list of products, select the product you’d like to edit to fill the values of your custom fields.
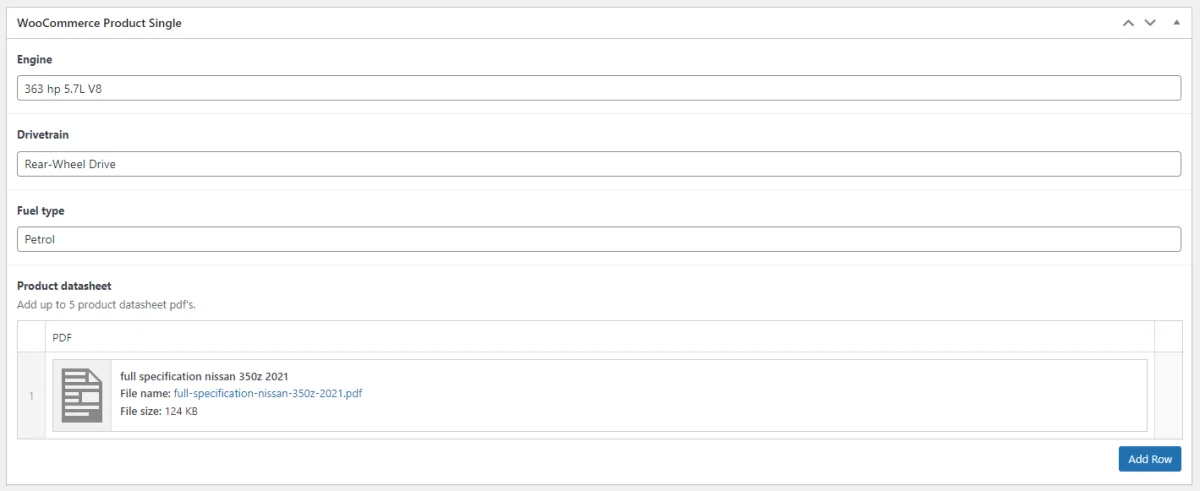
- Once on the edit product screen, scroll down until you see the custom field(s).
- Enter the custom field values. Click ‘Update’ to save the product.
- Keep doing these steps until you’ve added the custom field values to all your products.
Pro Tip: Setting a default value in your ACF Field group won’t automatically fill the custom field values for all your products. So you would need to edit the product and click ‘update’ for each product.
It’s time to show the fields on the product page.
Displaying field values on the Product page
Unfortunately, neither WooCommerce nor the ACF plugin come with a way to actually show the field values on the front end of your website. But any good WordPress developer must know how to amend the Woo product page template. So let's dive in.
For the pros and tech-savvy readers: modify and add PHP code to get and display these fields using the ACF get_field() function.
However, there’s another way. It means using some plugin that will do it instead of us. In our case, we'll use the Advanced Views framework to show the custom fields.
Advanced Views framework introduces smart templates, which give a way to display Posts and their ACF fields anywhere on your site using shortcodes. This means you no longer have to write any PHP code to query posts, get field values, or display them! Read how to display ACF fields without coding to know all benefits of the shortcode approach.
How to use Advanced Views to display custom field values on product pages
- Download and install the Advanced Views framework.
- Click ‘Add New’ to add a new View.
- You’re now presented with the ‘Edit ACF View’ screen.
- Give your View a title and short description, so you can easily find it later.
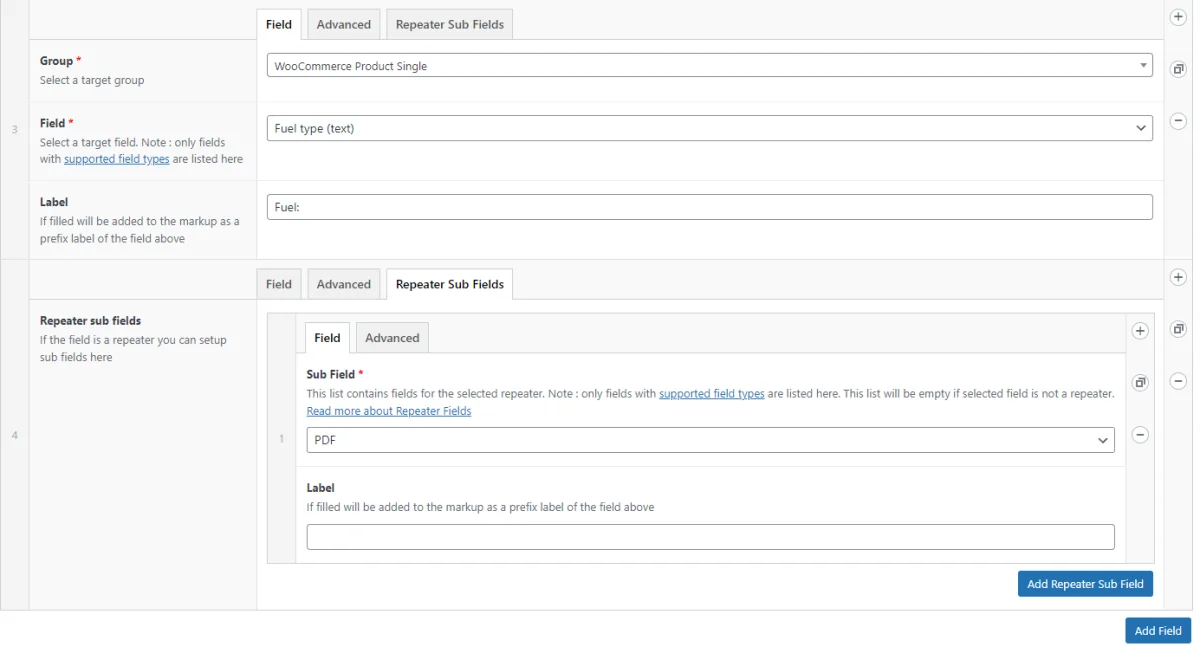
- Fields, Group, select the field group that you created earlier.
- Field, select the field, and give it a label.
- Click ‘Add Field’ and repeat step 6 until you’ve added all the fields.
Tip: Use the row handle to reorder fields.
For repeater field type; Switch the tab to ‘Repeater Sub Fields’, Sub Field, select your repeater field, then give it a Label. So now we've reached the final steps.
- Click ‘Update’ to save your View.
- Copy the shortcode.
- Connect to your server via FTP and navigate to your WordPress directory, then go to wp-content/plugins/woocommerce/templates/ and copy 'single-product' folder to your theme inside a new folder called ‘woocommerce’ (so the path is wp-content/themes/your-theme/woocommerce/)
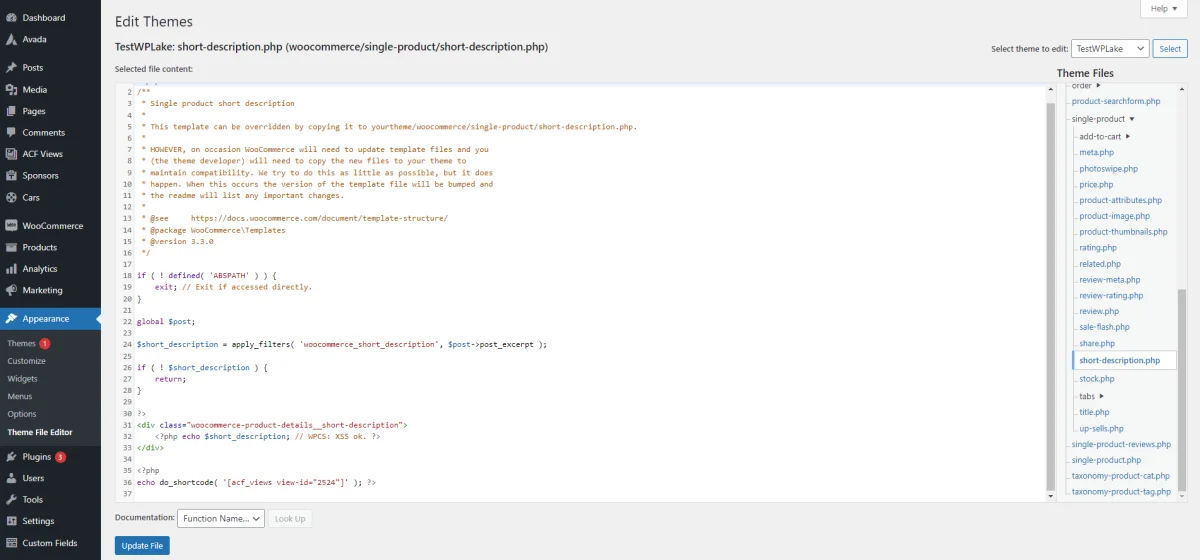
- In your WordPress admin backend, visit Appearance > Theme File Editor.
- In the top right select theme to edit -> select your-theme then go to woocommerce/single-product/short-description.php to open it in the editor window.
- Insert the shortcode by copying and pasting the code below to the bottom of your files contents and replacing the “ID” with your ACF View ID. <?php echo do_shortcode( '[acf_views view-id="ID"]' ); ?>
- View your product page to see the result.
Note: if you don’t see the custom fields on the frontend, edit the product and make sure that you’ve filled the custom fields with values.
Conclusions
You've learnt how to easily add custom fields to the WooCommerce product page. We used only a couple of free plugins but they made our task easy.
The Advanced Custom Fields plugin is amazing and allows manage meta fields as easily as it's possible. Using the Advanced Views addon you won't have any issues with displaying fields on the front of your website anymore.
Also, it's worth to be mentioned that these plugins are very useful not only regarding Woo tasks. You can use them anywhere, to add and display custom data, i.e. fields for any page or any Custom Post Type.
Thank you for reading! to our monthly newsletter to stay updated on the latest WordPress news and useful tips.

Stuck with development or facing an issue?
WPLake offers affordable on-demand website development and design.
No matter the size of your project - contact us now, and we'll get it done for you!
Frequently Asked Questions Test Your Knowledge
FAQ mode
/
Learning mode
- What are custom fields, and why are they important for WooCommerce product pages?
Custom fields are additional data fields that can be added to WooCommerce product pages to provide extra information beyond the standard product details. They are important for enhancing product pages with specific details or attributes.
- How can I display custom field values on the front end of my website?
There are two methods: manually modifying the WooCommerce template files to display field values using PHP code, or using a plugin like Advanced Views to generate shortcodes for displaying fields without coding.
- Can custom fields be displayed alongside product descriptions and other standard product details?
Yes, by integrating custom field values into the WooCommerce product page template, you can display them alongside standard product details like descriptions, images, and prices.
- Can I use the same approach to add and display custom data on other pages or custom post types?
Yes, the plugins mentioned in the article, such as ACF and Advanced Views, can be used to add and display custom data not only on WooCommerce product pages but also on any page or custom post type within WordPress.
Course navigation: WooCommerce Plugin
Lesson #1
Time to read: 8 mins
Updated 02 Dec, 2025

Lesson #3
Time to read: 11 mins
Updated 13 Mar, 2026
Content links (13)
About the Author