Advanced Custom Fields Explained
Key Points at a Glance
- About the plugin: Advanced Custom Fields (ACF) enhances WordPress by simplifying the creation of custom post types, taxonomies, meta fields, and options pages for site-wide settings and configurations.
- Field Types: ACF offers 30+ various field types, such as text, image, and repeater fields, to accommodate diverse data requirements.
- Front-end display: ACF offers the get_field() function, allowing you to load data from any field type. To streamline layout management, consider using the Advanced Views Framework or integrating with popular page builders.
- Performance Optimization: Leverage the ACF local JSON feature to boost performance by reducing database queries. Choose ACF Blocks over traditional meta fields to eliminate unnecessary database calls. Additionally, store Options Pages as posts to prevent overloading the wp_options table.
- Addons Availability: ACF can be enhanced with various addons that expand its capabilities. Consider ACF Extended, offering 14+ new fields; Advanced Views for advanced content display; and ACF Quick Edit Fields, which simplifies editing in the admin area.
Table of Contents
Advanced Custom Fields (ACF) is one of the most popular and cornerstone plugins in the WordPress ecosystem. It has become an essential tool for developers and site owners alike, allowing them to transform WordPress from a simple blogging platform into a fully customized content management system.
Whether you're working on a simple landing page, managing a large eCommerce store, or running a membership portal, ACF provides the tools you need. This makes it an indispensable plugin for any WordPress setup, offering the versatility to handle projects of any scale.
In this guide, we'll explore the full potential of the Advanced Custom Fields plugin, providing insights into its key features, best practices, and performance tips, so you can make the most out of this powerful plugin.
1. Use cases of the Advanced Custom Fields plugin
Before we dive into its features, let’s explore some practical use cases to see how ACF can enhance different types of websites.
1.1) Personal and company websites: custom Gutenberg blocks

Advanced Custom Fields plugin is ideal for building dynamic, visually engaging pages. With ACF Blocks, you can easily create custom Gutenberg blocks without the complexity of React. Whether you want to add sliders, testimonials, or custom call-to-action sections, ACF Blocks provides you with the flexibility to seamlessly connect data and layout, allowing you to focus on your design without constraints.
Best of all, clients can manage and update content for these elements directly in the WordPress editor - no coding required - ensuring both a smooth development process and an intuitive user experience.
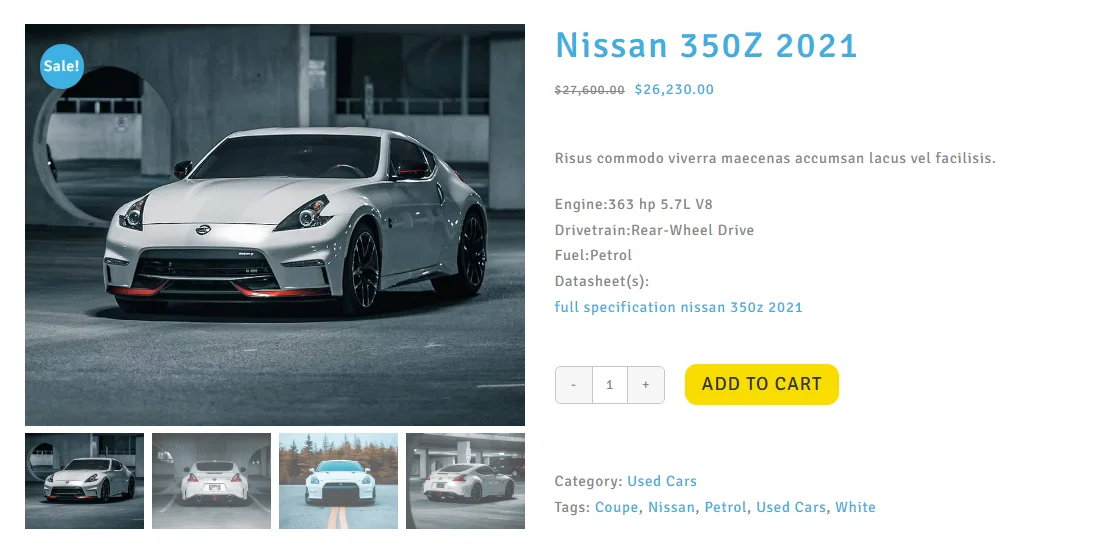
1.2) eCommerce websites: custom product fields and user profiles
In an eCommerce environment, ACF allows you to go beyond WooCommerce's built-in features by adding custom fields tailored to your store's unique needs. For example, you can create fields for product specifications like warranty details, materials used, or certifications.
For user profiles, Adanced Custom Fields plugin can capture additional data like loyalty program tiers, customized delivery options, or even product preferences - enabling a more personalized and streamlined shopping experience for your customers.
1.3) Membership portals: Custom Post Types and Taxonomies
ACF simplifies the creation of membership portals by enabling custom post types for member-only content and custom taxonomies to organize and categorize content based on user roles or interests. This allows for better content segmentation, such as differentiating between premium and free content or categorizing resources into different levels of membership access.
1.4) Event websites: event listings and custom filters
For websites centered around events, the Advanced Custom Fields plugin can be used to create custom fields for event details like date, venue, ticket availability, and organizers. You can also use ACF to build custom filters, allowing users to sort events by categories like location, event type, or date range. This makes managing event listings far more streamlined and intuitive.
1.5) Real estate websites: custom listings and search filters
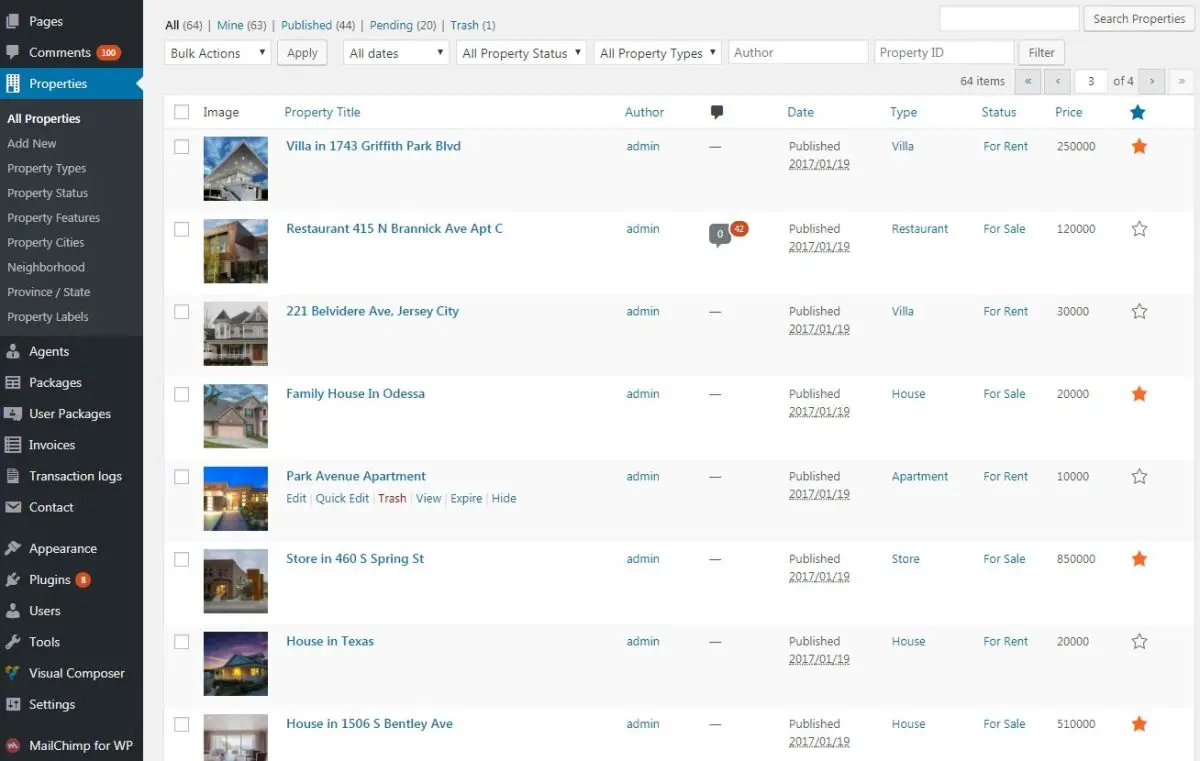
ACF is perfect for real estate sites, where you need custom fields for property listings, such as price, location, number of bedrooms, or square footage. Combined with custom taxonomies, you can enable advanced search filters for editors and users to narrow down their property search, giving the site a more personalized experience.
1.6) Educational websites: course management
The Advanced Custom Fields plugin can be utilized to build a course management system for educational websites. By creating custom post types for courses, lessons, and instructors, as well as adding fields for course duration, difficulty level, or required materials, you can create a highly structured learning environment that users can easily navigate.
Summary
We've explored just a few of the most common use cases for the Advanced Custom Fields plugin, demonstrating its versatility across various website types. However, the true potential of ACF goes far beyond these examples. In real life, you can leverage ACF’s powerful features to customize and enhance virtually any aspect of your website, regardless of its purpose or scale.
2. ACF and Custom Content Types
Now let's shift our focus from use cases to the powerful features of the Advanced Custom Fields plugin. Since ACF extends the core functionality of WordPress, it's essential to understand the different content types available in WordPress.
2.1) Post Types
In WordPress, default post types include Posts, Pages, and Attachments, but post types also serve as a fundamental feature that transforms WordPress from a simple blogging platform into a robust content management system. For example, WooCommerce introduces the Products custom post type, allowing you to manage and display products seamlessly.
Beyond the default post types, you can create your own custom post types tailored to your specific needs, such as Events for managing event listings, Properties for real estate listings, or Portfolios for showcasing creative work.
ACF simplifies the creation and management of custom post types, making it effortless to organize and control your content. Once you've introduced a custom post type, you can define its unique set of meta fields tailored to your specific needs, as well as customize the appearance of entries.
2.2) Taxonomies
By default, WordPress includes Categories and Tags as taxonomies for Posts, allowing for easy organization and navigation. However, taxonomies extend far beyond this, serving as a powerful tool for categorizing custom post types as well. For instance, you might create a Genre taxonomy for a custom post type like Books, or a Location taxonomy for a Properties post type in real estate.
ACF enhances this core functionality by providing UI to create and manage custom taxonomies.
2.3) Meta fields
While post types allow you to introduce new content types, they share a basic set of fields, such as title, excerpt, author, and publish date. However, this default setup often falls short of covering the unique requirements for specific content types.
This is where meta fields (also known as custom fields) come into play. Custom fields allow you to add, store, and display any additional information tailored to your post types. For example, an Events custom post type might require fields like Date, Venue, and Ticket Price.
While meta fields are a core feature of WordPress, it doesn’t provide a UI or support for advanced field types beyond simple text. ACF streamlines the entire process of creating and managing custom fields with its intuitive interface.
You can easily define and attach various field types - such as checkboxes, dropdowns, dates, and more - to your post types, making it easier to store and manage structured data that fits your specific needs.
2.4) Gutenberg blocks
The Gutenberg editor represents the next generation of content editing in WordPress, replacing the simple text-based Classic Editor. While it allows users to visually manage content, the default set of blocks is somewhat limited.
Creating your own React blocks can be time-consuming and complex. However, with the Advanced Custom Fields plugin, you can add custom blocks effortlessly, allowing you to enhance your site’s functionality and design without the hassle. This allows you to craft a more tailored and interactive experience for both editors and visitors, without relying on cumbersome page builders.
3. How to guides
3.1) How to install the Advanced Custom Fields plugin
ACF is available in two versions: Basic (Free) and Pro (Paid). The installation process is slightly different depending on which version you choose. We'll review the differences between the versions in detail in a separate chapter.
If you're just getting started with the Advanced Custom Fields plugin, we recommend starting with the Basic version to familiarize yourself with the concepts. You can then upgrade to Pro if you find that you need the advanced features.
Note: The Pro version supports everything created in the Basic version, so you don't need to worry about potential migration issues.
The Basic version
Note: In September 2024, the WordPress Foundation disabled WP Engine’s access to the WordPress repository, the owner of the Advanced Custom Fields plugin. Since then, you’ll need to download the ACF plugin from its official website to receive automatic updates. The version on WordPress.org is rebranded into Secure Custom Fields and managed by another team.
The new installation process is detailed in ACF's article, but here are the essentials:
- Open the ACF releases page on the official website and click the download link under the ACF label.
- In your website dashboard, go to Plugins, and click on the Add New button.
- Click the Upload Plugin button, then upload the zip file you downloaded.
- Once uploaded, click Activate Plugin.
Congratulations! You now have the basic version of Advanced Custom Fields running on your website, and it will receive automatic updates directly from the plugin authors.
The Pro version
To install the Pro version, follow these steps:
- Purchase and Download the Pro Version: Visit the official ACF website and purchase the Pro version. Download a ZIP plugin archive to your computer.
- Access the WordPress Plugin Directory: In your WordPress admin dashboard, navigate to the "Plugins" section.
- Click "Add New" and then "Upload Plugin": Click on "Add New" and select the "Upload Plugin" button.
- Upload the Pro Version: Click the "Choose File" button and select the plugin ZIP file you downloaded. Then, click "Install Now."
- Activate the Plugin: Once the installation is complete, click the "Activate" button to activate the ACF Pro plugin.
Find the new "ACF" item in your admin menu, and click on the "Updates" sub item. On the Updates page, enter your license key to unlock automatic updates.
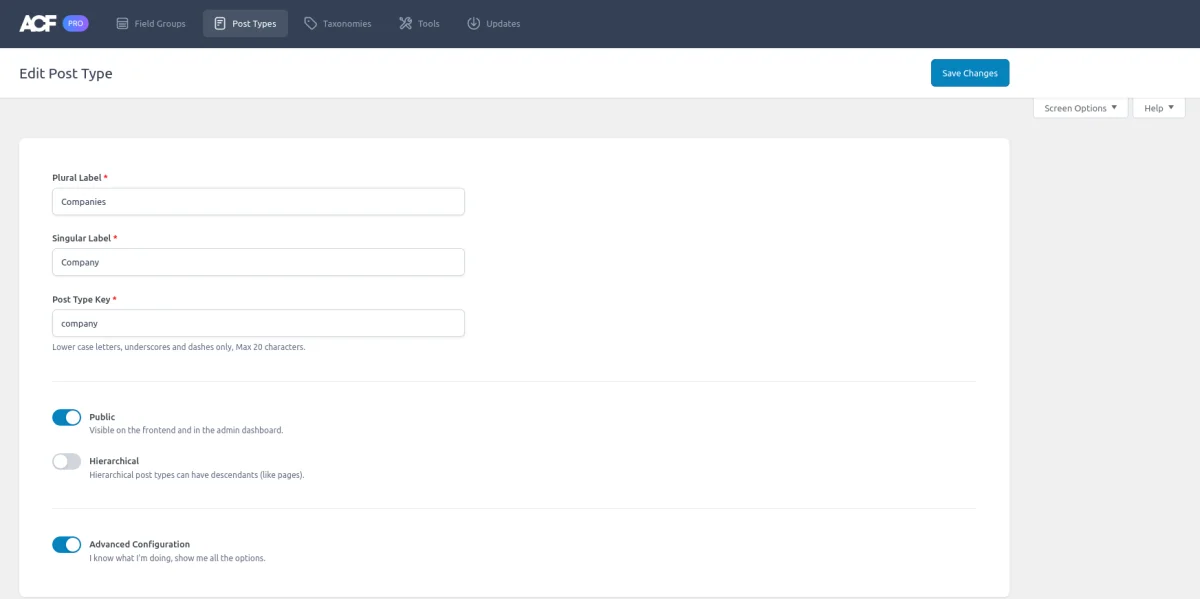
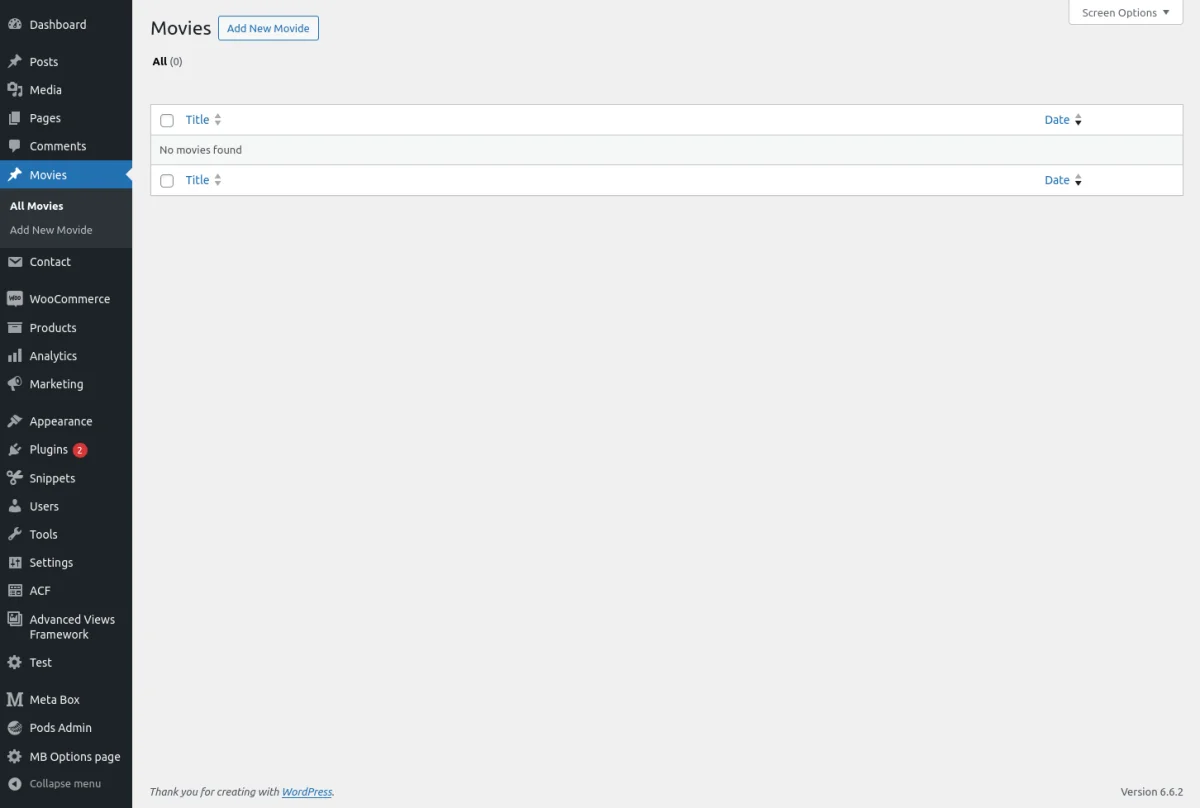
3.2) How to add Custom Post Types
ACF offers a user-friendly UI to register and manage Custom Post Types (CPTs). While it’s possible to create custom post types manually using code, the process involves many arguments that can be tedious to manage. ACF simplifies this by allowing you to configure everything through the interface.
Tip: For those who prefer to work with code, ACF can act as a snippet generator, fine-tuning all the necessary settings and providing you with a clean snippet to add to your theme's functions.php file.
Step-by-step guide:
- Navigate to Custom Post Types:
Go to your WordPress dashboard.
In the ACF menu, click on "Custom Post Types". - Add a New Custom Post Type:
Click the "Add New" button at the top of the Custom Post Types screen. - Enter Basic Details:
Fill in the Singular Label and Plural Label fields to define the name of your post type.
For example, “Event” (singular) and “Events” (plural). (See the detailed settings description below). - Set Public Visibility:
Ensure that the Public checkbox is selected if you want the post type to be publicly accessible. - Save the Custom Post Type:
After configuring the basic settings, click "Publish" to save your new post type. - View and Create New Items:
Once the new Custom Post Type is created, it will appear in the left-hand menu.
You can now visit the post type and start creating new items by clicking "Add New". - Advanced Settings (Optional):
After checking the basic functionality of your post type, you can return to the CPT settings to configure Advanced Settings and fine-tune the setup. (See the detailed settings description below).
Primary CPT settings description
- Plural Label:
The name used when referring to multiple entries of your post type.
Example: "Events" for an event-based post type. - Singular Label:
The label for a single entry of your post type.
Example: "Event" for individual event listings. - Post Type Key:
A unique identifier for your custom post type, often auto-generated from the singular label but can be customized.
Example: event for an events post type. This key will be used in queries and URLs. - Taxonomies:
Associate existing or new taxonomies (like Categories or Tags) with your post type. This makes it easier to group and filter your content. Taxonomies can be assigned from here or later in the Taxonomy settings.
Example: Assigning a custom taxonomy like “Event Types” to your Events CPT. - Public:
Determines whether this post type is publicly visible and accessible on the front end of your website. If selected, users will be able to view, search, and query this post type via the front end. - Hierarchical:
Set whether your post type should have a parent-child structure similar to Pages (hierarchical) or act like Posts, where each entry stands alone (non-hierarchical).
Useful for content that needs a nested structure, like property listings where specific houses can be children of locations.
Advanced CPT settings description (optional)
General
- Supports:
Select the features your post type supports, such as title, editor, thumbnail, or custom fields.
By default, the editor is set to Gutenberg, but you have the option to install the Classic Editor or disable it altogether if needed. - Description:
Add a brief description of what this post type is for. This is mainly for internal reference. - Active:
Determines whether this post type is active or inactive.
Labels
Provides custom labels for different elements of your post type, such as menu names, button labels, and singular/plural entry names. Customize how this post type appears in the WordPress admin menu and UI buttons like "Add New" or "View All."
Visibility
- Show in UI:
Enables or disables the visibility of the post type in the admin area. - Show in Admin Menu:
Controls whether the post type appears in the main WordPress admin menu. - Admin Menu Parent:
If set, the post type will be nested under a different menu item in the admin sidebar (like under "Settings"). - Menu Position:
Sets the order where your post type appears in the WordPress admin sidebar. - Menu Icon:
Choose or upload an icon that will appear next to your post type in the admin menu. - Exclude from Search:
Prevents the post type from being included in the site's search results.
URL
- Front URL Prefix:
Sets a custom slug to be used in the URLs of this post type. Example: "event" for an Events post type will appear as yourdomain.com/event/event-name. - Pagination:
Enable or disable pagination for post type archives. - Archive:
Determines whether this post type has an archive page where all entries are listed. - Publicly Queryable:
Sets whether this post type can be queried on the front end by users.
Permissions
- Rename Capabilities:
Customize the permissions for editing, publishing, and deleting this post type for different user roles. - Can Export:
Enables the post type to be exported as part of a WordPress export. - Delete with User:
Automatically deletes the user's posts of this type when the user is deleted.
REST API
- Show in REST API:
Makes this post type available in WordPress' REST API, allowing for external access and interaction. - Base URL:
Sets the base slug for this post type when accessed through the REST API. - Namespace Route:
Define a custom route in the REST API, which can be used to handle this post type's data.
Getting a CPT code snippet
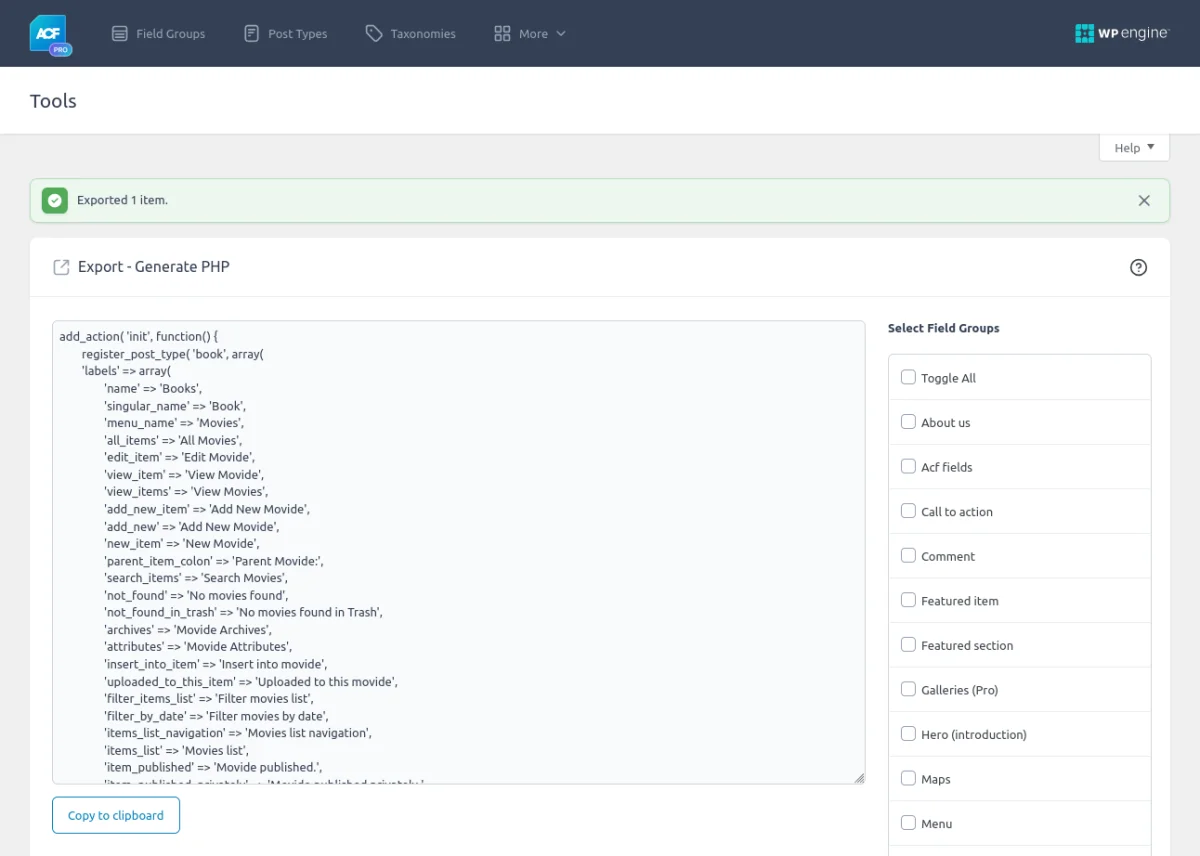
As we mentioned earlier, ACF can be used as a snippet generator. It's an advanced and optional feature, so you can continue using Custom Post Types (CPTs) through the interface if you prefer. However, if you'd like to work with code, ACF provides an easy way to generate the necessary snippets.
- Access the Tools Page:
Go to your WordPress dashboard. Navigate to the ACF menu and select Tools. - Select the Post Type:
On the Tools page, find the CPT you want to generate code for. Mark the checkbox next to the target Post Type. - Generate PHP Snippet:
Click the Generate PHP button. ACF will convert all the settings of the selected CPT into a clean PHP code snippet. - Add the Snippet to Your Theme:
Copy the generated code and paste it into your theme's functions.php file or a custom plugin. - Remove the CPT from the Interface:
After adding the code, you can remove the CPT from the ACF interface. The CPT will continue to work through the native code, allowing you to manage it independently of the ACF plugin.
3.3) How to add custom Taxonomies
ACF offers a user-friendly UI to register and manage custom taxonomies. While it's possible to create taxonomies manually using code, the process involves many arguments that can be tedious to handle. ACF simplifies this by allowing you to configure everything through the interface.
Tip: For those who prefer to work with code, ACF can act as a snippet generator, fine-tuning all the necessary settings and providing you with a clean snippet to add to your theme's functions.php file.
Step-by-step guide:
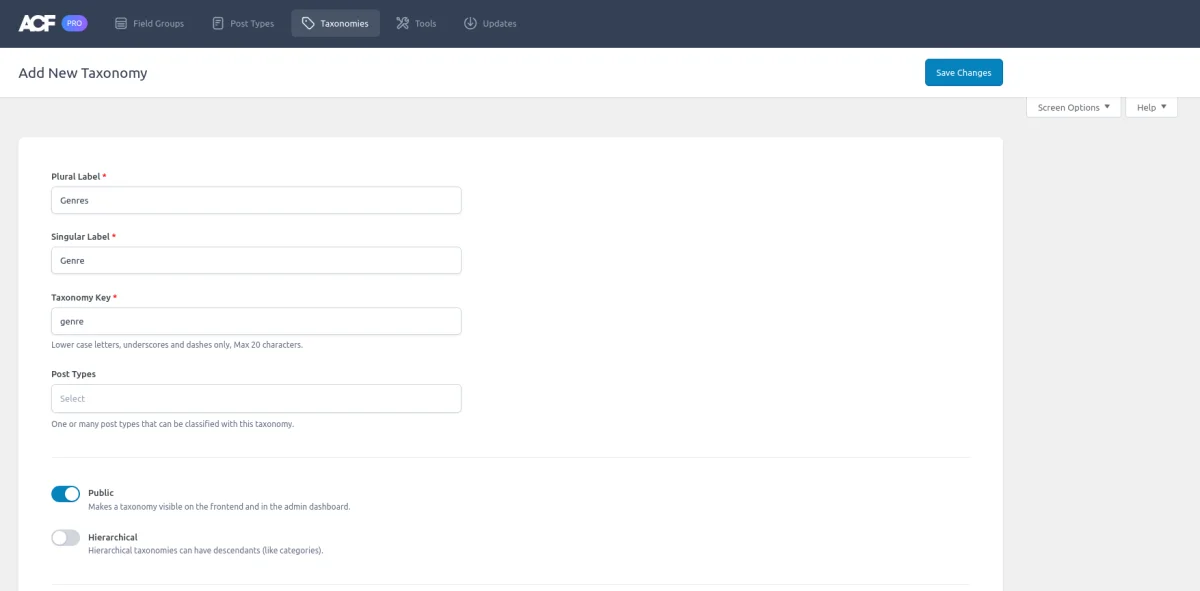
- Navigate to Taxonomies:
Go to your WordPress dashboard.
In the ACF menu, click on "Taxonomies." - Add a New Custom Taxonomy:
Click the "Add New" button at the top of the Taxonomies screen. - Enter Basic Details:
Fill in the Singular Label and Plural Label fields to define the name of your taxonomy.
For example, "Event Type" (singular) and "Event Types" (plural).
(See the detailed settings description below). - Assign Post Types:
Select which post types the taxonomy will apply to. For example, you can assign it to "Events" or "Posts." - Set Public Visibility:
Ensure that the Public checkbox is selected if you want the taxonomy to be publicly accessible. - Save the Custom Taxonomy:
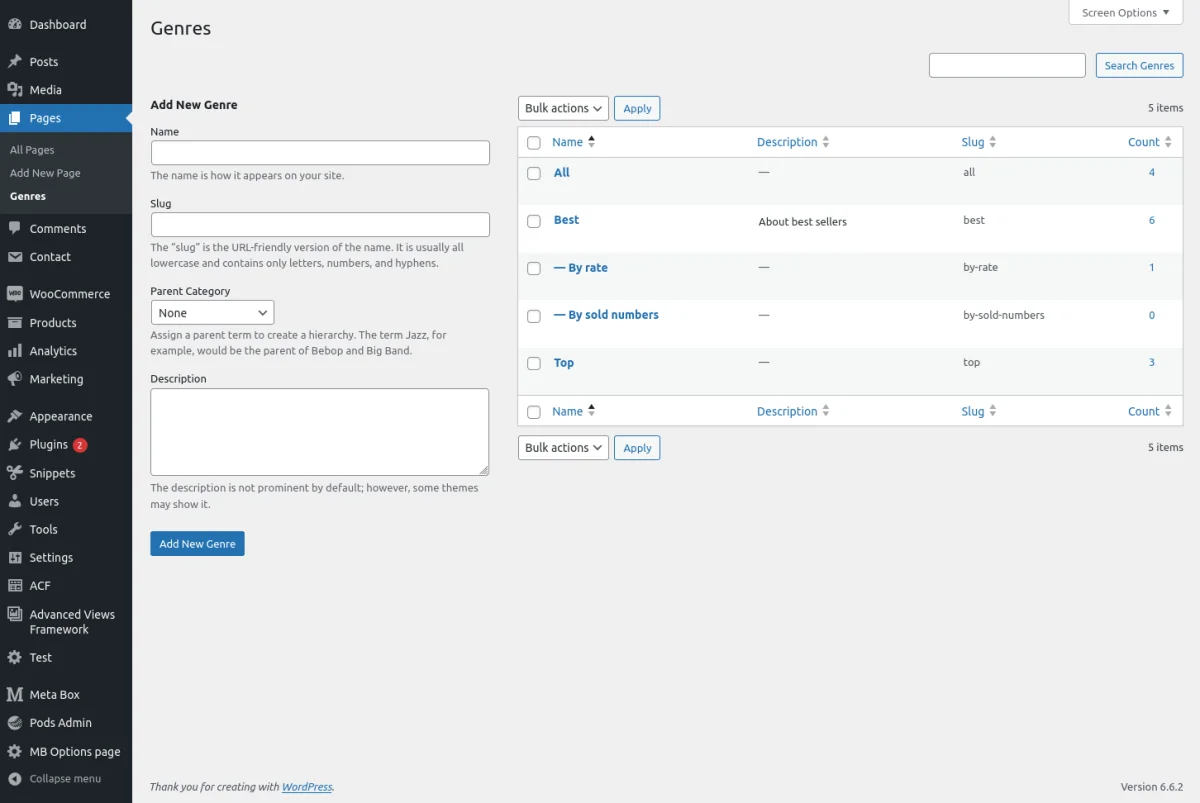
After configuring the basic settings, click "Publish" to save your new taxonomy. - View and Manage Terms:
Once the new taxonomy is created, it will appear in the left-hand menu.
You can now visit the taxonomy and start creating terms (categories, tags, etc.) by clicking "Add New." - Advanced Settings (Optional):
After checking the basic functionality of your taxonomy, you can return to the Taxonomy settings to configure Advanced Settings and fine-tune the setup.
(See the detailed settings description below).
Primary Taxonomy settings description
- Plural Label:
The name used when referring to multiple entries of your taxonomy.
Example: "Event Types." - Singular Label:
The label for a single entry of your taxonomy.
Example: "Event Type." - Taxonomy Key:
A unique identifier for your custom taxonomy, often auto-generated from the singular label but can be customized.
Example: event_type for an event types taxonomy. This key will be used in queries and URLs. - Post Types:
Select which post types the taxonomy will apply to. You can assign it to one or multiple post types.
Example: "Events" or "Posts." - Public:
Determines whether this taxonomy is publicly visible and accessible on the front end of your website. If selected, users will be able to view, search, and query this taxonomy via the front end. - Hierarchical:
Set whether your taxonomy should have a parent-child structure similar to Categories (hierarchical) or act like Tags, where each term stands alone (non-hierarchical).
Useful for creating nested structures like product categories.
Advanced Taxonomy settings description (optional)
General
- Sort Terms:
Allows you to enable term sorting, useful for custom order displays in front-end queries. - Default Term:
Set a default term that will be automatically assigned to posts if no other term is selected. - Description:
Add a brief description for this taxonomy. This is mainly for internal reference. - Active:
Determines whether this taxonomy is active or inactive.
Labels
- Provides custom labels for different elements of your taxonomy, such as menu names, button labels, and singular/plural entry names.
- Customize how this taxonomy appears in the WordPress admin menu and UI buttons like "Add New" or "View All."
Visibility
- Show in UI:
Enables or disables the visibility of the taxonomy in the admin area. - Show in Admin Menu:
Controls whether the taxonomy appears in the main WordPress admin menu. - Meta Box:
Defines how the taxonomy’s terms appear in post edit screens: either as a default WordPress widget or using a meta box. - Appearance Menus Support:
Determines if terms from this taxonomy can be added to appearance menus. - Tag Cloud:
Enable a tag cloud widget for this taxonomy if terms are frequently used. - Quick Edit:
Allows terms to be edited directly from the post list page using WordPress’s Quick Edit feature. - Show Admin Column:
Displays the taxonomy in the admin columns of post lists for easier management.
URLs
- Front URL Prefix:
Sets a custom slug to be used in the URLs of this taxonomy’s terms.
Example: "event-type" for an Event Types taxonomy will appear as yourdomain.com/event-type/term-name. - Hierarchical:
Enable or disable hierarchical structure for URLs, useful when creating parent-child term structures. - Publicly Queryable:
Sets whether this taxonomy can be queried on the front end by users.
Permissions
- Manage Capabilities:
Customize who can manage, edit, delete, and assign terms in this taxonomy for different user roles.
REST API
- Show in REST API:
Makes this taxonomy available in WordPress's REST API, allowing for external access and interaction. - Base URL:
Sets the base slug for this taxonomy when accessed through the REST API. - Namespace Route:
Define a custom route in the REST API, which can be used to handle this taxonomy's data.
Getting a Taxonomy code snippet
As previously mentioned, the Advanced Custom Fields plugin can also be utilized as a snippet generator for taxonomies. This is an advanced and optional feature, allowing you to continue managing your custom taxonomies through the ACF interface if you prefer. However, if you're more comfortable with code, ACF makes it easy to generate the necessary snippets.
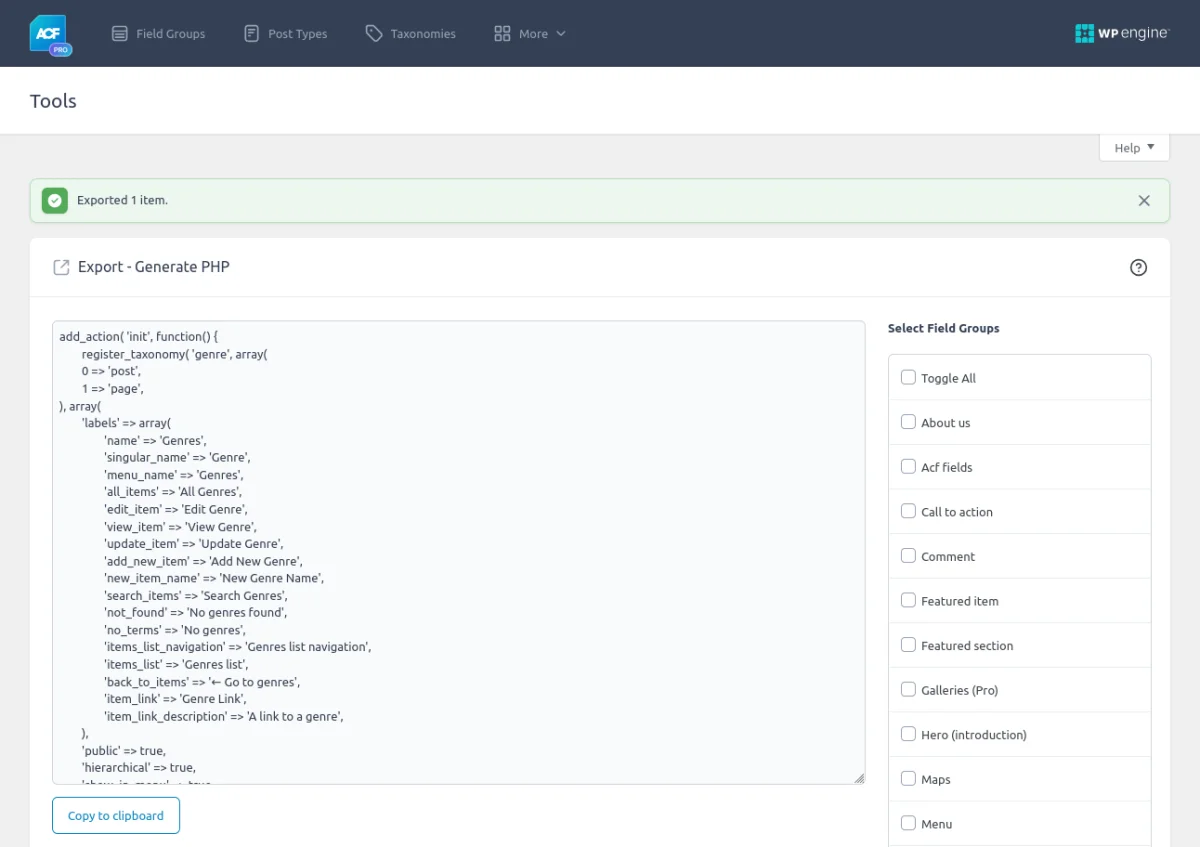
- Access the Tools Page:
Navigate to your WordPress dashboard. Click on the ACF menu and select Tools. - Select the Taxonomy:
On the Tools page, locate the taxonomy you wish to generate code for. Mark the checkbox next to your target taxonomy. - Generate PHP Snippet:
Click the Generate PHP button. ACF will transform all the settings of the selected taxonomy into a well-structured PHP code snippet. - Add the Snippet to Your Theme:
Copy the generated code and paste it into your theme's functions.php file or a custom plugin. - Remove the Taxonomy from the Interface:
Once the code is added, you can remove the taxonomy from the ACF interface. The taxonomy will continue to function through the native code, giving you the flexibility to manage it outside of ACF.
3.4) How to create custom fields
Basic terms
When getting started with the custom fields in the ACF plugin, it's important to get familiar with some basic terms that will help you navigate and make the most of its features. Let's take a closer look at these terms:
- ACF Group
An ACF group is a container that holds a collection of related fields. It allows you to organize and group fields together for a specific purpose. Think of it as a folder that holds various files related to a specific project. For example, you might create an ACF group called "Product Details" that contains fields like "Product Name", "Price", and "Description." - ACF Field
An ACF field represents a specific input or output element that captures or displays data. It defines the type of data you can enter or retrieve. You can think of an ACF field as a form field you encounter on a website, such as a text input, select dropdown, or image upload. Each field has its own settings and configurations, allowing you to customize its behavior and appearance. - Group Location Rules
Location rules in ACF determine where your fields are displayed within the WordPress administration area. These rules define the context or conditions under which your fields will be visible. For example, you can set location rules to display certain fields only on specific pages, posts, or custom post types. This ensures that your fields appear exactly where you need them, providing a tailored editing experience.
Screenshots
So, ACF groups help you group related fields together, ACF fields represent the individual input or output elements, and location rules ensure that your fields appear in the right place at the right time. Together, these terms lay the foundation for creating and managing custom data structures with ease and efficiency.
Location rules
We have reviewed the basic terms, and now let's dig a bit deeper into the location rules. Through this setting, we'll be able to better understand the Advanced Custom Fields plugin capabilities.
So, the location rules determine where your ACF fields will be displayed. Let's explore the different location rule options available in ACF:
Primary locations
- Page
You can attach ACF fields to specific pages on your WordPress website. This means you can create custom fields that are visible and editable only when editing certain pages. For example, you might have a "Company history" File field that appears only on the "Home" page, allowing you to attach a unique file for the homepage. - Post:
Similar to pages, ACF fields can be attached to individual posts. This allows you to customize the data associated with each post separately. For instance, you could have a "Rating" field that appears only when editing a "Movie Review" post, allowing you to assign a rating to that specific movie. - Custom Post Type:
In addition to pages and posts, ACF fields can be associated with custom post types. Custom post types are a way to create content structures tailored to your specific needs. For example, if you have a WooCommerce store and use the "WooProducts" custom post type, you can attach ACF fields to this type of post to capture additional product information like SKU, price, or specifications.
Extra locations
In addition to the post and CPT admin screens, you can 'attach' your group to the following screens:
- User:
ACF fields can also be attached to user profiles, allowing you to gather additional information about users beyond the standard WordPress user fields. For instance, you might create fields to capture user details, such as their designation. - Options (Site-wide):
ACF fields can be attached to site-wide options, which means they will be accessible and editable from anywhere within your WordPress site. These fields store data that applies globally across the entire website. An example could be a "Site Logo" field that allows you to easily change the logo displayed throughout your site. - Taxonomy:
ACF fields can be associated with taxonomies, which are used to categorize and organize content. For instance, if you have a "Product Category" taxonomy, you can add ACF fields to this taxonomy to capture additional information specific to each category, such as a category description or image.
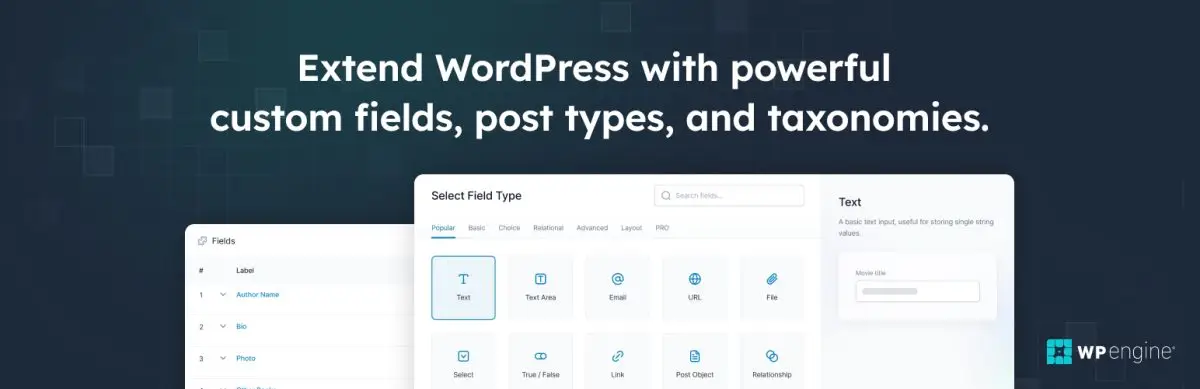
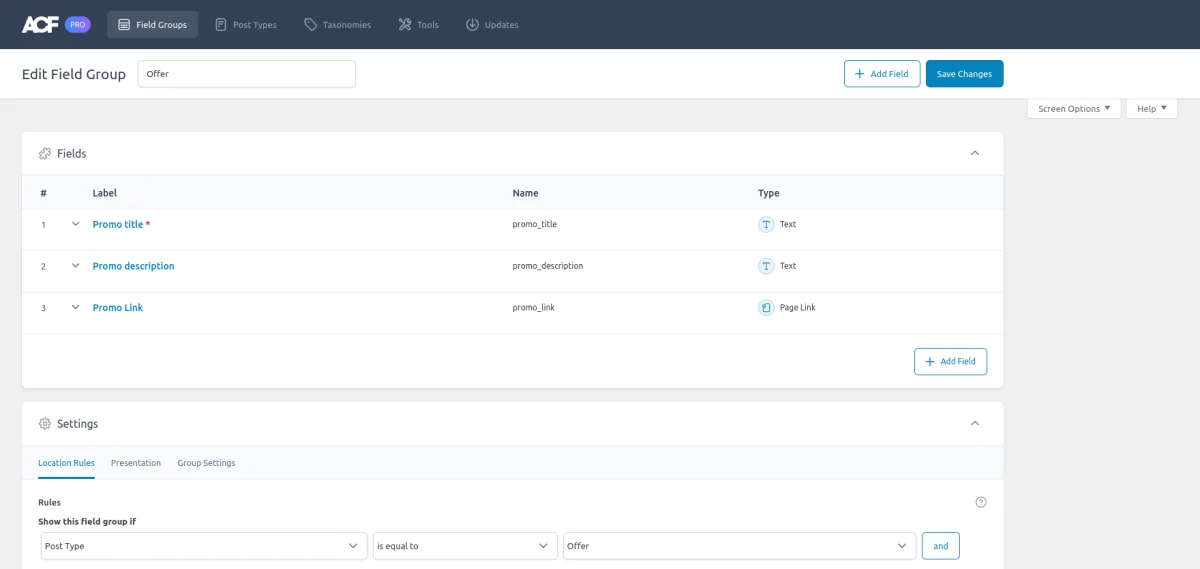
Advanced Custom Fields creation: step by step
- Visit the ACF menu and select Field Groups.
- Click the Add New button.
- Define a Group Title for your field group.
- Add your target fields by specifying their types and labels. You can preview available field types by using the Browse Fields button.
- Set up the Location Rule to determine where the fields will appear. For example, set the rule to show fields when the post type is equal to Product (for WooCommerce).
- Press the Save Changes button to save your field group.
- Visit any entity of the attached custom post type (CPT) to confirm that the fields are present.
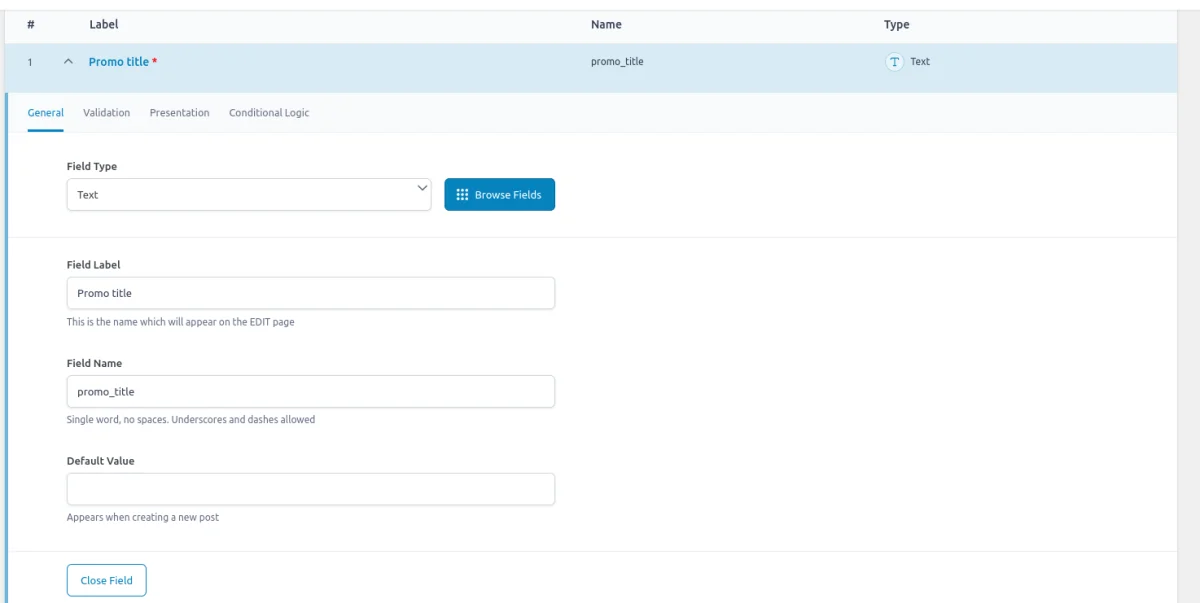
That’s it! Now you can fill out the information in the custom fields you've created. While all field types in ACF share common settings - such as name, label, and required status - most types also come with their own distinct settings that allow you to fine-tune their behavior.
For example, the Number field includes optional settings for Minimum and Maximum values, enabling you to restrict input as needed. The ACF Relationship field, on the other hand, allows you to filter by post type, status, and taxonomy, giving you greater control over how content is linked.
Later in this article, we'll provide a comprehensive list of all the ACF field types, complete with links to their detailed guides, so you can explore their unique settings and functionalities further.
3.5) How to display custom field values on the front end
Up to this point, we've set up the ACF fields, but they are only visible to editors in the WordPress admin area. By default, users won’t see any of these fields on the front end. For instance, if you’ve added fields to a WooCommerce product, the "About Product" page won’t showcase them.
This is because the fields store the content but do not display it. To show field values, you need to "pull" the target fields and "insert" them into the appropriate places within your theme templates.
Here are several ways to achieve this:
Using the ACF get_field() function
The Advanced Custom Fields plugin provides a rich set of functions and an API. The built-in ACF get_field() function allows you to retrieve the field value for any field type.
Keep in mind that the field location is crucial. While both are meta fields, they may be stored in different tables. For example, post fields are stored in the postmeta table, while user fields are in the usermeta table. Therefore, you should specify the source when loading the field. Check out the detailed guide on the get_field() function for more information.
Since get_field() is a universal function that can load any field type, its response varies depending on the field type, so you need to account for this while working. Additionally, you must find the right template and create the markup manually, which might lead you to prefer alternative approaches described below.
Using the Advanced Views Framework
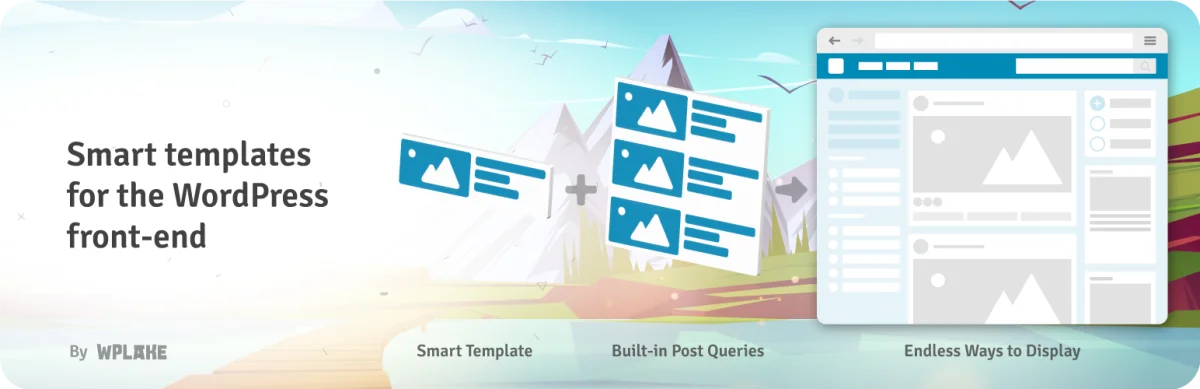
While ACF offers a comprehensive functions set and API, it’s important to remember that ACF functions are essentially wrappers around built-in WordPress features. This means you need to be familiar with core WordPress classes and functions to load and display field values. Writing markup from scratch and manually escaping data can also be time-consuming.
To streamline development, you can use the Advanced Views Framework. This framework provides smart templates for the front end, simplifying post queries and template creation. It generates default markup and automatically loads escaped data into the template, allowing you to concentrate on the layout.
Unlike drag-and-drop page builders, the smart templates in Advanced Views are modular and based on a template engine (Twig or Blade). This gives you full control over the markup and helps you avoid issues with global CSS and JavaScript files. The framework natively supports all ACF field types, along with other data sources.
Using page builder integration
The methods above are universal and flexible, suitable for any website. However, if you prefer a popular page builder, check if there's built-in ACF support. Given ACF’s popularity, many builders include some level of integration.
However, most of these integrations are basic, offering limited control over layout or lacking support for advanced field types like Gallery or Repeater.
Here’s a snapshot of the built-in features offered by some of the most popular WordPress themes and page builders for displaying ACF field values:
| Theme/Builder | ACF-related feature |
|---|---|
| Astra | - |
| Avada | Dynamic Content |
| Beaver | ACF Module |
| Bricks | Dynamic data |
| Divi | ACF Module |
| Elementor | Dynamic Tags |
| GeneratePress | - |
| Gutenberg | - |
| Kadence | Dynamic Content |
| OceanWP | - |
| Visual Composer | Dynamic Content |
| WPBackery | - |
3.6) How to add Options Pages
Note: ACF Options Pages feature is part of the Pro version.
ACF allows you to create fields for various locations, including posts, taxonomies, and users. These are the default (core) locations available in WordPress out of the box. The ACF Options Page feature goes further, enabling you to create your own settings page.
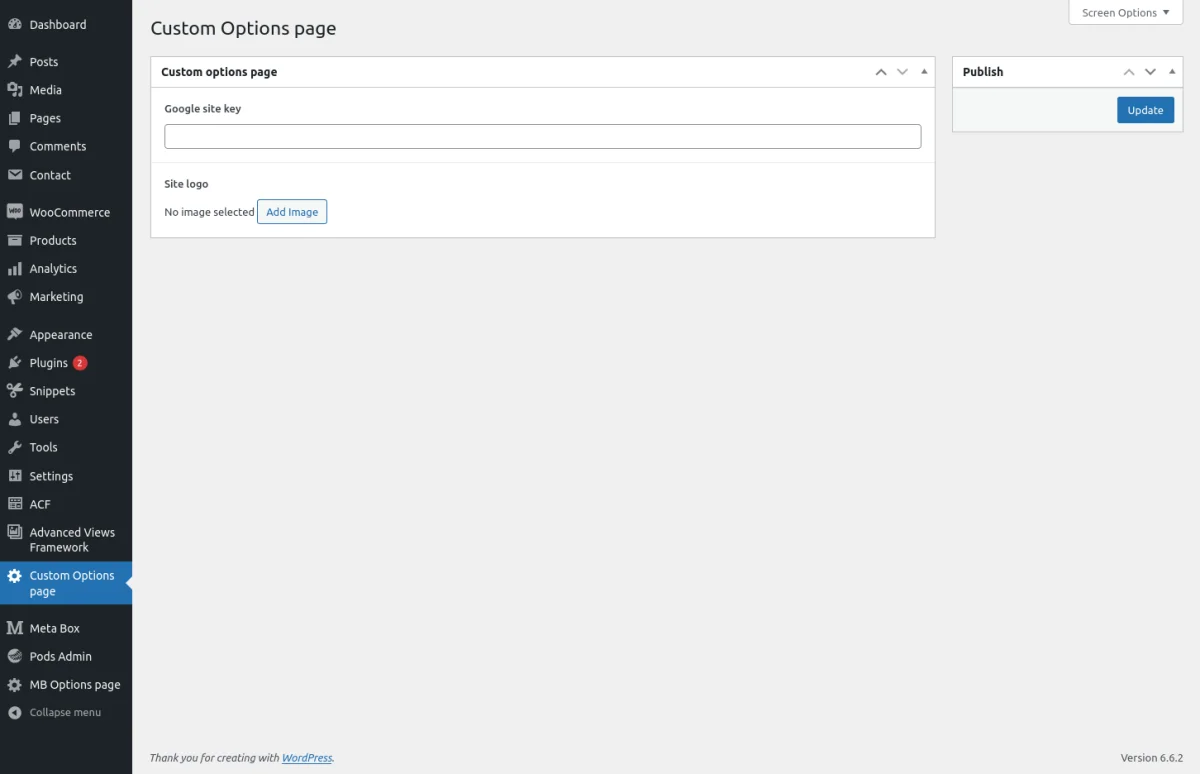
The beauty of this feature is that you can assign any ACF Groups and fields to this page, just like for any other location. This allows you to master a custom settings page for your theme or plugin, utilizing all the rich field types that ACF offers.
Step-by-Step Guide
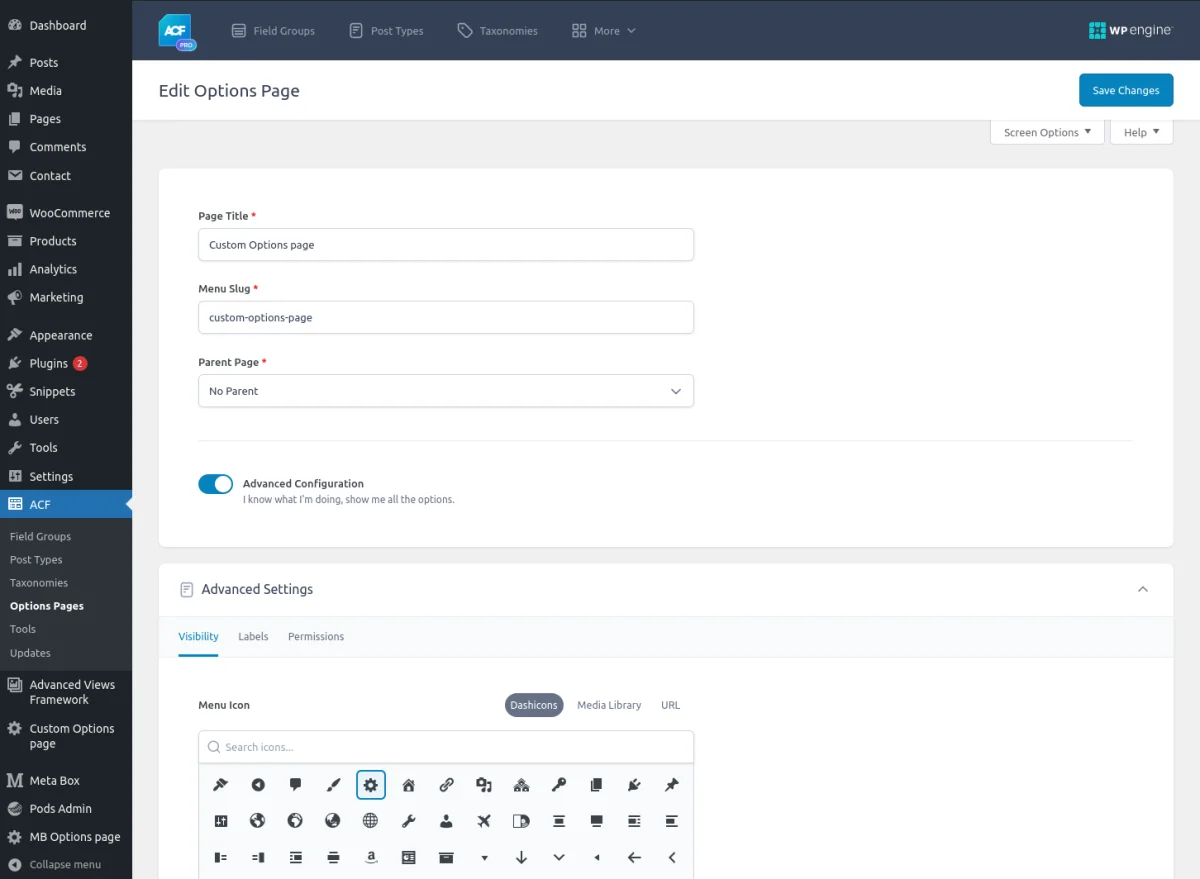
- Navigate to ACF -> Options Pages in your WordPress dashboard.
- Click on "Add New" to create a new options page.
- Fill in the Page Title, Menu Slug, and select a Parent Page if needed.
- Press the "Publish" button to save your new options page.
- To check the page, go to the newly created options page in the WordPress admin menu.
- Open (or create) the desired Field Group. In the location rules, select the options page you just created and click Save.
- You can now fill out the fields you’ve assigned to the options page.
- (Optional) Visit the options page settings to amend the advanced settings and fine-tune your settings page.
Basic settings of the Options Page
- Page Title: The title of your options page. For example, you might use "Theme Settings" if you're creating a settings page for a theme
- Menu Slug: A unique identifier for the URL of the options page. For instance, if your page title is "Theme Settings," you might set the menu slug as "theme-settings".
- Parent Page: Optionally set a parent page for nesting your options page. For example, if you want your options page to appear under the "Settings" menu, you could select "Settings" as the parent page.
Advanced settings (optional)
Visibility
- Menu Icon
Select an icon that represents your options page in the admin menu, making it visually distinctive. - Menu Title
Customize the title that appears in the admin menu. - Position
Set the order of the menu item in the admin sidebar by specifying a numeric position. Lower numbers appear higher in the menu. - Redirect to Child Page
If your options page has child pages, you can set it to automatically redirect users to a specified child page upon access. - Description
Provide a brief description for the options page. This can help users understand its purpose and the settings they can configure.
Labels
- Updated Button: Customize the text for the button used to save changes.
- Updated Message: Define the message displayed after successful updates.
Permissions
- Capability
Set the capability required to edit the options (e.g., edit_posts). - Data Storage
Choose how to store the options data - either in the default options table or in a custom storage location, like a specific post. - Autoload options
Decide if the options should be automatically loaded on every page load, which can improve performance for the site-wide settings by reducing unnecessary database queries.
To retrieve values from the ACF Options page, use the option (or options) argument as the location source in the get_field() function. If you've set up custom data storage, make sure to use that specific value instead.
Note: If you're working with Advanced Views, simply use options as the object-id argument in the shortcode as detailed in the AVF shortcode documentation.
3.7) How to add Gutenberg blocks
Note: ACF Blocks feature is part of the Pro version.
ACF offers a powerful feature for creating custom Gutenberg blocks, allowing you to assign ACF fields as block settings. While it's possible to create Gutenberg blocks natively, without ACF, doing so requires significant knowledge and can be time-consuming.
Using ACF to create blocks saves you a ton of time, enabling you to focus on layout instead of complex coding. Whether you're designing a hero section, a call to action, or a pricing table, custom ACF blocks provide an intuitive editing experience for content creators while giving developers complete control over the design.
For detailed instructions on creating and fine-tuning ACF blocks, check out the comprehensive ACF Blocks article.
3.8) Troubleshooting issues
While ACF is a well-known and thoroughly tested plugin, you may still encounter some confusing scenarios during your use. Here are a few common scenarios you might run into:
ACF Group is not visible on the target location
The group may not be visible for a couple of reasons:
- The 'active' setting may be disabled in the group settings.
- The group-related meta box could be hidden in the user preferences.
Since each WordPress user has their own profile and preferences, the field group can be hidden for various reasons.
To resolve this:
- For standard pages: Click on Screen Options in the top right corner and ensure the related group is checked in the list.
- For Gutenberg: Click the three dots in the top right corner, go to the General tab, scroll to the Advanced section, and toggle on the group-related option.
Can't find the field key in the ACF Field Group
In certain scenarios, such as when using specific ACF filters, you may need to reference the field key instead of the field name. However, the field key is hidden by default in the ACF interface.
To enable the display of field keys:
- Click on the Screen Options button in the top right corner of the page.
- Check the Field Keys option.
Once enabled, the field keys will appear next to each field name in the group.
Others
If you're experiencing installation-specific issues, there's no need to worry - ACF offers friendly support! For users of the free version, you can open a thread on the support forum for assistance. If you have the Pro version, submit a ticket for more direct support.
Tip: Depending on the issue, it may be helpful to provide your installation info. To do this, visit your WordPress dashboard, go to Tools > Site Health, and copy the data from the 'ACF' tab. This will help the support team assist you more effectively.
4. ACF Basic vs. Pro version
It's important to know that there are two Advanced Custom Fields plugin versions available: Basic and Pro. The Basic version has all the essential features you need and is suitable for most websites. On the other hand, the Pro version offers extra features and personal support.
We recommend starting with the Basic version, which provides ample functionality for many websites. If you later find yourself needing more advanced features, you can easily upgrade to the Pro version.
The good news is that the migration from Basic to Pro is painless and seamless. All the data you've already created using the Basic version will remain intact, ensuring a smooth transition without any loss or inconvenience.
So, the Pro version of Advanced Custom Fields offers several advantages over the Basic version. These include:
4.1) Extra field types
The Pro version introduces additional field types such as gallery, repeater, and flexible content.
- Gallery Field
The Gallery field enables you to create image galleries within your content. You can easily upload multiple images or select them from your media library, providing a visually appealing way to showcase photo galleries, portfolios, or any collection of images. - Group field
The Group field allows for better organization and structuring of your fields. It's particularly useful for large sets of fields, as it simplifies navigation for editors and helps avoid potential name conflicts. - Repeater Field
The Repeater field allows you to create repeating sets of fields. It's like having a mini form within your form. This is especially useful when you need to collect and display multiple instances of the same type of data. For example, you can create a repeater field for a team member section, where you can add multiple team members with their respective information such as name, photo, and role. The ACF Repeater field gives you the flexibility to handle repetitive data structures with ease. - Clone Field
The Clone field type serves as a virtual connector, facilitating the linking of other fields or entire groups within various contexts, including nested groups or layout fields. - Flexible Content Field
The Flexible Content field is a versatile feature that enables you to create flexible and customizable layouts. It allows you to define different sets of fields, called layouts, and then choose and arrange these layouts within your content. This flexibility lets you create dynamic page structures with varying sections, such as hero banners, text blocks, image galleries, or any other content module you require. The ACF Flexible Content field empowers you to build highly customizable and reusable content layouts without limitations.
4.2) ACF blocks
ACF Blocks is a powerful feature of the Advanced Custom Fields plugin that allows you to create custom Gutenberg blocks effortlessly. Gutenberg is the default WordPress editor, and blocks are the building elements of content.
With ACF Blocks, you can design and add unique blocks tailored to your website's needs. These blocks can be used for various purposes like testimonials, team member profiles, or call-to-action sections. ACF Blocks seamlessly integrate with the Gutenberg editor, and you can easily add, customize, and rearrange them.
The beauty of ACF Blocks is that you can use Advanced Custom Fields to define and control the fields within each block. This allows you to gather specific data for each block using custom fields like text inputs, image uploads, or select dropdowns. ACF Blocks provide flexibility and a user-friendly editing experience.
4.3) Options pages
The options pages feature is very useful when you need to configure global settings, such as site colors, logo, social media links, or custom scripts. With ACF's option pages, you can streamline the management of these settings, making it easier to maintain consistency throughout your website.
4.4) Personal Support
With the Pro version, you gain access to priority support from the ACF team. They are known for their prompt and helpful assistance, ensuring that you receive timely solutions to any issues or queries you may have.
5. ACF alternatives

While ACF is an outstanding plugin for managing meta fields and custom post types, several other strong contenders also excel in this area.
In addition to ACF, two top alternatives are Meta Box and Pods. Both have a long history and are feature-rich, allowing for effective management of custom post types and taxonomies, as well as offering options pages.
Each plugin has its unique advantages, so you might find one better suited to your workflow than the others. For example, Pods is completely free, offering all its features without any charge, which makes it an attractive option for those looking to manage custom fields and post types without a budget.
For a comprehensive comparison, check out our article on the Best Meta Field Plugins in WordPress to learn more.
6. ACF field type reviews
As we mentioned before, ACF has over 30 field types, which gives you full flexibility over the content formats.
Remember that each field type has its own settings and may require a specific approach. To help you navigate this, we've compiled a list of detailed guides for all the main field types, providing in-depth insights into each one:
6.1) Basic
- Text
The Text field type allows users to enter and store simple text or alphanumeric characters. - Textarea
The Textarea field type extends the Text field and is better suited for multiline text data. - Wysiwyg
The Wysiwyg-editor field type allows storing and managing HTML-related content. - Number
The Number field type enables users to input and store numerical values, including integers or decimal numbers. - Url
The Url field type allows users to input any URL, including both internal and external links.
6.2) Content
- Image
The Image field type allows users to upload and store image files, providing a convenient way to manage and display images within custom fields. - oEmbed
The oEmbed field provides an interactive component for embedding videos, images, tweets, audio, and other content. This field makes use of the native WordPress oEmbed functionality. - Gallery
The Gallery field type allows users to create and manage image galleries by uploading multiple images and arranging them in a specific order. - Link
The Link field type enables users to input and store URL links, including website addresses or internal/external links. - Page Link
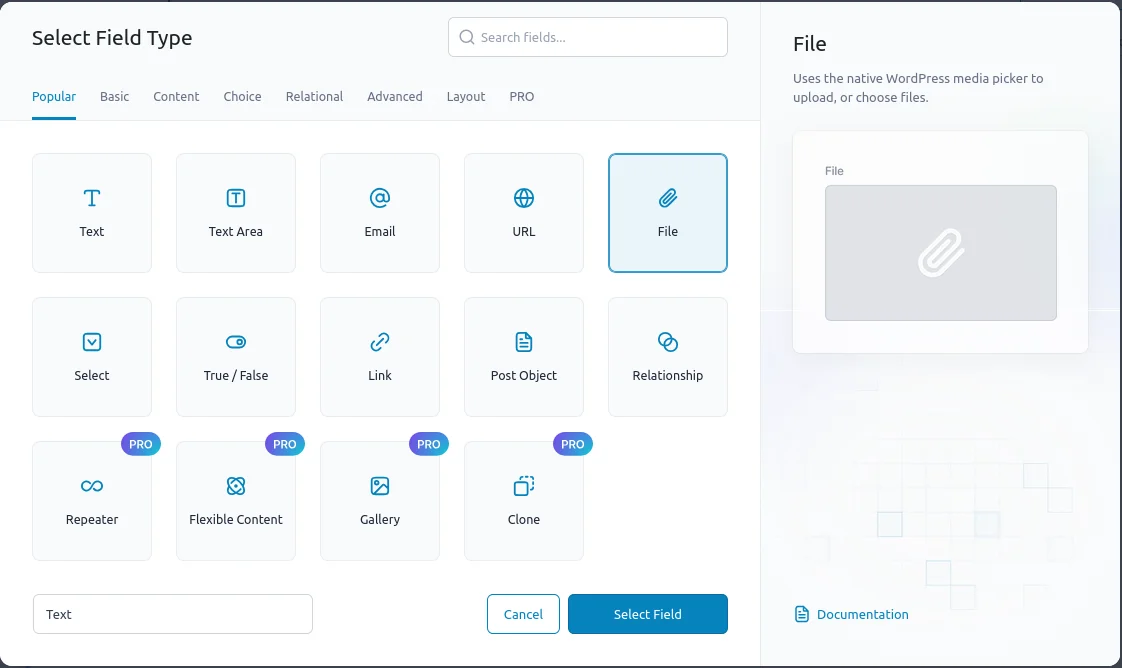
The Page Link field type is specifically designed for internal links and provides additional filters to refine options for editors. - File
The File field type allows users to upload and store various file types, such as documents, PDFs, or multimedia files.
6.3) Choice
- True/false
The True/False field type provides a checkbox or toggle option, allowing users to select either a true or false value. - Select
The Select field type offers a dropdown or list of predefined options, allowing users to choose a single value from the provided options.
6.4) Relational
- Relationship
The Relationship field type allows to create connections between various post types, pages, or custom post types. - Post Object
The Post Object field type provides a dropdown or an autocomplete field that allows users to select and link to other posts or pages within the WordPress site. - Taxonomy
The Taxonomy field allows editors to choose terms and can be utilized as an alternative input to the native WP terms form. - User
The user field allows users to 'relate' one or more users to posts, CPT items, or other users.
6.5) Advanced
- Google Map
The Google Map field type integrates with the Google Maps API, enabling users to select and store geographic locations on a map. - DatePicker
The Date, DateTime, and Time fields are included in the Advanced group fields, enabling editors to select and store date, date and time, or just time data.
6.6) Layout
- Group
The Group field allows for better organization and structuring of your fields. It's particularly useful for large sets of fields, as it simplifies navigation for editors and helps avoid potential name conflicts. - Repeater
The Repeater field type allows users to create repeatable sets of fields, making it possible to add multiple instances of a group of fields for structured data entry or flexible content display. - Clone
The Clone field type serves as a virtual connector, facilitating the linking of other fields or entire groups within various contexts, including nested groups or layout fields. - Flexible
The Flexible field stands apart from other field types, offering an enhanced editor experience.
7. Security tips for ACF
As one of the largest plugins in the WordPress ecosystem, so ACF’s developers take security extremely seriously and work diligently to ensure the plugin remains safe. However, security is not solely reliant on the tools; it also depends on how they’re used.
That's why we've compiled some of the most important practices you should follow on your end to maintain a secure website when using ACF:
- Always escape field values or use a template engine
When outputting ACF field values, make sure to escape them properly using functions like esc_html(), esc_attr(), or esc_url() depending on the content. Alternatively, use a template engine (like Twig), or Advanced Views Framework, that handles escaping by default. - Check Options Page permissions
Ensure that only the appropriate user roles have access to the ACF Options Page. When creating the options page, always review the capability settings in the Permissions tab to restrict access. - Avoid using ACF shortcodes
ACF shortcodes are disabled by default for security reasons. They only work for simple text based values so it's better to keep them disabled, and use display methods described in this article. - Use acf_form for front-end forms
If you need users to create or edit content using ACF fields from the front end, it's best to use the built-in acf_form feature. This method includes essential security checks.
General
While the tips above are ACF-specific, it's also important to follow essential security practices for your overall WordPress setup:
- Avoid 'nulled' (illegal) ACF Pro versions
Using pirated copies of ACF Pro exposes your website to severe security risks, such as malware infections. - Keep plugins up-to-date
Ensure that ACF and all your plugins are regularly updated. Enabling auto-updates not only simplifies maintenance but also enhances your site's security. You can rest easy about potential compatibility issues; since WordPress 6.6, the platform includes a built-in rollback feature for auto-updates.
For more general advice, check out our article on securing your WordPress for comprehensive security tips.
8. Best practices for ACF
One of the standout features of ACF and WordPress in general is their flexibility. They allow you to create without imposing strict guidelines. However, adhering to best practices is essential to ensure that your creations are high-quality and easy to maintain.
8.1) Give proper names for Groups and Fields
While it might seem obvious, many overlook the importance of clear naming conventions for fields and groups. Remember, the field name serves as its identifier in the database and is critical for accessing it in your code. Unlike labels, field names cannot be changed later without the loss of access to previously saved data.
To avoid confusion and potential collisions - especially if multiple groups exist on the same page - take care when naming fields. Use the ACF Group field to wrap related fields, which not only prevents naming conflicts but also enhances the user experience for editors.
8.2) Split template from logic
Using the ACF get_field() function allows you to load and print ACF fields directly in any template. However, this approach can lead to messy and non-reusable code. It’s best practice to keep your template logic separate from the data retrieval process, which minimizes errors when some fields are unfilled or missing.
To achieve this separation, consider using the Advanced Views Framework, which offers modular templates. Alternatively, you can manually structure your code as shown below:
Incorrect usage:
// single.php
<p>Hi, <?php echo esc_html(get_field('user_field')['display_name']); ?></p>
<p>Your membership level is <?php echo esc_html(get_field('level_field', get_field('user_field')['ID'])); ?></p>
In this example, there’s no check to ensure the user exists and has an assigned membership level. Instead, the correct approach is to split data loading from the template rendering:
Data loading (e.g. data.php):
function get_user_data(): array {
	// Defaults
	$data = [
		'is_set'       => false,
		'display_name' => '',
		'level'        => 'default_level',
	];

	$user_data = get_field( 'user_field' );

	if ( false === is_array( $user_data ) ) {
		return $data;
	}

	$user_id = $user_data['ID'];

	$user = get_user_by( 'id', $user_id );

	if ( false === $user ) {
		return $data;
	}

	$data['is_set']       = true;
	$data['display_name'] = $user->display_name;

	$user_level = get_field( 'level_field', $user_id );

	if ( null !== $user_level ) {
		$data['level'] = $user_level;
	}

	return $data;
}
Rendering (e.g. render.php):
<?php
$is_set = $data['is_set'];
$display_name = $data['display_name'];
$level = $data['level'];

if ( $is_set ) { ?>
    <p><?php
        printf(
            '%s %s',
            esc_html__( 'Hi,', 'your-text-domain' ),
            esc_html( $display_name )
        );
    ?></p>
    <p><?php
        printf(
            '%s %s',
            esc_html__( 'Your membership level is', 'your-text-domain' ),
            esc_html( $level )
        );
    ?></p>
<?php } else { ?>
    <p><?php
        echo esc_html__( 'User info is not available.', 'your-text-domain' );
    ?></p>
<?php }
Combining It:
<?php
$data = get_user_data();
include 'render.php';
When you split data and template, it's not only improves structure, but also makes easier to keep security in mind and escape the output.
8.3) Keep assets on demand
Another crucial aspect that is often overlooked is the management of asset files (CSS and JavaScript). In many WordPress themes, you might find global files like style.css and script.js, which are intended for site-wide functionality such as loading fonts.
However, it’s essential not to include styles that are only relevant to a single page in these global files. Doing so not only increases the potential for CSS conflicts but also adds unnecessary bloat, which can slow down your website's performance.
To mitigate this, adopt a modular approach. For instance, using the Advanced Views Framework allows you to add specific CSS and JS code to each element, ensuring that they only load on the targeted pages.
If you prefer custom solutions, consider creating individual CSS and JS files for each template (e.g., contact-page.css, homepage.css) and enqueue them using conditional checks like is_page(). This way, you ensure that only the necessary assets are loaded for each page.
add_action( 'wp_enqueue_scripts', function () {
	// Check if we are on the contact page
	if ( true === is_page( 'contact' ) ) {
		wp_enqueue_style( 'contact-page-css', get_template_directory_uri() . '/css/contact-page.css' );
		wp_enqueue_script( 'contact-page-js',
			get_template_directory_uri() . '/js/contact-page.js',
			array(),
			null,
			[
				'in_footer' => true,
			] );
	}

	// Check if we are on the homepage
	if ( true === is_front_page() ) {
		wp_enqueue_style( 'homepage-css', get_template_directory_uri() . '/css/homepage.css' );
		wp_enqueue_script( 'homepage-js',
			get_template_directory_uri() . '/js/homepage.js',
			array(),
			null,
			[
				'in_footer' => true,
			] );
	}
} );
Summary
By following these best practices you not only streamline your project and code structure, but also enhance the overall performance and maintainability of your WordPress site.
9. Performance tips for Advanced Custom Fields
While ACF is designed with performance in mind, proper usage is key to maximizing its efficiency. Here are some strategies to enhance your ACF performance:
9.1) Utilize the ACF local JSON feature
The ACF local JSON feature reduces the number of database queries and simplifies the process of launching to a live environment. By saving your field groups as JSON files, you minimize the load on your database and make it easier to manage field configurations across different environments.
9.2) Prefer ACF Blocks over meta fields when possible
While ACF Blocks include ACF fields, they store data directly within the post content, which eliminates the need for additional database queries. In contrast, traditional meta fields are stored in separate meta tables, resulting in extra database requests. By choosing ACF Blocks, you enhance performance and simplify the content editing experience for users, making it more efficient and user-friendly.
9.3) Configure Options Page storage
When creating an ACF options page, consider changing the Storage option, to save it in a specific post instead of the default options table. This approach helps avoid overloading the wp_options table, which can lead to performance issues as the number of options grows.
9.4) Use WordPress taxonomies for content categorization
When querying content, prefer using WordPress taxonomies for categorization. While ACF Taxonomy fields can be used, make sure to enable the "Load" and "Save" options from terms to ensure efficient querying.
9.5) Be cautious with repeater fields
Repeater fields can impact performance, as they store each value of every row in separate database records. To mitigate potential slowdowns, use repeater fields judiciously or consider nesting them within ACF Blocks to streamline data handling.
Repeater fields can affect performance since they store each value of every row as separate database records. To prevent potential slowdowns, consider using ACF addons that allow you to enable Custom Database Tables for storage. Alternatively, you can nest Repeater fields within ACF Blocks, which helps optimize data handling and improve overall performance.
9.6) Avoid meta queries for large sets
If you expect to run extensive queries on large datasets, avoid using meta queries directly on the standard meta tables (wp_postmeta, wp_termmeta, wp_usermeta). Instead, consider using some ACF custom tables addon. These core WordPress tables are not optimized for heavy query requests, so if you are building a filter-based content website (e.g., for properties), using custom tables can greatly enhance performance.
9.7) Consider caching solutions
Implement caching solutions such as object caching or full-page caching to enhance site performance. This is especially useful if your site relies heavily on ACF fields, as caching can help reduce database load and improve load times.
Summary
By following these tips, you can optimize your use of Advanced Custom Fields effectively. Remember that website performance is influenced by various factors, including your theme and hosting environment. To further enhance your site's speed, check out our comprehensive article on general essentials for WordPress speed optimization.
10. Advanced Custom Fields and Multilingual installations
If your website has, or going to have, content in several languages, then you may have a question about translation.
As you know, WordPress doesn't offer multilingual out of the box. So, to make your website multilingual, you need to use some plugins. The most popular are WPML and Polylang.
So, in fact, supporting the field translation is a matter of the plugin, that you use. The good news is that as we mentioned, ACF is super popular, and most of the multilingual plugins support ACF out-of-the-box. Moreover, they provide multiple options about it: e.g. to translate only field values or field labels as well.
Check out the ACF-related pages in the WPML and Polylang documentation for detailed instructions on configuring translations.
Tip: The ACF options page is a feature, that uses another approach, than other features. It means translation of the options page may require extra steps. You can read more in the ACF options page article.
11. ACF addons
The popularity of the Advanced Custom Fields plugin can be partially attributed to its powerful addons, which enhance its capabilities with new features, integrations, field types, and settings. Here’s a brief overview of some of the most popular ACF addons:
11.1) Advanced Custom Fields: Extended
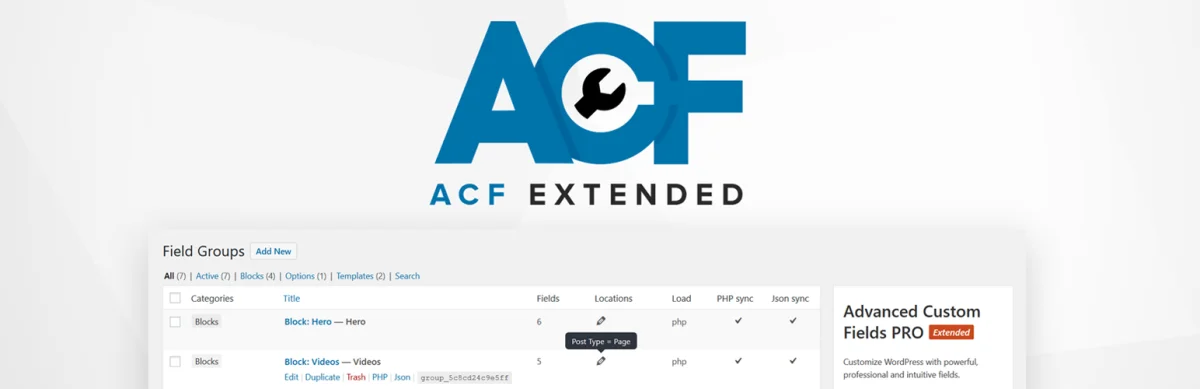
ACF: Extended suite is designed to supercharge both WordPress and ACF. It offers a robust administration framework with over 14 new ACF fields, 10+ enhanced fields, advanced field validation, and a front-end forms manager, providing significant improvements and optimizations.
11.2) Advanced Views
Advanced Views is a powerful tool allows you to showcase posts, WooCommerce products, and fields from ACF, Meta Box, and Pods. Advanced Views takes a modern and flexible approach to content display and customization, fully harnessing the potential of ACF fields and offering advanced tools to display and manipulate ACF data, including complex database queries
11.3) ACF Quick Edit Fields

ACF Quick Edit is enhancing the WordPress admin experience and adds Quick Edit functionality to ACF. It allows you to view and edit ACF field values directly from the list views of posts, terms, and users, making content management more efficient and streamlined.
11.4) ACF Content Analysis for Yoast SEO

The ACF Content Analysis addon ensures that Yoast SEO analyzes all ACF content, including Flexible Content and Repeaters. By integrating with Yoast SEO’s content analysis, it provides a more comprehensive evaluation of your ACF fields for better SEO optimization.
11.5) WPGraphQL for ACF
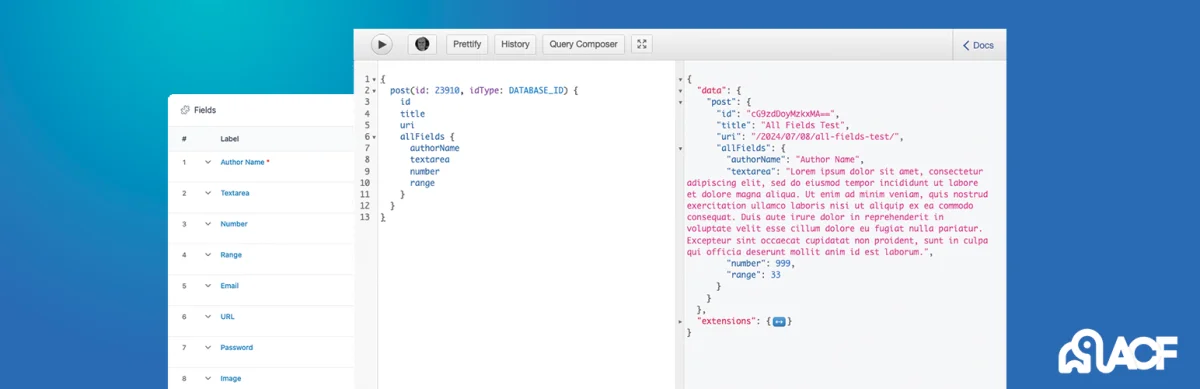
WPGraphQL for ACF plugin integrates ACF with the WPGraphQL schema, allowing you to expose ACF fields and field groups to GraphQL. This enables seamless querying of ACF data within your GraphQL queries, enhancing the flexibility of data retrieval.
11.6) ACF to Custom Database Tables
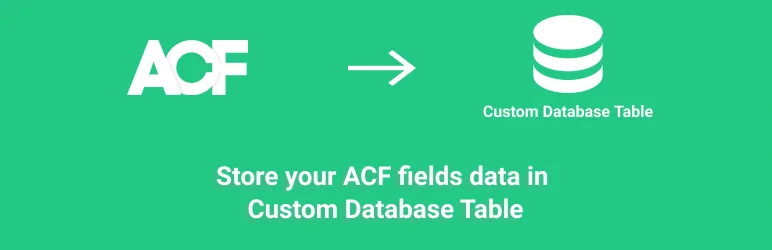
ACF to Custom Tables is an essential addon that saves your custom field data in dedicated, structured database tables. This improves organization and performance, making it easier to manage large sets of data.
11.7) ACF OSM Add-on

The OSM ACF addon brings OpenStreetMap integration to your WordPress site. With the new OSM field type, you can embed customizable maps using OpenStreetMap and Leaflet.
Summary
Thanks to the flexible customization options offered by ACF and the support of a vibrant community, you can extend ACF functionality to tailor it perfectly to your specific use case. To explore more addons, check out the article: ACF Addons: 40+ Extensions to Expand ACF Capabilities.
12. ACF Changelog
Developers of the Advanced Custom Fields plugin have constantly been improving the plugin. Below we review the last most significant releases:
6.0: New UI
Since 21st April 2022, the plugin has had a new UI.
6.1: Custom Post Type and Taxonomy Registration
Since 3rd April 2023, we can create Post Types and Taxonomies using the plugin's UI.
6.2: Options Pages UI and Bidirectional Relationships
Since 9th August 2023, we can create Options Pages using the plugin's UI. In addition, the new Bidirectional feature for Relationships fields allows us to get related posts without making a WP_Query.
Important note: In September 2024, the WordPress Foundation disabled WP Engine’s access to the WordPress repository, the owner of the Advanced Custom Fields plugin. Since then, you’ll need to download the ACF plugin from its official website to receive automatic updates. The version on WordPress.org is rebranded into Secure Custom Fields, and supported by another team. The installation process of the origin ACF plugin is desibed in this article, and also detailed in ACF's article.
P.S. The list is been updated to review every major release since ACF 6.0. You can bookmark the article to stay updated about the new most important updates.
Thank you for reading! to our monthly newsletter to stay updated on the latest WordPress news and useful tips.

Stuck with development or facing an issue?
WPLake offers affordable on-demand website development and design.
No matter the size of your project - contact us now, and we'll get it done for you!
Frequently Asked Questions Test Your Knowledge
FAQ mode
/
Learning mode
-
Can I find entities by values in their meta fields?
Yes, you can perform meta queries using the WP_Query class or Advanced Views Framework. However, the approach may vary depending on the field type. Refer to the guide specific to each field type for detailed instructions.
-
What will happen if my ACF Pro license expires?
You won’t be able to access Pro features for building new things, but your existing setups will continue to function as they are.
-
Can I extend the default plugin behavior?
Yes, ACF provides a wide range of filters and hooks that allow you to add custom functionality, such as making API calls or sending emails.
Course navigation: ACF Plugin

Lesson #2
Time to read: 11 mins
Updated 25 Sep, 2024

Lesson #3
Time to read: 20 mins
Updated 25 Sep, 2024
Content links (169)
2.
wplake.org110.
twig.symfony.com116.
6 6 (wordpress.org)138.
wpml.org154.
openstreetmap.org156.
leafletjs.comAbout the Author