ACF Link Field: Complete Guide with Code Snippets

Key Points at a Glance
- Storage format: The ACF Link field stores data as a serialized array in the database, regardless of the return format chosen.
- Supported locations: This field can be applied to posts, user profiles, options pages, terms, and ACF Gutenberg blocks.
- Website migration: The Link field stores URLs as strings, potentially leading to broken links after migration, unlike the Page Link field, which stores references as post IDs.
- Querying by Link field: Querying link data varies depending on where the field values are stored, requiring different approaches for postmeta, termmeta, and usermeta.
Table of Contents
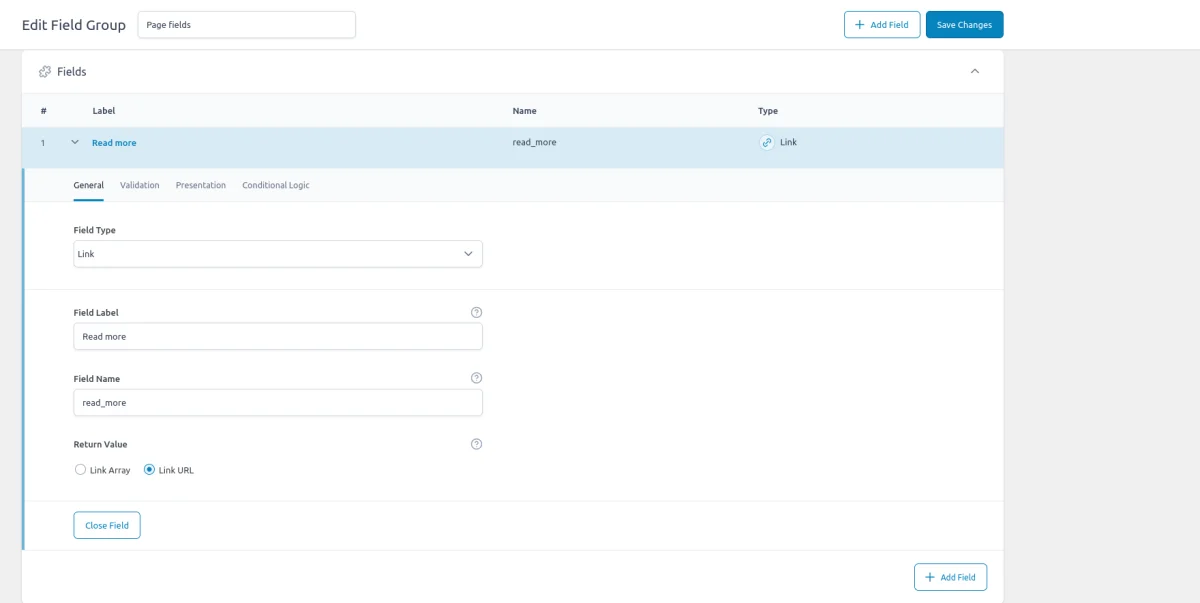
The ACF Link field is a type within the Advanced Custom Fields plugin, categorized under the Relational group. This field allows you to add and manage link data, including the URL, title, and target (self/blank).
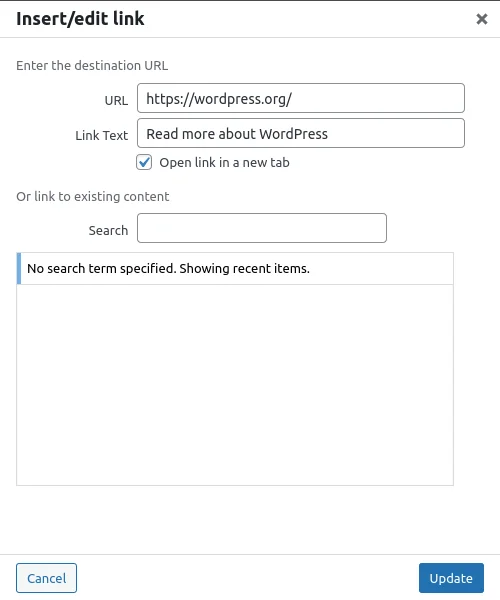
The management of the link data happens using the built-in WordPress Insert Link popup. With this field, you can create both external and internal links.
ACF Link field UI

ACF Link field-related addons
ACF addons can be an important part of the workflow, and there are several addons especially useful for the ACF Link field:
- ACF Quick Edit Fields enhances the WordPress admin experience by adding Quick Edit functionality to Advanced Custom Fields. This plugin allows you to quickly view and edit ACF field values directly from the list views.
- ACF Tooltip enhances the user experience by managing lengthy instruction texts in ACF fields. Instead of cluttering the edit screen, this plugin allows you to add tooltips to field labels, keeping the interface clean and space-efficient.
- WPGraphQL for ACF allows you to expose ACF fields and field groups to GraphQL, enabling seamless querying of ACF data within your GraphQL queries.
Link fields in other meta-field plugins
In case you're looking for ACF alternatives, the ACF Link field is similar to the URL field in the Meta Box plugin and the Upload Multiple field in the Pods plugin. Read our comparison of the best meta field plugins to learn about the differences between vendors.
1. ACF Link field essentials
1.1) Storage format and supported field locations
Regardless of the field settings, specifically the "Return Format" option, ACF stores the link data as a serialized array in the database. This means that even if you choose to return the link data as a simple URL or an array, the underlying data is always stored in the same way.
The serialized array includes the URL, title, and target attributes:
a:3:{
    s:5:"title";s:9:"WordPress";
    s:3:"url";s:22:"https://wordpress.org/";
    s:6:"target";s:6:"_blank";
}
Supported field locations
You can use the ACF Link field in various locations, and it consistently stores the serialized link data regardless of where the field is applied. Below are the supported field locations, along with how the data is stored:
- Post Objects (Post, Page, Media Attachment, CPT Item, WooCommerce Product):
The ACF Link field can be applied to any post object, including standard posts, pages, media attachments, custom post types, and WooCommerce products.
The serialized link data is stored in the wp_postmeta table, associated with the relevant post or custom post type item. - Options Page:
When used on an ACF Options Page, the Link field stores the serialized link data in the wp_options table.
This makes the link data accessible as a global site-wide setting, which can be particularly useful for site-wide elements like global navigation links or resources. - User Profiles:
The Link field can be added to user profiles, storing the serialized link data in the wp_usermeta table. This is useful for associating specific links with users, such as profile links, portfolio URLs, or social media connections. - Terms (e.g., Post Categories, Tags, Custom Taxonomies):
The Link field can be attached to terms, such as post categories, tags, or custom taxonomies.
The serialized link data is stored in the wp_termmeta table, linked to the specific term. This allows you to associate links with categories, tags, or other taxonomies, which can be helpful for category-specific resources or external references. - ACF Gutenberg Block:
The Link field can be incorporated into custom ACF blocks within the Gutenberg editor.
When used within an ACF Block, the serialized link data is stored within the post_content as part of the block's JSON data structure in the wp_posts table.
1.2) Return value formats
The Return Value setting determines how the attachments are returned when using the ACF get_field() function:
- Array Return Format
When the "Array" option is selected, ACF returns the link data as an associative array. This array includes three keys: url, title, and target. - URL Return Format
When the "URL" option is selected, ACF returns only the URL as a string, without the title or target attributes.
Array keys:
$link = array(
    'url' => 'https://wordpress.org/',
    'title' => 'WordPress',
    'target' => '_blank'
);
1.3) Alternative field types
In addition to the Link field, ACF offers URL and Page Link fields, each with its own use cases and advantages:
- Link Field (current)
The most flexible option, allowing you to work with both external and internal links. However, using the built-in popup for link management can be time-consuming, especially since it requires manual URL input. This may not be ideal when working exclusively with internal links. - URL Field (alternative)
If you only need to capture external URLs without additional attributes like title or target, the URL field is a simpler alternative. It provides a straightforward input field for entering a URL, saving time and avoiding the extra steps involved in the Link field. - Page Link Field (alternative)
Designed specifically for internal links, this field allows you to select a post, page, or custom post type from your WordPress site, eliminating the need for manual URL entry. This makes it a quicker and more reliable option when linking to internal content.
For a comprehensive comparison and to determine which field type best suits your needs, check out our ACF Link field types comparison.
Multiple links in a single field
If you need to include multiple related links, such as social media profiles, the best approach is to create an ACF Repeater field with a Link field inside it.
2. Use cases of the ACF Link field
The ACF Link field is highly versatile and can be used in various scenarios. Here are some common use cases:
- Custom Buttons and Call-to-Actions (CTAs)
Add custom buttons or CTAs to different parts of your site, such as banners, hero sections, or product pages. - External Resource Links
Link to external resources, such as documentation, partner sites, or external articles. - Navigation Menus
Customize navigation links in sidebars, footers, or within content blocks. - Related Posts or Content
Add links to related posts, pages, or custom post types at the end of a blog post or within a sidebar. - Social Media Links
Create links to social media profiles for authors, businesses, or site-wide use. - Downloadable Resources
Provide links to downloadable resources, such as PDFs, images, or software. - Sponsor or Partner Logos
Link sponsor or partner logos to their respective websites.
3. Link fields and website migration
The ACF Link field, unlike the Page Link field, stores the URL as a string in the database. This has important implications when migrating your website from one domain to another (e.g., from a staging environment to a live site, or vice versa).
Since the URL in the Link field is stored as a plain string, any internal links will still point to the old domain after the migration. This can lead to broken links, as users might be directed to the staging site or an incorrect URL.
To avoid these issues, it's generally recommended to use the ACF Page Link field for internal linking. The Page Link field stores internal references as post IDs, which remain consistent regardless of domain changes. This makes the Page Link field a safer option when internal links are involved.
If you already have Link fields with incorrect URLs after a migration, don’t worry—there are solutions:
- Database Replacement Tools
You can use free plugins like Better Search Replace to quickly update all URLs in the database. This tool allows you to search for the old domain and replace it with the new one across all your database tables, including ACF Link fields. - Advanced Migration Plugins
Some advanced WordPress migration plugins, such as All-in-One WP Migration, offer built-in database replacement functionality. These tools automatically handle domain changes during the migration process, updating URLs in Link fields along with the rest of your content.
4. ACF Link field support in Themes and Builders
ACF is one of the most popular WordPress plugins, and it's supported by many page builders right out of the box. However, most of these integrations are basic, providing limited control over layout or lacking support for advanced field types like Gallery or Repeater.
To achieve universal compatibility with any theme and page builder while gaining advanced control over your layout, consider using the Advanced Views Framework or custom code snippets as discussed in the following chapter.
Here's a snapshot of the built-in features offered by some of the most popular WordPress themes and page builders for displaying ACF Link fields:
| Theme/Builder | ACF-related feature | ACF Link type support |
|---|---|---|
| Astra | - | no |
| Avada | Dynamic Content | no (not declared) |
| Beaver | ACF Module | no (not declared) |
| Bricks | Dynamic data | no (not declared) |
| Divi | ACF Module | yes |
| Elementor | Dynamic Tags | no (not declared) |
| GeneratePress | - | no |
| Gutenberg | - | no |
| Kadence | Dynamic Content | no (not declared) |
| OceanWP | - | no |
| Visual Composer | Dynamic Content | no (not declared) |
| WPBackery | - | no |
While this list may seem brief, many themes come with their own page builders. Check your theme’s documentation for guidance on displaying ACF Link fields, or refer to the universal methods outlined below for a more flexible approach.
5. Code snippets for the ACF Link field
ACF functions and their responses are essentially wrappers around built-in WordPress features. This means that to load and display field values, you need to be familiar not only with ACF but also with core WordPress classes and functions. Additionally, writing markup from scratch and manually escaping data can be time-consuming.
To streamline development, you can use the Advanced Views Framework. This WordPress framework offers smart templates for the front end, simplifying post queries and template creation. It generates default markup and automatically loads the escaped data into the template, allowing you to focus on the layout itself.
Unlike drag-and-drop page builders, smart templates in Advanced Views are modular and based on a template engine (Twig or Blade), providing full control over the markup and helping you avoid the pitfalls of global CSS and JavaScript files. The framework natively supports all ACF field types, along with other data sources.
Below are examples for both Advanced Views and custom code:
5.1) Loading and displaying the value
The most straight way is to turn the link data into an anchor tag (<a>):

Using Advanced Views Framework
- Navigate to the Views section and create a new View.
- Select the Link field in the Fields tab.
- Save the Layout; a template will be automatically generated. You can copy and modify this template as needed.
- To integrate it into your page, paste the generated shortcode or use the Custom Gutenberg block option.
AVF comes with built-in data binding, which means the framework will load the link data into the template automatically and will handle the Return format for you. After you've created Layout and added the target link field, you can modify the default generated template as needed:
{% if link.value %}
    <a target="{{ link.target }}" href="{{ link.value }}">
        {{ link.linkLabel|default(link.title) }}
    </a>
{% endif %}
You can control the target link attribute in the Layout settings, or define it directly in the template.
Loading from different locations: To load a field from different locations (e.g., user profile), use the object-id shortcode argument.
Using custom code
To get the chosen File data, you need to use the ACF get_field() function. The return value depends on the field’s Return Format settings. Don't forget about security and escape the output, as shown below:
Array return format (default):
// don't forget to replace 'link' with your field name
$linkData = get_field('link');

if ($linkData) {
    // if the 'target' is presented, it's a bool. We've to convert it into the HTML format
    $target = isset($linkData['target']) && $linkData['target'] ?
        '_blank' :
        '_self';
    // displays the link. Each %s in the string will be replaced with the related argument
    printf("<a href='%s' target='%s'>%s</a>",
        esc_url($linkData['url']),
        esc_html($target),
        esc_attr($linkData['title']));
}
Url return format:
Try to avoid this return format, as it doesn't allow you to get either title or target attribute value.
// don't forget to replace 'link' with your field name
$linkUrl = get_field('link');

if ($linkUrl) {
    // displays the link. Each %s in the string will be replaced with the related argument
    printf("<a href='%s' target='_blank'>Read more</a>",
        esc_url($linkUrl));
}
5.2) Displaying the image link
Another effective method to display a link is wrapping the image in a clickable link. This technique provides a visual representation of the link, allowing readers to click on the image to open a specified URL.
Tip: In most cases, you'll want to wrap the image selected from the ACF Image field directly on the page where it's being used. However, if you need a global image that links to the same URL across all custom post-type items, consider adding the Image field to the ACF Options page. This way, you can manage a single image that is accessible site-wide, ensuring consistency across your site.
Using Advanced Views Framework
Make sure both image and file fields are added to the target View, and amend the template to put the img tag inside the tag, as shown below:
{% if link.value and image.value %}
    <a target="{{ link.target }}"
       href="{{ link.value }}">
        <img src="{{ image.value }}" width="{{ image.width }}" height="{{ image.height }}" alt="{{ image.alt }}" decoding="{{ image.decoding }}" loading="{{ image.loading }}" srcset="{{ image.srcset }}" sizes="{{ image.sizes }}">
    </a>
{% endif %}
Using get_field() function
// don't forget to replace these with your field names
$linkData  = get_field( 'link' );
$imageData = get_field( 'image' );

if ( $linkData && $imageData ) {
	printf( "<a href='%s' target='_blank'>",
		esc_attr( $linkData['url'] )
	);
	echo wp_get_attachment_image( $imageData['ID'], 'medium', false, [
		'class' => 'my-image',
	] );
	echo "</a>";
}
5.3) Displaying the link preview
Whether the link field points out on the external or internal URL, you can display it directly on the page using the <iframe> element:
Using Advanced Views Framework
<iframe src="{{ link.value }}" width="100%" height="600px"></iframe>Using get_field() function
// Don't forget to replace 'link' with your field name
$linkData = get_field('link');
if ($linkData) {
    // Display the file using the <iframe> element
    printf(
        "<iframe src='%s' width='100%' height='600px'></iframe>",
        esc_url($linkData['url']) // URL of the link
    );
}
5.4) Updating the link field programmatically
To update the Link field programmatically, you can use the ACF update_field function. Since this field stores items in the array, the data you pass must be an array with specific keys.
add_action('acf/init', function() {
    // Define the link data
    $link_data = array(
        'url'    => 'https://example.com', // Replace with the desired URL
        'title'  => 'Example Link',        // Replace with the desired link title
        'target' => '_blank'               // Replace with the desired target (e.g., '_self', '_blank')
    );

    // Update the Link field
    update_field('my_link_field', $link_data, 1); // Replace 'my_link_field' with your Link field key, and 1 with the target post ID
});
If you need to update the Link field on a user or term object, you must add the appropriate prefix, just as shown in the "loading" field value section.
Note: You should call the update_field function inside the acf/init action, or in any hooks that happen later.
6. Querying by the ACF Link field
When working with the ACF Link field, you might need to find items with a specific URL (or domain) inside the field. Unlike displaying the link, querying items by these values can be more complex due to varying storage locations for ACF fields.
Here’s how to handle queries depending on where the Link field values are stored:
6.1) By postmeta (Post, Page, Any CPT)
Using Advanced Views Framework:
If you're using the AVF: Pro edition, querying by ACF File field values is straightforward with Meta Queries. You need to create a Card, choose the target Link field in the Meta Fields tab, and define the desired value. It can be a static id or pointer to another field. Then the framework will take care of the rest.
Using WP_Query
For custom queries, you can use the built-in WP_Query class:
$args = array(
    'post_type' => 'post', // Replace with your custom post type if needed
    'post_status' => 'publish',
    'posts_per_page' => -1, // Retrieve all posts
    'meta_query' => array(
        array(
            'key'     => 'your_link_field', // Replace with your ACF Link field key
            'value'   => 'targetdomain.com', // Target domain or URL
            // using 'like' instead of '=', as the field value contains a string of the serialized array
            'compare' => 'LIKE',
        )
    )
);

// Execute the query
$query = new WP_Query($args);

// Loop through the results
foreach($query->get_posts() as $post) {
    // Process each WP_Post object here
    // For example, display the post title
    echo '<h2>' . get_the_title($post->ID) . '</h2>';
}
6.2) By termmeta (Terms)
Here we need to employ the WP_Term_Query class:
$args = array(
    'taxonomy'   => 'category', // Replace with your taxonomy
    'meta_query' => array(
        array(
            'key'     => 'your_link_field', // Replace with your custom field key
            'value'   => 'targetdomain.com', // Target domain or URL
            // using 'like' instead of '=', as the field value contains a string of the serialized array
            'compare' => 'LIKE',
        )
    )
);

// Execute the query
$term_query = new WP_Term_Query($args);

// Loop through the results
foreach ($term_query->get_terms() as $term) {
    // Process each WP_Term object
    // Example: echo $term->name;
}
6.3) By usermeta (user profile)
In this case, we need to use the WP_User_Query class:
$args = array(
    'meta_query' => array(
        array(
            'key'     => 'your_link_field', // Replace with your custom field key
            'value'   => 'targetdomain.com', // Target domain or URL
            // using 'like' instead of '=', as the field value contains a string of the serialized array
            'compare' => 'LIKE',
        )
    )
);

$user_query = new WP_User_Query($args);

// Loop through the results
foreach ($user_query->get_results() as $user) {
    // Process each WP_User object
    // Example: echo $user->user_login;
}
6.4) Inside ACF Blocks
ACF Blocks save their data as JSON in the post_content. This data cannot be queried directly. However, if you enable the "Save in Meta" feature for ACF Blocks, the field values are also saved in post meta, allowing you to query them similarly to other postmeta fields.
7. Related Link field filters and hooks
ACF offers a variety of filters and hooks that enable you to modify field data and behavior, extending WordPress's core hooks functionality. You can utilize the standard add_action and add_filter functions to attach custom code to these hooks.
Below are some of the most commonly used hooks along with the ACF Link field type:
7.1) acf/load_field
The acf/load_field filter allows you to modify the field settings before it is displayed on the editor's screen. This filter is particularly useful for dynamically adjusting the field's configuration, such as setting default values, changing labels, or customizing available options.
add_filter('acf/load_field/name=my_link_field', function (array $field): array {
    // Modify the field settings as needed
    $field['instructions'] = 'Please provide a valid URL.';

    return $field;
});
7.2) acf/render_field
The acf/render_field action allows you to add custom HTML before or after a field's input on the editor's screen in the WordPress admin. This can be particularly useful for adding custom-styled text, icons, styles, or additional interactive elements to enhance the field's functionality.
// Replace field key with yours
add_action('acf/render_field/key=field_123456789abc', function (array $field): void {
    // Your custom HTML
    echo '<div class="my-custom-class">Custom field-related element</div>';
});
Note: By default, the acf/render_field action is triggered after the field input has been printed. If you need to print your HTML before the input, you should set the priority number to 9 or lower in the third argument of the add_action WordPress function.
7.3) acf/validate_value
Use the acf/validate_value filter to validate the values entered into the field. You can ensure that the entered value meets specific criteria:
add_filter('acf/validate_value/name=my_link_field', function($valid, $value, array $field) {
    if (true !== $valid) {
        return $valid; // Skip validation if there is an existing error
    }

    // Custom validation: Ensure the URL is valid
    if (!filter_var($value['url'], FILTER_VALIDATE_URL)) {
        $valid = 'Please enter a valid URL.';
    }

    return $valid;
}, 10, 3);
7.4) acf/validate_save_post
The acf/validate_save_post action allows you to perform custom form validations before saving ACF fields. This is particularly useful when you need to validate one field's value based on another field's input or enforce specific rules across multiple fields.
add_action('acf/validate_save_post', function () {
    // Get the link field values from ACF fields
    $link_1 = $_POST['acf']['field_link_id_1'] ?? [];
    $link_2 = $_POST['acf']['field_link_id_2'] ?? [];

    if (empty($link_1) || empty($link_2)) {
        return;
    }

    // Check if the URLs are the same
    if ($link_1['url'] !== $link_2['url']) {
        // Add a validation error if the URLs do not match
        acf_add_validation_error('field_link_id_1', 'The URLs must match.');
        acf_add_validation_error('field_link_id_2', 'The URLs must match.');
    }
});
Tip: To find the field key, navigate to the ACF field group in the WordPress admin. Click on the Screen Options button at the top right corner of the page, then check the Field Keys option. Once enabled, the field keys will be displayed next to each field name in the group.
7.5) acf/save_post
The acf/save_post action is triggered when the current item (page/product/user) is saved. You can use it to perform any additional actions, e.g. updating related data.
add_action('acf/save_post', function ($post_id) {
    // Retrieve the link field value (replace with your actual link field key)
    $link = get_field('project_link', $post_id); // Field key for link

    if (!$link) {
        return;
    }

    // Fetch the current related links
    $related_links = get_field('related_links', $post_id);

    // If there are no related links, initialize as an array
    if (!$related_links) {
        $related_links = [];
    }

    // Add the current link URL to the related links array
    $related_links[] = $link['url'];

    // Update the related links field with the new array
    update_field('related_links', $related_links, $post_id);
});
Thank you for reading! to our monthly newsletter to stay updated on the latest WordPress news and useful tips.

Stuck with development or facing an issue?
WPLake offers affordable on-demand website development and design.
No matter the size of your project - contact us now, and we'll get it done for you!
Frequently Asked Questions Test Your Knowledge
FAQ mode
/
Learning mode
- What is the difference between Link and URL fields in ACF?
The Link field is more flexible, supporting both external and internal links, and allows for additional attributes like title and target. The URL field, on the other hand, is simpler, capturing only external URLs without extra attributes, making it faster to use when you don't need those additional options.
- What is the difference between Link and Page Link fields in ACF?
The Link field requires manual URL input and is suitable for both external and internal links. The Page Link field is designed specifically for internal links, allowing you to select posts, pages, or custom post types directly from your WordPress site, making it quicker and more reliable for internal linking.
Related articles

Content links (68)
About the Author