ACF File Field: Complete Guide with Code Snippets

Key Points at a Glance
- The ACF File field enables users to select files from WordPress Media Library which supports all file types such as documents along with videos and images.
- The File field serves multiple purposes that involve product specification documents and user portfolios alongside event brochures and taxonomy documentation.
- The duplicate file detection system is absent from WordPress. Create descriptive file names before checking for duplicate files in your current collection.
- The acf/upload_prefilter hook enables you to define unique upload directories for ACF fields based on their specifications.
- You can customize file display by creating direct download or view links and by embedding video files with an HTML video player, or PDFs with an iframe. Also, you can wrap images in links for easy viewing or downloading.
Table of Contents
Within the Advanced Custom Fields plugin, ACF File operates as a field type which belongs to the Content group. Files within the WordPress Media Library become available for attachment through this field type. This field type recognizes all file types found within the Media Library for both documents, together with videos and images.
ACF File Field UI

ACF File field-related addons
ACF addons serve as essential workflow tools with several additions suited for the ACF File field that improve productivity:
- ACF Dropzone equips the Advanced Custom Fields file upload capabilities with resourceful drag-and-drop functionality.
- ACF Quick Edit Fields elevates WordPress administration because it adds Quick Edit capabilities to Advanced Custom Fields. Users can view and edit ACF field values through the list views by using this plugin.
- ACF Tooltip offers an enhanced user experience by managing and displaying pop-up tips for lengthy instructions of ACF fields. ACF Tooltip improves usability through its tooltip function that adds tooltips to field labels so the edit screen stays uncluttered and organized.
- WPGraphQL for ACF gives developers the ability to present both ACF fields and field groups to GraphQL so users can question ACF data through their GraphQL query processes.
File fields in other meta-field plugins
Developers searching for ACF alternatives will find the ACF File field comparable to the File Advanced field from Meta Box plugin and Upload Multiple field from Pods plugin. Our comparison of the best meta field plugins discusses vendor distinctions in detail.
1. ACF File field essentials
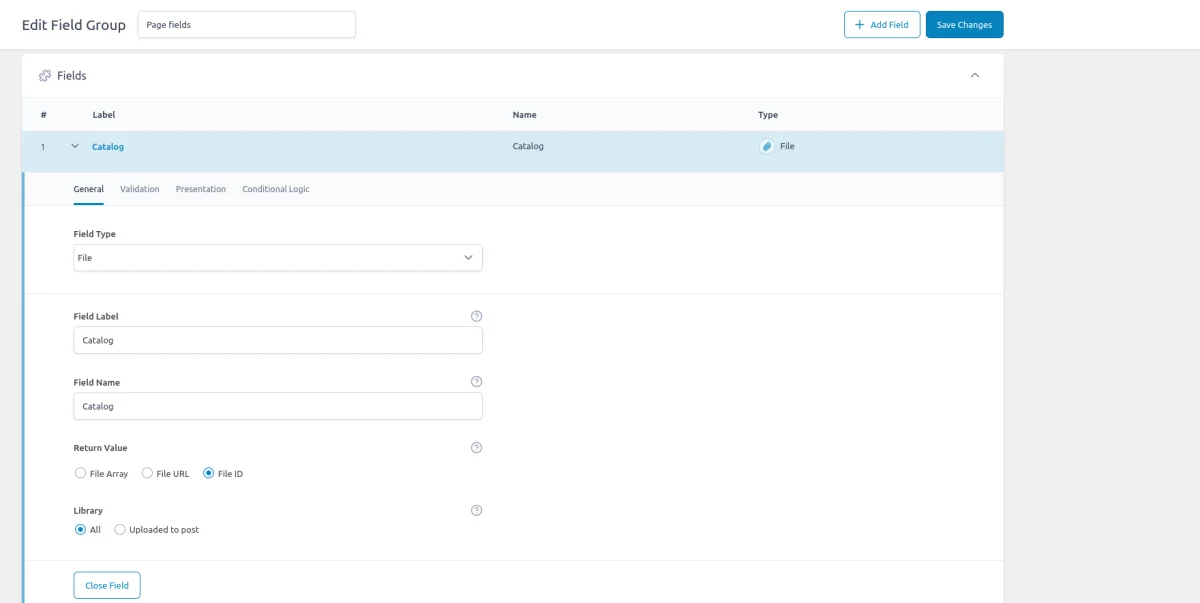
1.1) Field settings
General Tab
- Return Format
This setting determines what data will be returned when the file is retrieved using the ACF get_field() function.
File Array: Returns an array of file data, including the URL, title, mime type, and more.
File URL: Returns only the URL of the file.
File ID: Returns the attachment ID of the file, which can be useful for further processing. - Library
Specifies which files can be selected when using the field.
All: Allows access to all files in the WordPress Media Library.
Uploaded to Post: Restricts the selection to only those files uploaded directly to the current post.
Validation tab
- Minimum size
Sets the minimum file size allowed for upload in MB. - Maximum size
Sets the maximum file size allowed for upload in MB. - Allowed File Types
Specifies which file types can be uploaded through the File field.
You can restrict uploads to specific file types, such as PDFs, DOCX, etc., to ensure that only the desired file formats are used.
1.2) Storage format and supported field locations
The ACF File field stores the ID of the selected attachment in the database. This ID references the attachment stored in the WordPress Media Library. In WordPress, attachments - including files, images, and videos - are treated as a post type, similar to pages, products, and other content types.
When you upload a file to the Media Library, WordPress stores it as a post in the wp_posts table. The ID associated with each attachment in the ACF File field is actually the post ID of the corresponding attachment.
Whether the file is used in posts, pages, custom post types, or within ACF fields, WordPress uses this attachment ID to reference the file's metadata, including its URL, type, size, and more.
Note: An entry in the wp_posts table doesn’t store the actual attachment file. Instead, it stores the file’s metadata. The physical file itself is stored in the /wp-content/uploads/ directory of your WordPress installation.
Supported field locations
You can use the ACF File field in various locations, and it consistently stores the attachment IDs regardless of where you apply the field:
- Post Objects (Post, Page, Media Attachment, CPT Item, WooCommerce Product):
All content types, including pages, media attachments, and custom post types, are stored in the wp_posts table. The attachment IDs from the ACF File field are stored in the wp_postmeta table, associated with the relevant post or custom post type item. - Options Page:
The File field can be used on an ACF Options Page, storing the attachment IDs in the wp_options table. This makes the selected files accessible as a global site-wide setting, useful for elements like downloadable resources or site-wide media. - User Profiles:
When the File field is added to user profiles, the selected attachment IDs are stored in the wp_usermeta table, linked to the corresponding user. This is particularly useful for user-specific documents, certificates, or profile pictures. - Terms (e.g., Post Categories):
The File field can be attached to terms, such as post categories, tags, or custom taxonomies. In this case, the attachment IDs are stored in the wp_termmeta table, connected to the specific term. This can be useful for attaching documents or files specific to a category or taxonomy. - ACF Gutenberg Block:
The File field can be added to custom ACF blocks. When used within an ACF Block, the attachment IDs are stored within the post_content as part of the block's JSON data structure in the wp_posts table, making it part of the block's content.
1.3) Return value formats
The Return Value setting determines how the attachments are returned when using the ACF get_field() function.
Here’s a breakdown of the options:
- Array
Returns an associative array containing the file's URL, ID, and other details like the title and MIME type. This format is best suited when you need access to multiple pieces of information about the file. See the code snippet below for the full list of array keys. - URL
Returns only the direct URL to the file as a string. This format is ideal when you need a simple link to display or download the file without any additional metadata. - ID
Returns the attachment ID of the file as an integer. This format is useful when you need to reference the file for further processing or retrieval of additional data later.
Array keys:
$file = [
    'ID' => 123,                   // int: The attachment ID
    'url' => 'https://example.com/file.pdf', // string: The file's URL
    'title' => 'Sample File',      // string: The file's title
    'filename' => 'file.pdf',      // string: The file's name
    'filesize' => 204800,          // int: The file's size in bytes
    'link' => 'https://example.com/file.pdf', // string: The file's permalink
    'alt' => 'An example file',    // string: Alternative text for the file
    'author' => 1,                 // int: ID of the file's author
    'description' => 'This is a sample file.', // string: File description
    'caption' => 'File caption',   // string: File caption
    'name' => 'file',              // string: The name (slug) of the file
    'status' => 'inherit',         // string: Post status (usually 'inherit' for attachments)
    'uploaded_to' => 456,          // int: ID of the post the file was uploaded to
    'date' => '2024-08-26 12:34:56', // string: The upload date
    'modified' => '2024-08-26 12:35:56', // string: The date the file was last modified
    'menu_order' => 0,             // int: Order within a menu
    'mime_type' => 'application/pdf', // string: MIME type of the file
    'type' => 'application',       // string: General type of the file
    'subtype' => 'pdf',            // string: Specific subtype of the file
    'icon' => 'https://example.com/icon.png', // string: URL to the icon representing the file
    'width' => 0,                  // int: Width of the file (if applicable, e.g., for images)
    'height' => 0,                 // int: Height of the file (if applicable)
    'sizes' => [                   // array: Different sizes of the file (if an image)
        'thumbnail' => 'https://example.com/file-thumbnail.jpg',
        'medium' => 'https://example.com/file-medium.jpg',
        'large' => 'https://example.com/file-large.jpg',
    ],
];
1.4) Alternative field types
The File field is a versatile option for managing attachments of any type. However, if your goal is to handle images specifically, using the ACF Image field is preferable. It provides an image preview, making it easier to visualize and select images.
The File field is designed to handle a single attachment per field. If you need to manage multiple items, consider using the ACF Gallery field or the ACF Repeater field.
The ACF Gallery field allows you to manage and display multiple images (or other attachments) with preview functionality, while the ACF Repeater field provides flexibility for managing various types of fields in a repeatable structure.
2. Use cases of the ACF File field
Here are some practical use cases to help you leverage the ACF File field effectively in different scenarios.
- Product Specifications/Details for WooCommerce Products
Using the File field, you can attach detailed product specifications, technical sheets, or user manuals directly to WooCommerce product pages. For instance, you can add a PDF with comprehensive specs to a high-tech gadget product. This file provides customers with essential information, such as technical details or installation instructions, directly on the product page. - User-Related Portfolio/Bio
Using the ACF File field, you can allow users to upload and manage portfolio items or biographical documents associated with their profiles. For example, on a freelance portfolio site, users can upload their resumes or portfolio PDFs, which are then showcased on their profile pages. - Related Brochure for Custom Post Type Items (e.g., Events)
With the file field, you can attach promotional brochures or detailed documents to custom post types, such as events or conferences. For example, you might attach a brochure PDF to an event post, such as a conference or workshop. This brochure could include schedules, speaker information, and venue details, ensuring attendees have all the necessary information. - Taxonomy-Related Usage
By attaching the file field to taxonomy terms like categories, or custom taxonomies you can provide additional resources or information related to those terms. For example, you could add a guideline PDF to a custom taxonomy term like “Industry Standards” or “Certification Levels” in a knowledge base or educational site. This setup allows users to download relevant resources directly related to specific categories or tags.
3. Duplicates and ACF File field
When you upload a new attachment to your Media Library, WordPress doesn’t automatically check for duplicates. As a result, even if you upload a file that already exists, a new attachment entry will be created.
To avoid accumulating duplicate attachments, consider the following steps:
- Use clear filenames: Choose descriptive names for your files to prevent confusion and duplicate entries.
- Search before uploading: Always check your Media Library to see if the file already exists before uploading it again.
Neglecting these practices can lead to unnecessary storage usage and management challenges.
Furthermore, removing an attachment from an ACF File field does not delete the file from your WordPress Media Library. The file will remain in the Media Library even if it is no longer associated with any posts or pages.
4. ACF File field support in Themes and Builders
ACF is one of the most popular WordPress plugins, and it's supported by many page builders right out of the box. However, most of these integrations are basic, providing limited control over layout or lacking support for advanced field types like Gallery or Repeater.
To achieve universal compatibility with any theme and page builder while gaining advanced control over your layout, consider using the Advanced Views Framework or custom code snippets as discussed in the following chapter.
Here's a snapshot of the built-in features offered by some of the most popular WordPress themes and page builders for displaying ACF File fields:
| Theme/Builder | ACF-related feature | ACF File type support |
|---|---|---|
| Astra | - | no |
| Avada | Dynamic Content | no (not declared) |
| Beaver | ACF Module | yes |
| Bricks | Dynamic data | no (not declared) |
| Divi | ACF Module | no (not declared) |
| Elementor | Dynamic Tags | no (not declared) |
| GeneratePress | - | no |
| Gutenberg | - | no |
| Kadence | Dynamic Content | no (not declared) |
| OceanWP | - | no |
| Visual Composer | Dynamic Content | no (not declared) |
| WPBackery | - | no |
While this list may seem brief, many themes come with their own page builders. Check your theme’s documentation for guidance on displaying ACF File fields, or refer to the universal methods outlined below for a more flexible approach.
5. Code snippets for the ACF File field
ACF functions and their responses are essentially wrappers around built-in WordPress features. This means that to load and display field values, you need to be familiar not only with ACF but also with core WordPress classes and functions. Additionally, writing markup from scratch and manually escaping data can be time-consuming.
To streamline development, you can use the Advanced Views Framework. This WordPress framework offers smart templates for the front end, simplifying post queries and template creation. It generates default markup and automatically loads the escaped data into the template, allowing you to focus on the layout itself.
Unlike drag-and-drop page builders, smart templates in Advanced Views are modular and based on a template engine (Twig or Blade), providing full control over the markup and helping you avoid the pitfalls of global CSS and JavaScript files. The framework natively supports all ACF field types, along with other data sources.
Below are examples for both Advanced Views and custom code:
5.1) Loading and displaying the value
The most universal and traditional method for displaying an attachment is to create a direct link to view it. Using the target link attribute you can control whether it's open in the current or new tab.

Using Advanced Views Framework
- Navigate to the Views section and create a new View.
- Select the File field in the Fields tab.
- Save the Layout; a template will be automatically generated. You can copy and modify this template as needed.
- To integrate it into your page, paste the generated shortcode or use the Custom Gutenberg block option.
AVF comes with built-in data binding, which means the framework will load the file data into the template automatically and will handle the Return format for you. You can modify the default generated template as needed:
{% if file.value %}
    <a target="{{ file.target }}"
       href="{{ file.value }}">
        {{ file.linkLabel|default(file.title) }}
    </a>
{% endif %}
You can control the target link attribute in the field settings, or define it directly in the template.
Loading from different locations: To load a field from different locations (e.g., user profile), use the object-id shortcode argument.
Using get_field() function
To get the chosen File data, you need to use the ACF get_field() function. The return value depends on the field’s Return Format settings. Don't forget about security and escape the output as shown below:
Array return format:
// don't forget to replace 'file' with your field name
$fileData = get_field('file');
if ($fileData) {
    // displays the file. Each %s in the string will be replaced with the related argument
    printf("<a href='%s' target='_blank'>%s</a>",
     esc_attr($fileData['url']), esc_html($fileData['filename']));
}
Url return format:
Try to avoid this format, as it doesn't allow us to get any file information, even its name.
// don't forget to replace 'file' with your field name
$fileUrl = get_field('file');
if ($fileUrl) {
    // displays the file. Each %s in the string will be replaced with the related argument
    printf("<a href='%s' target='_blank'>Prices.pdf</a>", esc_attr($fileUrl));
}
ID return format:
In this case we need to use the wp_get_attachment_url and get_post WordPress functions to get the link data.
// don't forget to replace 'file' with your field name
$fileID = get_field('file');
if ($fileID) {
   // $fileID is an ID (integer) of a Post with the Attachment type.
   // we need to use the built-in WP functions to get necessary data
    $url = wp_get_attachment_url($fileID);
    $name = get_post($fileID)->post_title ?? '';
    // displays the file. Each %s in the string will be replaced with the related argument
    printf("<a href='%s' target='_blank'>%s</a>", esc_attr($url), esc_html($name));
}
5.2) Displaying the download attachment link
Regardless of the target link attribute, the default behavior for links to files is to open the file in the browser if the file type is supported (such as PDFs). However, in some cases, you might want to create a 'download' link that triggers an immediate download of the file instead of opening it in the browser.
To achieve this, you need to use the download attribute in the link.
The download link attribute can either be empty, which simply enables the download functionality, or it can contain a string value that specifies the filename under which the file will be saved on the user's device. This is particularly useful when the default file names are technical or not very descriptive.
Using Advanced Views Framework
{% if file.value %}
    <a target="{{ file.target }}"
       href="{{ file.value }}" download='{{ file.title }}'>
        {{ file.linkLabel|default(file.title) }}
    </a>
{% endif %}
Using the get_field() function
// don't forget to replace 'file' with your field name
$fileData = get_field('file');
if ($fileData) {
    // displays the file. Each %s in the string will be replaced with the related argument
    printf("<a href='%s' target='_blank' download='%s'>%s</a>",
     esc_attr($fileData['url']), esc_html($fileData['filename']), esc_html($fileData['filename']));
}
5.3) Displaying the image link
Another way to display an attachment link is by wrapping the image in a link. This well-known technique provides a visual representation of the attachment, allowing users to click on the image to view or download the file.
Tip: In most cases, you'll want to wrap the selected image from the ACF Image field on the same page. However, if you need a global image to be used across all custom post-type items, you can add the Image field to the ACF Options page. This approach allows you to manage a single image that is accessible site-wide.
Using Advanced Views Framework
Make sure both image and file fields are added to the target View, and amend the template to put the img tag inside the tag, as shown below:
{% if file.value and image.value %}
    <a target="{{ file.target }}"
       href="{{ file.value }}">
        <img src="{{ image.value }}" width="{{ image.width }}" height="{{ image.height }}" alt="{{ image.alt }}" decoding="{{ image.decoding }}" loading="{{ image.loading }}" srcset="{{ image.srcset }}" sizes="{{ image.sizes }}">
    </a>
{% endif %}
Using get_field() function
// don't forget to replace these with your field names
$fileData  = get_field( 'file' );
$imageData = get_field( 'image' );

if ( $fileData && $imageData ) {
	printf( "<a href='%s' target='_blank'>",
		esc_attr( $fileData['url'] )
	);
	echo wp_get_attachment_image( $imageData['ID'], 'medium', false, [
		'class' => 'my-image',
	] );
	echo "</a>";
}
5.4) Displaying the video attachment
If the File field is used for video attachments, you can display the selected video on the page using the HTML <video> element:
Using Advanced Views Framework
Amend the default file markup in the target View's template, to add the video tag:
<video controls>
    <source src="{{ file.value }}" type="video/mp4">
</video>
Using get_field() function
// Don't forget to replace 'file' with your field name
$fileData = get_field( 'file' );
if ( $fileData ) {
	// Display the video using the <video> element
	printf(
		"<video controls>
            <source src='%s' type='video/mp4'>
        </video>",
		esc_url( $fileData['url'] ) // URL of the video file
	);
}
5.5) Displaying the file attachment preview
In case the File field contains a browser-supported file, such as a PDF, you can display the file directly on the page using the <iframe> element:
Using Advanced Views Framework
<iframe src="{{ file.value }}" width="100%" height="600px"></iframe>Using get_field() function
// Don't forget to replace 'file' with your field name
$fileData = get_field('file');
if ($fileData) {
    // Display the file using the <iframe> element
    printf(
        "<iframe src='%s' width='100%%' height='600px'></iframe>",
        esc_url($fileData['url']) // URL of the file
    );
}
5.6) Setting up a field-specific uploads directory
By default, all attachments are saved in the /wp-content/uploads/ folder, following the year/month structure. For instance, a file uploaded in August 2024 will be stored in /wp-content/uploads/2024/08/.
In some cases, it’s beneficial to define a specific folder for certain attachments, organizing them by topic rather than by date. While WordPress allows you to change the uploads folder using the upload_dir hook, this change applies to all uploads, including those unrelated to ACF.
Fortunately, there’s a simple solution: you can wrap the upload_dir hook within the acf/upload_prefilter hook. This code changes the custom uploads folder only for attachments that editors upload via a specific ACF field.
The code example below changes the uploads dir folder for the attachments uploaded via a file field with the file name to the /wp-content/uploads/user-attachments:
// https://www.advancedcustomfields.com/resources/acf-upload_prefilter/
add_filter( 'acf/upload_prefilter/name=file', function ( array $errors, array $file, array $field ): array {
	// https://developer.wordpress.org/reference/hooks/upload_dir/
	add_filter( 'upload_dir', function ( array $uploads ): array {
		$dir             = '/user-attachments';
		$uploads['url']  = $uploads['baseurl'] . $dir;
		$uploads['path'] = $uploads['basedir'] . $dir;

		return $uploads;
	} );

	return $errors;
}, 10, 3 );
By changing the file name and target dir, you can fine-tune this snippet to your case. After that, you can add the code to your theme's functions.php.
5.7) Updating the file field programmatically
To update the File field programmatically, you can use the ACF update_field function. Since this field stores the attachment ID, the data you pass must be an attachment ID.
add_action('acf/init', function() {
    update_field('my_file_field', 123, 1); // Replace 123 with the attachment ID, and 1 with the target post id
});
If you need to update the File field on a user or term object, you must add the appropriate prefix, just as shown in the "loading" field value section.
Note: You should call the update_field function inside the acf/init action, or in any hooks that happen later.
6. Querying by the ACF File field
When working with the ACF File field, you might need to find items with a specific attachment. Unlike displaying the file, querying items by these values can be more complex due to varying storage locations for ACF fields.
Here’s how to handle queries depending on where the File field values are stored:
6.1) By postmeta (Post, Page, Any CPT)
Using Advanced Views Framework:
If you're using the AVF: Pro edition, querying by ACF File field values is straightforward with Meta Queries. You need to create a Card, choose the target File field in the Meta Fields tab, and define the desired value. It can be a static id or pointer to another field. Then the framework will take care of the rest.
Using WP_Query
For custom queries, you can use the built-in WP_Query class:
$args = array(
    'post_type' => 'post', // Replace with your custom post type if needed
    'post_status' => 'publish',
    'posts_per_page' => -1, // Retrieve all posts
    'meta_query' => array(
        array(
            'key'     => 'your_file_field', // Replace with your ACF File field key
            'value'   => '10', // Target attachment ID as a string
        )
    )
);

// Execute the query
$query = new WP_Query($args);

// Loop through the results
foreach($query->get_posts() as $post) {
    // Process each WP_Post object here
    // For example, display the post title
    echo '<h2>' . get_the_title($post->ID) . '</h2>';
}
6.2) By termmeta (Terms)
Here we need to employ the WP_Term_Query class:
$args = array(
    'taxonomy'   => 'category', // Replace with your taxonomy
    'meta_query' => array(
        array(
            'key'     => 'your_file_field', // Replace with your custom field key
            'value'   => '10', // Target attachment ID as a string
        )
    )
);

// Execute the query
$term_query = new WP_Term_Query($args);

// Loop through the results
foreach ($term_query->get_terms() as $term) {
    // Process each WP_Term object
    // Example: echo $term->name;
}
6.3) By usermeta (user profile)
In this case, we need to use the WP_User_Query class:
$args = array(
    'meta_query' => array(
        array(
            'key'     => 'your_file_field', // Replace with your custom field key
            'value'   => '10', // Target attachment ID as a string
        )
    )
);

$user_query = new WP_User_Query($args);

// Loop through the results
foreach ($user_query->get_results() as $user) {
    // Process each WP_User object
    // Example: echo $user->user_login;
}
6.4) Inside ACF Blocks
ACF Blocks save their data as JSON in the post_content. This data cannot be queried directly. However, if you enable the "Save in Meta" feature for ACF Blocks, the field values are also saved in post meta, allowing you to query them similarly to other postmeta fields.
7. Related File field filters and hooks
ACF offers a variety of filters and hooks that enable you to modify field data and behavior, extending WordPress's core hooks functionality. You can utilize the standard add_action and add_filter functions to attach custom code to these hooks.
Below are some of the most commonly used hooks along with the ACF File field type:
7.1) acf/upload_prefilter
The acf/upload_prefilter allows you to perform custom validation on an attachment. For example, with the File field, you can use this filter to set up a field-specific upload directory, as demonstrated earlier:
// https://www.advancedcustomfields.com/resources/acf-upload_prefilter/
add_filter( 'acf/upload_prefilter/name=file', function ( array $errors, array $file, array $field ): array {
	// https://developer.wordpress.org/reference/hooks/upload_dir/
	add_filter( 'upload_dir', function ( array $uploads ): array {
		$dir             = '/user-attachments';
		$uploads['url']  = $uploads['baseurl'] . $dir;
		$uploads['path'] = $uploads['basedir'] . $dir;

		return $uploads;
	} );

	return $errors;
}, 10, 3 );
7.2) acf/load_field
The acf/load_field filter allows you to modify the field settings before it is displayed on the editor's screen. This filter is particularly useful for dynamically adjusting the field's configuration, such as setting default values, changing labels, or customizing available options.
add_filter('acf/load_field/name=my_file_field', function (array $field): array {
    // Define allowed file types
    $allowed_types = ['pdf', 'docx'];

    // Modify the field to only allow the specified file types
    $field['library'] = 'all'; // Allow files from the entire library (or set to 'uploadedTo' for only files attached to the current post)

    // Restrict the field to specific file types
    if (!empty($allowed_types)) {
        $field['mime_types'] = implode(',', $allowed_types);
    }

    return $field;
});
7.3) acf/render_field
The acf/render_field action allows you to add custom HTML before or after a field's input on the editor's screen in the WordPress admin. This can be particularly useful for adding custom-styled text, icons, styles, or additional interactive elements to enhance the field's functionality.
// todo replace field key with yours
add_action('acf/render_field/key=field_123456789abc', function (array $field):void {
	// todo your custom HTML
	echo '<div class="my-custom-class">Custom field-related element</div>';
});
Note: By default, the acf/render_field action is triggered after the field input has been printed. If you need to print your HTML before the input, you should set the priority number to 9 or lower in the third argument of the add_action WordPress function.
7.4) acf/validate_value
Use the acf/validate_value filter to validate the values entered into the field. You can ensure that the entered value meets specific criteria:
add_filter('acf/validate_value/name=my_file_field', function($valid, $value, array $field) {
    if (true !== $valid) {
        return $valid; // Skip validation if there is an existing error
    }

    // todo your custom validation
    if (false === my_custom_value_validation($value)) {
        $valid = 'Invalid value selected';
    }

    return $valid;
}, 10, 3);
7.5) acf/validate_save_post
The acf/validate_save_post action allows you to perform custom form validations before saving ACF fields. This is particularly useful when you need to validate one field's value based on another field's input or enforce specific rules across multiple fields.
add_action( 'acf/validate_save_post', function () {
    // Get the uploaded file IDs from ACF fields
    $file_id_1 = $_POST['acf']['field_file_id_1'] ?? 0; // Replace with your first File field key
    $file_id_2 = $_POST['acf']['field_file_id_2'] ?? 0; // Replace with your second File field key

    if ( ! $file_id_1 || ! $file_id_2 ) {
        return;
    }

    // Get the file types
    $file_type_1 = wp_check_filetype( get_attached_file( $file_id_1 ) );
    $file_type_2 = wp_check_filetype( get_attached_file( $file_id_2 ) );

    // Check if the file extensions are the same
    if ( $file_type_1['ext'] !== $file_type_2['ext'] ) {
        // Add a validation error if the file extensions do not match
        acf_add_validation_error( 'field_file_id_1', 'The uploaded files must have the same extension.' );
        acf_add_validation_error( 'field_file_id_2', 'The uploaded files must have the same extension.' );
    }
} );
Tip: To find the field key, navigate to the ACF field group in the WordPress admin. Click on the Screen Options button at the top right corner of the page, then check the Field Keys option. Once enabled, the field keys will be displayed next to each field name in the group.
7.6) acf/save_post
The acf/save_post action is triggered when the current item (page/product/user) is saved. You can use it to perform any additional actions, e.g. updating related data.
add_action( 'acf/save_post', function ( $post_id ) {
    // Retrieve the file field value (replace with your actual file field key)
    $file_id = get_field( 'project_file', $post_id ); // Field key for file

    if ( ! $file_id ) {
        return;
    }

    // Fetch the current related posts
    $related_posts = get_field( 'related_posts', $file_id );

    // If there are no related posts, initialize as an array
    if ( ! $related_posts ) {
        $related_posts = [];
    }

    if ( true === in_array( $post_id, $related_posts, true ) ) {
        return;
    }

    // Add the current post ID to the related posts array
    $related_posts[] = $post_id;

    // Update the related posts field with the new array
    update_field( 'related_posts', $related_posts, $file_id );
} );
Thank you for reading! to our monthly newsletter to stay updated on the latest WordPress news and useful tips.

Stuck with development or facing an issue?
WPLake offers affordable on-demand website development and design.
No matter the size of your project - contact us now, and we'll get it done for you!
Frequently Asked Questions Test Your Knowledge
FAQ mode
/
Learning mode
- What file types are supported by the ACF File field?
All file types that WordPress Media Library allows function within the ACF File field. The ACF File field enables users to upload any standard WordPress media including images and videos together with files. Find the complete list of supported file extensions in the WordPress documentation. You can modify the allowed file extensions by accessing the Validation tab of the ACF File field.
- Can I automatically populate an ACF text field with the content of a file when editors upload it to the ACF File field?
Text field data can be automatically added through programming. The acf/post_save hook enables you to read uploaded files while the ACF update_field function allows you to update the target field. The text extraction process requires a specialized library when dealing with files that are not plain text documents like PDFs.
Related articles

Content links (75)
About the Author