ACF Gallery Field: Complete Guide with Code Snippets

Key Points at a Glance
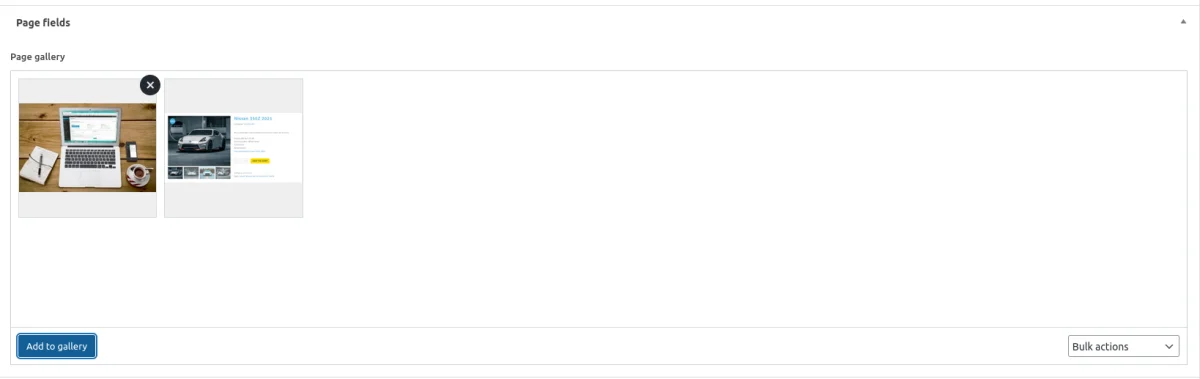
- Selection and Management: Editors can upload or select multiple attachments from the WordPress media library, including images, videos, and files. Items can be replaced or removed, but removal detaches them from the field rather than deleting them.
- Storage and Support: Selected image IDs are stored as a serialized array in the WordPress database and can be used across various field locations like posts, pages, options pages, user profiles, and custom taxonomies.
- Image Sizes: WordPress generates multiple image sizes upon upload, such as thumbnail, medium, and large, which can be customized in the Media Settings.
- Multiple Display Options: Chosen items can be displayed in various formats, including grids, masonry layouts, carousels, and sliders. Customization is available through the Advanced Views Framework or custom theme code.
- Alternative Fields: For additional features like titles and links, the ACF Repeater field may be used. For external video embeds, the ACF oEmbed field is more suitable.
Table of Contents
The ACF Gallery is a versatile field type within the Advanced Custom Fields plugin, categorized under the Content group. This field is available in the ACF Pro version and allows editors and users to upload or select multiple attachments, including images, videos, and files, directly from the WordPress media library. This flexible field works seamlessly with all content attachment types.
ACF Gallery field UI
ACF Gallery field-related addons
ACF addons can significantly enhance functionality, and there are several that can play well with the ACF Gallery field:
- ACF Photo Gallery Field: is a free alternative to ACF's built-in Gallery field, offering similar functionality.
- ACF Dropzone enhances the file upload experience in Advanced Custom Fields by enabling drag-and-drop functionality.
- ACF Quick Edit Fields enhances the WordPress admin experience by adding Quick Edit functionality to Advanced Custom Fields. This plugin allows you to quickly view and edit ACF field values directly from the list views.
- ACF Tooltip enhances the user experience by managing lengthy instruction texts in ACF fields. Instead of cluttering the edit screen, this plugin allows you to add tooltips to field labels, keeping the interface clean and space-efficient.
- WPGraphQL for ACF allows you to expose ACF fields and field groups to GraphQL, enabling seamless querying of ACF data within your GraphQL queries.
Gallery fields in other meta-field plugins
If you're looking for ACF alternatives, the ACF Gallery field is similar to the Image Advanced field in the Meta Box plugin and the Upload Multiple field in the Pods plugin. Read our comparison of the best meta field plugins to learn about the differences between vendors.
1. ACF Gallery field essentials
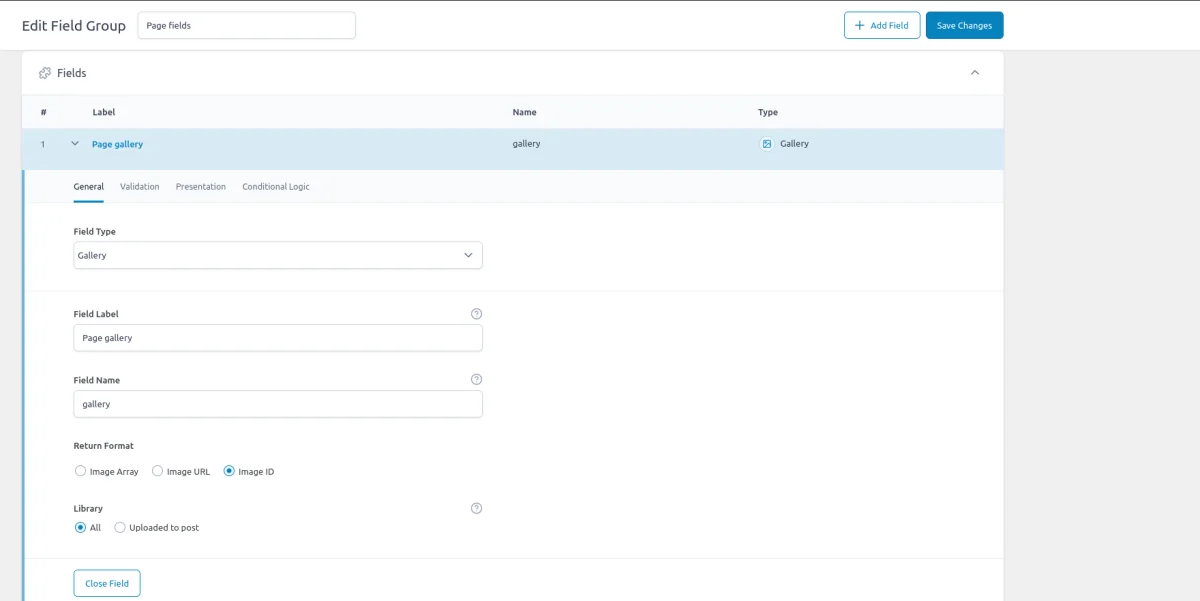
1.1) Field settings
General tab
- Return Format
This setting determines the format in which the selected images will be returned. You can choose between returning an array of image data or an array of image URLs. This allows developers to decide how they want to handle the images in their custom theme or plugin. - Library
This option specifies which images can be selected from the WordPress media library. You can either allow selection from the entire library or limit it to images uploaded to the specific post or page. This is useful for maintaining a more organized and relevant media selection process.
Validation tab
- Minimum/Maximum Selection:
These settings control how many images can be selected. The minimum selection sets the least number of images required, while the maximum selection caps the number of images that can be chosen. This is particularly useful for maintaining design consistency and ensuring that users don’t exceed layout limits.
Image Restrictions
- Minimum/Maximum Width and Height:
These settings restrict the dimensions of the images that can be selected, ensuring that only images with appropriate resolutions are used. This helps maintain visual quality and consistency across the site. - File Size:
This restriction sets the minimum and maximum file size for the images. It helps prevent users from uploading images that are either too large, which could slow down page load times, or too small, which might appear pixelated. - Allowed File Types:
This option allows you to specify which image file types can be uploaded, such as JPEG, PNG, GIF, etc. This ensures that only compatible and optimized image formats are used.
Presentation Tab:
- Preview Size:
This setting determines the size of the image previews displayed within the ACF Gallery field in the WordPress editor. You can choose from different image sizes (e.g., thumbnail, medium, large) to suit your needs, making it easier for users to review their selections before publishing.
1.2) Storage format and supported field locations
The ACF Gallery field stores a serialized array of selected image IDs in the database. These IDs are references to the images stored in the WordPress media library. In WordPress, attachments, including images, are treated as a post type, much like pages, products, and other content types.
For example, when you select multiple images using the ACF Gallery field, the serialized array might look something like this:
a:3:{i:0;i:123;i:1;i:456;i:2;i:789;}This array represents the IDs of the selected images, where each ID corresponds to an attachment in the WordPress media library.
When you upload a file to the media library, WordPress stores it as a post in the wp_posts table. The ID associated with each image in the ACF Gallery field is actually the post ID of the corresponding attachment.
Whether the image is used in posts, pages, custom post types, or within ACF fields, WordPress uses this attachment ID to reference the image's metadata, including its URL, title, alt text, and other properties.
Note: An entry in the wp_posts table doesn’t store the actual image file. Instead, it stores the image’s metadata, such as the URL, title, alt text, and other relevant properties. The physical image file itself is stored in the /wp-content/uploads/ directory of your WordPress installation.
Supported field locations
You can use the ACF Gallery field in various locations, and it consistently stores the attachment IDs regardless of where you apply the field:
- Post Objects (Post, Page, Media Attachment, CPT Item, WooCommerce Product):
All content types, including pages, media attachments, and custom post types, are stored in the wp_posts table. The attachment IDs from the ACF Gallery field are stored in the wp_postmeta table, associated with the relevant post or custom post type item. - Options Page:
The Gallery field can be used on an ACF Options Page, storing the attachment IDs in the wp_options table. This makes the chosen attachments accessible as a global site-wide setting, useful for elements like partner logos. - User Profiles:
When the Gallery field is added to user profiles, the selected attachment IDs are stored in the wp_usermeta table, linked to the corresponding user. This is particularly useful for user avatars or profile pictures. - Terms (e.g., Post Categories):
The Gallery field can be attached to terms, such as post categories, tags, or custom taxonomies. In this case, the attachment IDs is stored in the wp_termmeta table, connected to the specific term. - ACF Gutenberg Block:
The Gallery field can be added to custom ACF blocks. When used within an ACF Block, the attachment IDs are stored within the post_content as part of the block's JSON data structure in the wp_posts table, making it part of the block's content.
1.3) Return value formats
The Return Value setting determines how the attachments are returned when using the ACF get_field() function. While an array is always returned, this setting controls the format of each item within that array.
Here’s a breakdown of the options:
- Array:
Returns an array of detailed attachment data, including the URL, title, alt text, caption, and more. This is the most versatile option, ideal for scenarios where you need comprehensive information about each attachment. See the code snippet below for the full list of array keys. - Image URL:
Returns an array where each item is the direct URL of a selected attachment. This format is useful for simple attachment outputs where you don’t need additional metadata. - Image ID:
Returns an array where each item is the ID of an attachment in the WordPress media library. This option is useful if you plan to use native WordPress functions or perform additional operations with the image IDs.
Array item keys:
$file = [
    'ID' => 123,                   // int: The attachment ID
    'url' => 'https://example.com/image.png', // string: The file's URL
    'title' => 'Sample Image',     // string: The file's title
    'filename' => 'image.png',     // string: The file's name
    'filesize' => 102400,          // int: The file's size in bytes
    'link' => 'https://example.com/image.png', // string: The file's permalink
    'alt' => 'An example image',   // string: Alternative text for the file
    'author' => 1,                 // int: ID of the file's author
    'description' => 'This is a sample image.', // string: File description
    'caption' => 'Image caption',  // string: File caption
    'name' => 'image',             // string: The name (slug) of the file
    'status' => 'inherit',         // string: Post status (usually 'inherit' for attachments)
    'uploaded_to' => 456,          // int: ID of the post the file was uploaded to
    'date' => '2024-08-26 12:34:56', // string: The upload date
    'modified' => '2024-08-26 12:35:56', // string: The date the file was last modified
    'menu_order' => 0,             // int: Order within a menu
    'mime_type' => 'image/png',    // string: MIME type of the file
    'type' => 'image',             // string: General type of the file
    'subtype' => 'png',            // string: Specific subtype of the file
    'icon' => 'https://example.com/icon.png', // string: URL to the icon representing the file
    'width' => 800,                // int: Width of the image
    'height' => 600,               // int: Height of the image
    'sizes' => [                   // array: Different sizes of the file
        'thumbnail' => 'https://example.com/image-thumbnail.png',
        'medium' => 'https://example.com/image-medium.png',
        'large' => 'https://example.com/image-large.png',
    ],
];
1.4) Image sizes
When you upload a new image in WordPress via the Media Library, WordPress automatically generates several thumbnail versions of the image, each with different dimensions.
These thumbnails are scaled versions of the original image, preserving the aspect ratio to ensure that your images display correctly across various devices without compromising performance. For instance, loading a 2000x3000px image on a 300px-wide mobile screen is unnecessary and could slow down page loading times.
By default, WordPress generates the following image sizes in addition to the original:
- Thumbnail: 150px square
- Medium: Maximum width and height of 300px
- Medium_large: Maximum width and height of 768px
- Large: Maximum width and height of 1024px
You can fine-tune the default sizes in the Site Settings->Media page, as well as add more sizes (programmatically).
Even though these are different versions, they all stem from the same original image. In WordPress, each image attachment has a single image ID, and the sizes are accessed through string arguments like 'thumbnail,' 'medium,' 'medium_large,' and 'large'.
When you insert an image into a post or page using the Gutenberg editor, WordPress automatically creates an img tag with a srcset attribute. The srcset attribute helps the browser decide which image size to load based on the screen size, ensuring optimal performance and quality.
You can read more about image sizes in WordPress in this wordpress.com article.
1.5) Alternative field types
While the ACF Gallery field is versatile and suits many needs, there are scenarios where it may not be sufficient. For instance:
- Adding extra information:
If you need to include additional elements like titles and links along with your media, the ACF Repeater field is a better choice. The Repeater field allows you to create repeatable rows with various content types, such as images, files, and links, providing more flexibility in how you structure and display your content. - Embedding Videos:
The ACF Gallery field supports only videos that are uploaded to the WordPress media library, which means it can’t handle external video embeds, such as YouTube videos. For embedding videos from external sources, the ACF oEmbed field is more appropriate. If you need to include multiple embedded videos, you can use the oEmbed field within a Repeater field.
2. Use cases of the ACF Gallery field
While it's commonly used for displaying images in various layouts, such as grids, masonry, or inline galleries, its versatility extends beyond these common scenarios:
- Product Galleries:
Perfect for showcasing product images in e-commerce sites. You can display multiple views of a product, such as different angles or color options, all within a cohesive gallery layout. - Portfolio Showcases:
Ideal for portfolio websites where multiple images need to be presented in an organized and visually appealing way. Galleries can display completed projects, artwork, or design samples. - Event Galleries:
Useful for event websites to display photos from events, conferences, or parties. This helps in visually documenting the event and engaging visitors with rich media content. - Testimonials and Case Studies:
Enhances testimonials or case studies by including images relevant to the feedback or project. For instance, before-and-after photos or images highlighting the client’s experience. - Team Member Profiles:
Can be used to show a grid of team member photos, allowing for a clean, professional presentation of the people behind a company. - Real Estate Listings:
Effective for real estate sites where you need to showcase property photos, including interior shots, exterior views, and special features. - Travel Blogs:
Great for travel blogs to present photo galleries of destinations, experiences, or trips, making the content more engaging and visually appealing.
3. Duplicates and ACF Gallery field
When you upload a new attachment to WordPress, whether it image, file, or video, WordPress creates a new attachment entry in your Media Library. WordPress does not automatically check if the item you're uploading already exists, so even if you're uploading a duplicate, a new attachment will be created.
To prevent accumulating duplicate attachments, it's important to:
- Give clear names: Use descriptive filenames to avoid confusion.
- Search the Media Library first: Check if the attachment already exists before uploading it again.
Failing to do this can lead to increased storage usage on your web hosting account and potential management issues.
Additionally, removing an attachment from an ACF Gallery field does not delete the image from your WordPress installation. The image will remain in your Media Library even if it's no longer assigned to any posts or pages.
4. ACF Gallery field support in Themes and Builders
ACF is one of the most popular WordPress plugins, and it's supported by many page builders right out of the box. However, most of these integrations are basic, providing limited control over layout or lacking support for advanced field types like Gallery.
To achieve universal compatibility with any theme and page builder while gaining advanced control over your layout, consider using the Advanced Views Framework or custom code snippets as discussed in the following chapter.
Here's a snapshot of the built-in features offered by some of the most popular WordPress themes and page builders for displaying ACF Gallery fields:
| Theme/Builder | ACF-related feature | ACF Gallery type support |
|---|---|---|
| Astra | - | no |
| Avada | Dynamic Content | no (not declared) |
| Beaver | ACF Module | yes |
| Bricks | Dynamic data | yes |
| Divi | ACF Module | no (not declared) |
| Elementor | Dynamic Tags | no (not declared) |
| GeneratePress | - | no |
| Gutenberg | - | no |
| Kadence | Dynamic Content | no (not declared) |
| OceanWP | - | no |
| Visual Composer | Dynamic Content | no (not declared) |
| WPBackery | - | no |
While this list may seem brief, many themes come with their own page builders. Check your theme’s documentation for guidance on displaying ACF Gallery fields, or refer to the universal methods outlined below for a more flexible approach.
5. Code snippets for the ACF Gallery field
ACF functions and their responses are essentially wrappers around built-in WordPress features. This means that to load and display field values, you need to be familiar not only with ACF but also with core WordPress classes and functions. Additionally, writing markup from scratch and manually escaping data can be time-consuming.
To streamline development, you can use the Advanced Views Framework. This WordPress framework offers smart templates for the front end, simplifying post queries and template creation. It generates default markup and automatically loads the escaped data into the template, allowing you to focus on the layout itself.
Unlike drag-and-drop page builders, smart templates in Advanced Views are modular and based on a template engine (Twig or Blade), providing full control over the markup and helping you avoid the pitfalls of global CSS and JavaScript files. The framework natively supports all ACF field types, along with other data sources.
Below are examples for both Advanced Views and custom code:
5.1) Loading and displaying items
Using Advanced Views Framework
- Navigate to the Views section and create a new View.
- Select the Gallery field in the Fields tab.
- Save the Layout; a template will be automatically generated. You can copy and modify this template as needed.
- To integrate it into your page, paste the generated shortcode or use the Custom Gutenberg block option.
AVF comes with built-in data binding, which means the framework will load the gallery data into the template automatically and will handle the Return format for you. You can modify the default generated template as needed:
{% if gallery.value %}
    <div>
        {% for image_item in gallery.value %}
            <img src="{{ image_item.value }}"
                 width="{{ image_item.width }}" height="{{ image_item.height }}" alt="{{ image_item.alt }}"
                 decoding="{{ image_item.decoding }}" loading="{{ image_item.loading }}"
                 srcset="{{ image_item.srcset }}" sizes="{{ image_item.sizes }}">
        {% endfor %}
    </div>
{% endif %}
Loading from different locations: To load a field from different locations (e.g., user profile), use the object-id shortcode argument.
Using custom code
To get the Gallery field items, you need to use the ACF get_field() function. While the return value is always an array, the format of the items will depend on the field’s Return Format settings:
1. Array return format (default)
$gallery = get_field('your_gallery_field'); // from the current post
$gallery = get_field('your_gallery_field', 10); // from a specific post by ID
$gallery = get_field('your_gallery_field', 'option'); // from the options page
$gallery = get_field('your_gallery_field', 'user_1'); // from the user by ID
$gallery = get_field('your_gallery_field', 'category_2'); // from the category term with ID 2
$gallery = get_field('your_gallery_field', 'genre_3'); // from the custom genre term with ID 3

// Check if the gallery is not empty
if ($gallery) {
    foreach ($gallery as $image) {
        // Ensure $image is an array and contains the 'ID' key
        if (is_array($image) && isset($image['ID'])) {
            // Prefer the function over manual markup creation, as WordPress makes srcset and sizes attributes there for you.
            // Arguments: id, size, icon, attributes
            echo wp_get_attachment_image($image['ID'], 'medium', false, [
                'class' => 'my-image',
            ]);
        }
    }
}
2. Url return format
Try to avoid this return format, as doesn't allow us to create responsive images.
$gallery = get_field('your_gallery_field'); // from the current post
$gallery = get_field('your_gallery_field', 10); // from a specific post by ID
$gallery = get_field('your_gallery_field', 'option'); // from the options page
$gallery = get_field('your_gallery_field', 'user_1'); // from the user by ID
$gallery = get_field('your_gallery_field', 'category_2'); // from the category term with ID 2
$gallery = get_field('your_gallery_field', 'genre_3'); // from the custom genre term with ID 3

// Check if the gallery is not empty
if ($gallery) {
    foreach ($gallery as $image_url) {
        // Output each image URL directly
        printf('<img src="%s">', esc_url($image_url));
    }
}
3. ID return format
$gallery = get_field('your_gallery_field'); // from the current post
$gallery = get_field('your_gallery_field', 10); // from a specific post by ID
$gallery = get_field('your_gallery_field', 'option'); // from the options page
$gallery = get_field('your_gallery_field', 'user_1'); // from the user by ID
$gallery = get_field('your_gallery_field', 'category_2'); // from the category term with ID 2
$gallery = get_field('your_gallery_field', 'genre_3'); // from the custom genre term with ID 3

// Check if the gallery is not empty
if ($gallery) {
    foreach ($gallery as $image_id) {
        // Ensure the item is an integer ID
        if (is_numeric($image_id)) {
            // Prefer the function over manual markup creation, as WordPress makes srcset and sizes attributes there for you.
            // Arguments: id, size, icon, attributes
            echo wp_get_attachment_image($image_id, 'medium', false, [
                'class' => 'my-image',
            ]);
        }
    }
}
5.2) Displaying Gallery as a grid

The CSS grid feature is the simplest way to display Gallery items as a grid.
Using Advanced Views Framework
Open the target Layout with the Gallery field, and add the acf-view__gallery class to the gallery markup:
{% if gallery.value %}
    <div class='acf-view__gallery'>
        {% for image_item in gallery.value %}
            <img class='acf-view__image' src="{{ image_item.value }}"
                 width="{{ image_item.width }}" height="{{ image_item.height }}" alt="{{ image_item.alt }}"
                 decoding="{{ image_item.decoding }}" loading="{{ image_item.loading }}"
                 srcset="{{ image_item.srcset }}" sizes="{{ image_item.sizes }}">
        {% endfor %}
    </div>
{% endif %}
Then add the following CSS to the CSS field as shown in the AVF Gallery Docs:
#view__gallery {
 display: grid;
 grid-template-columns: 1fr;
 gap: 20px;
}

@media screen and (min-width:992px) {
 #view__gallery {
  grid-template-columns: repeat(2, 1fr);
 }
}
The CSS will automatically be enqueued on the target with this View by the framework. By adjusting the grid-template-columns and gap CSS properties you can fine-tune the grid according to your needs.
Using custom theme code
In this case, the approach will be similar, but you'll need to find the target page template and add CSS to your theme's style.css.
In the target template, add the following PHP code:
<?php

$gallery = get_field('your_gallery_field'); // from the current post

// Check if the gallery is not empty
if ($gallery) {
	echo '<div class="gallery">';
	foreach ($gallery as $image) {
		// Ensure $image is an array and contains the 'ID' key
		if (is_array($image) && isset($image['ID'])) {
			// Prefer the function over manual markup creation, as WordPress makes srcset and sizes attributes there for you.
			// Arguments: id, size, icon, attributes
			echo wp_get_attachment_image($image['ID'], 'medium', false, [
				'class' => 'gallery__image',
			]);
		}
	}
	echo '</div>';
}
Then add the CSS code to your theme's style.css:
.gallery {
 display: grid;
 grid-template-columns: 1fr;
 gap: 20px;
}

@media screen and (min-width:992px) {
.gallery {
  grid-template-columns: repeat(2, 1fr);
 }
}
As we mentioned above, by adjusting the grid-template-columns and gap CSS properties you can fine-tune the grid according to your needs.
5.3) Displaying Gallery as masonry


Masonry gallery can't be created using CSS only, so we need to employ some JS library. For this example, we'll use Macy.js for the classic masonry, and Flat masonry script from Lightsource.
Using Advanced Views Framework
AVF: Pro edition comes with a set of pre-configured Slider, Masonry, and Image gallery libraries. To convert the Gallery field into a Masonry layout, just enable this option in the Layout field settings.
The framework will automatically generate the proper markup, and JS code for the masonry instance. If it is needed, you can fine-tune the JavaScript code added by AVF for this Masonry to the View's JS code field as shown in the AVF Gallery Docs.
For this example, we used the following JS instance configuration for Macy.js:
var gallery = this.querySelector('acf-view__gallery');
if (gallery) {
	/* https://github.com/bigbite/macy.js */
	new Macy({
		container: gallery,
		columns: 4,
		margin: {
			x: 10,
			y: 10,
		},
		breakAt: {
			992: 2,
			400: 1,
		},
	});
}
And the following for the Flat masonry:
var gallery = this.querySelector('.acf-view__gallery');
if (gallery) {
	/* https://gitlab.com/lightsource/masonry */
	new AcfViewsMasonry(
		gallery,
		{
			ROW_MIN_HEIGHT: 180,
			GUTTER: 20,
			MOBILE_GUTTER: 10,
			MOBILE_WIDTH: 992,
		}
	);
}
Using custom theme code
In this case, you need to download the JS code of the chosen library to your theme. Then, print the gallery in the target template and wrap items into the li tag:
<?php

$gallery = get_field('your_gallery_field'); // from the current post

// Check if the gallery is not empty
if ($gallery) {
    echo '<ul class="gallery">';
    foreach ($gallery as $image) {
        // Ensure $image is an array and contains the 'ID' key
        if (is_array($image) && isset($image['ID'])) {
            echo '<li class="gallery__item">'; // Each image should be wrapped in an li for Macy.js
            // Output the medium size image
            echo wp_get_attachment_image($image['ID'], 'medium', false, [
                'class' => 'gallery__image',
            ]);
            echo '</li>';
        }
    }
    echo '</ul>';
}
For Macy.js, add the following JS to your theme's JS:
import '/wp-content/themes/YOUR_THEME/assets/js/macy.js';

document.addEventListener('DOMContentLoaded', function () {
    var gallery = document.querySelector('.gallery');
    if (gallery) {
        /* https://github.com/bigbite/macy.js */
        new Macy({
            container: gallery,
            columns: 4,
            margin: {
                x: 10,
                y: 10,
            },
            breakAt: {
                992: 2,
                400: 1,
            },
        });
    }
});
Make sure to update the library path in the import statement.
Note: If you're looking for the import statement in the pure JavaScript code, you might not realize that all major browsers have supported modules and imports for a while. So, don’t worry - no additional packaging like webpack is necessary.
For Flat masonry, add the following JS to your theme's JS:
import '/wp-content/themes/YOUR_THEME/assets/js/flat.js';

document.addEventListener('DOMContentLoaded', function () {
    var gallery = this.querySelector('.acf-view__gallery');
    if (gallery) {
        /* https://gitlab.com/lightsource/masonry */
        new AcfViewsMasonry(
            gallery,
            {
                ROW_MIN_HEIGHT: 180,
                GUTTER: 20,
                MOBILE_GUTTER: 10,
                MOBILE_WIDTH: 992,
            }
        );
    }
});
As in the previous case, make sure to update the library path in the import statement.
5.4) Displaying the Gallery as an inline carousel gallery
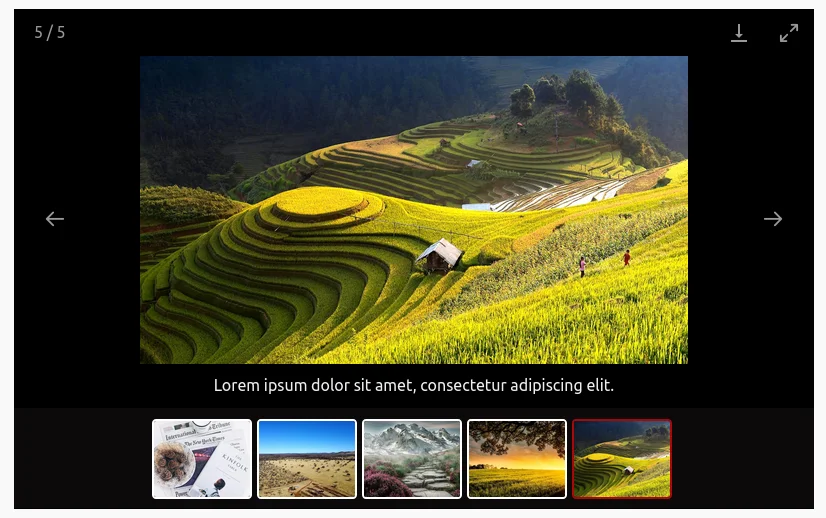
To create such an element we need to employ the LightGallery library and its Carousel feature.
Using Advanced Views Framework
As we mentioned earlier, AVF: Pro edition comes with a set of pre-configured Slider, Masonry, and Image gallery libraries. To convert the Gallery field into an Inline-Carousel layout, enable this option in the Layout field settings.
The framework will automatically generate the proper markup, and JS code for the carousel instance. If it is needed, you can fine-tune the JavaScript code added by AVF for this Carousel to the View's JS code field as shown in the AVF Gallery Docs.
For this example, we used the following JS instance configuration for LightGallery:
import '/wp-content/themes/YOUR_THEME/assets/js/lightgallery.js';

document.addEventListener('DOMContentLoaded', function () {
    var gallery = document.body.querySelector('.gallery');
    if (gallery) {
        var container = document.createElement('div');
        container.classList.add('inline-gallery');
        gallery.parentElement.insertBefore(container, gallery);

        /* https://www.lightgalleryjs.com/docs/settings/#lightgallery-core */
        new lightGallery(gallery, {
            container: container,
            showMaximizeIcon: true,
            download: true,
            enableDrag: false,
            allowMediaOverlap: false,
            closable: false,
            plugins: [window.lgThumbnail,],
        }).openGallery();
    }
});
Using custom theme code
In this case, you need to download the CSS and JS code of the LightGallery library to your theme. Then, print the gallery in the target template and wrap each image into li with a full-size image URL in the data-src attribute:
$gallery = get_field('your_gallery_field'); // from the current post

// Check if the gallery is not empty
if ($gallery) {
    echo '<ul id="lightgallery" class="gallery">';

    foreach ($gallery as $image) {
        // Ensure $image is an array and contains the 'ID' key
        if (is_array($image) && isset($image['ID'])) {
            // Get the full-size image URL for the lightbox
            $full_image_url = wp_get_attachment_image_url($image['ID'], 'full');
            // Get the image caption, if available
            $caption = isset($image['caption']) ? $image['caption'] : '';

            // Create the list item with necessary data attributes
            echo '<li data-src="' . esc_url($full_image_url) . '" data-sub-html="' . esc_attr($caption) . '" class="gallery__item">';
            // Output the medium size image for the inline gallery
            echo wp_get_attachment_image($image['ID'], 'medium', false, [
                'class' => 'gallery__image',
            ]);
            echo '</li>';
        }
    }

    echo '</ul>';
}
Enqueue the library's CSS using the wp_enqueue_style function, and add the following JS to your theme's script.js:
import '/wp-content/themes/YOUR_THEME/assets/js/lightgallery.js';

document.addEventListener('DOMContentLoaded', function () {
    var gallery = document.body.querySelector('.gallery');
    if (gallery) {
        var container = document.createElement('div');
        container.classList.add('inline-gallery');
        gallery.parentElement.insertBefore(container, gallery);

        /* https://www.lightgalleryjs.com/docs/settings/#lightgallery-core */
        new lightGallery(gallery, {
            container: container,
            showMaximizeIcon: true,
            download: true,
            enableDrag: false,
            allowMediaOverlap: false,
            closable: false,
        }).openGallery();
    }
});
Don't forget to update the library path in the import statement.
5.5) Displaying Gallery as a slider

To create a slider we'll use a great and well-known Splide library.
Using Advanced Views Framework
As we mentioned earlier, AVF: Pro edition comes with a set of pre-configured Slider, Masonry, and Image gallery libraries. To turn the Gallery field into a slider, enable this option in the Layout field settings.
The framework will automatically generate the proper markup, and JS code for the slider instance. If it is needed, you can fine-tune the JavaScript code added by AVF for this Slider to the View's JS code field as shown in the AVF Gallery Docs.
For this example, we used the following JS instance configuration for Splide:
var gallery = this.querySelector('.acf-view__gallery');
if (gallery) {
	/* https://splidejs.com/guides/options/ */
	new Splide(gallery, {
		type: 'loop',
		perPage: 1,
		perMove: 1,
	}).mount();
}
Using custom theme code
In this case, you need to download the CSS and JS code of the Splide library to your theme. Then, print the gallery in the target template with the necessary splide classes:
$gallery = get_field('your_gallery_field'); // from the current post

// Check if the gallery is not empty
if ($gallery) {
    echo '<div class="splide">';
    echo '<div class="splide__track">';
    echo '<ul class="splide__list">';

    foreach ($gallery as $image) {
        // Ensure $image is an array and contains the 'ID' key
        if (is_array($image) && isset($image['ID'])) {
            echo '<li class="splide__slide">';
            // Use the WordPress function to output the image
            echo wp_get_attachment_image($image['ID'], 'medium', false, [
                'class' => 'splide__image',
            ]);
            echo '</li>';
        }
    }

    echo '</ul>';
    echo '</div>'; // Close splide__track
    echo '</div>'; // Close splide
}
Then enqueue the library's CSS using the wp_enqueue_style function, and add the following JS to your theme's script.js:
import '/wp-content/themes/YOUR_THEME/assets/js/splide.js';

document.addEventListener('DOMContentLoaded', function () {
    var gallery = document.body.querySelector('.gallery');
    if (gallery) {
        /* https://splidejs.com/guides/options/ */
        new Splide(gallery, {
            type: 'loop',
            perPage: 1,
            perMove: 1,
        }).mount();
    }
});
Make sure you've updated the library path in the import statement.
5.6) Setting lightbox for items
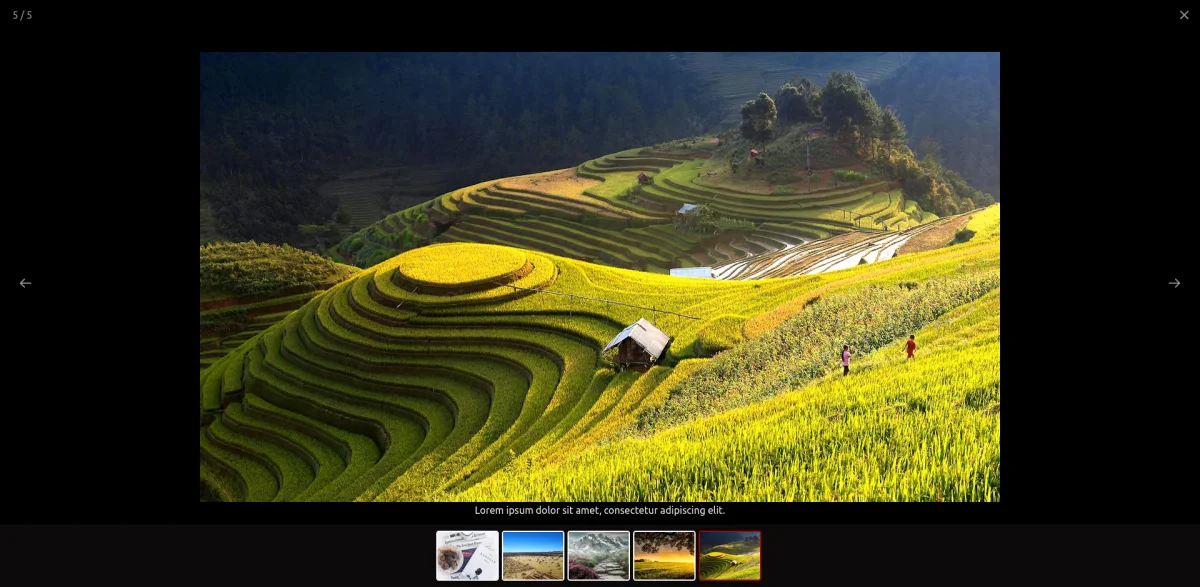
The LightGallery library which we used for the inline carousel before is feature-rich and offers the lightbox feature as well, so we'll use it.
Pro tip: You can apply both Masonry and Lightbox to the same gallery field simultaneously to provide a visually appealing preview and allow for a detailed view on click.
Using Advanced Views Framework
As we mentioned earlier, AVF: Pro edition comes with a set of pre-configured Slider, Masonry, and Image gallery libraries. To enable the LightBox feature for the Gallery image items, enable this option in the Layout field settings.
The framework will automatically generate the proper markup, and JS code for the Lightbox instance. If it is needed, you can fine-tune the JavaScript code added by AVF for this Lightbox to the View's JS code field as shown in the AVF Gallery Docs.
For this example, we used the following JS instance configuration for Lightbox:
var gallery = this.querySelector('.acf-view__gallery');
if (gallery) {
	/* https://www.lightgalleryjs.com/docs/settings/#lightgallery-core */
	new lightGallery(gallery, {
		closeOnTap: true,
		counter: true,
		download: false,
		allowMediaOverlap: false,
		enableDrag: false,
		plugins: [window.lgThumbnail,],
	});
}
Using custom theme code
In this case, you need to download the CSS and JS code of the LightGallery library to your theme. Then, print the gallery in the target template and wrap each image into li with a full-size image URL in the data-src attribute:
$gallery = get_field('your_gallery_field'); // from the current post

// Check if the gallery is not empty
if ($gallery) {
    echo '<ul id="lightgallery" class="gallery">';

    foreach ($gallery as $image) {
        // Ensure $image is an array and contains the 'ID' key
        if (is_array($image) && isset($image['ID'])) {
            // Get the full-size image URL for the lightbox
            $full_image_url = wp_get_attachment_image_url($image['ID'], 'full');
            // Get the image caption, if available
            $caption = isset($image['caption']) ? $image['caption'] : '';

            // Create the list item with necessary data attributes
            echo '<li data-src="' . esc_url($full_image_url) . '" data-sub-html="' . esc_attr($caption) . '" class="gallery__item">';
            // Output the medium size image for the inline gallery
            echo wp_get_attachment_image($image['ID'], 'medium', false, [
                'class' => 'gallery__image',
            ]);
            echo '</li>';
        }
    }

    echo '</ul>';
}
Enqueue the library's CSS using the wp_enqueue_style function, and add the following JS to your theme's script.js:
import '/wp-content/themes/YOUR_THEME/assets/js/lightgallery.js';

document.addEventListener('DOMContentLoaded', function () {
    var gallery = this.querySelector('.gallery');
    if (gallery) {
        /* https://www.lightgalleryjs.com/docs/settings/#lightgallery-core */
        new lightGallery(gallery, {
            closeOnTap: true,
            counter: true,
            download: false,
            allowMediaOverlap: false,
            enableDrag: false,
            plugins: [window.lgThumbnail,],
        });
    }
});
5.7) Allowing SVG uploading
By default, WordPress restricts SVG file uploads due to security concerns. SVG files, being XML-based, can potentially contain malicious code that might compromise your site.
However, if you need to enable SVG uploads for specific user roles, such as editors and administrators, you can do so by white-listing the SVG extension.
There are a couple of options:
- Use the Safe SVG Plugin
This free plugin not only allows SVG uploads but also sanitizes the files to remove any potentially harmful code. It also enables a preview of SVG files in the Media Library. - Add a white-listing code
If you prefer a straightforward method without additional plugins, you can use the following code snippet to whitelist SVG uploads for editors and admins:
add_filter( 'upload_mimes', function ( array $mimes ): array {
	$roles = wp_get_current_user()->roles;
	if ( false === in_array( 'administrator', $roles, true ) &&
	     false === in_array( 'editor', $roles, true ) ) {
		return $mimes;
	}

	$mimes['svg'] = 'image/svg+xml'; // Allow SVG uploads

	return $mimes;
} );
5.8) Setting up a field-specific uploads directory
By default, all attachments are saved in the /wp-content/uploads/ folder, following the year/month structure. For instance, an image uploaded in August 2024 will be stored in /wp-content/uploads/2024/08/.
In some cases, it’s beneficial to define a specific folder for certain attachments, organizing them by topic rather than by date. While WordPress allows you to change the uploads folder using the upload_dir hook, this change applies to all uploads, including those unrelated to ACF.
Fortunately, there’s a simple solution: you can wrap the upload_dir hook within the acf/upload_prefilter hook. This code changes the custom uploads folder only for images that editors upload via a specific ACF field.
The code example below changes the uploads dir folder for the images uploaded via an ACF Gallery field with the gallery name to the /wp-content/uploads/user-images:
// https://www.advancedcustomfields.com/resources/acf-upload_prefilter/
add_filter( 'acf/upload_prefilter/name=gallery', function ( array $errors, array $file, array $field ): array {
	// https://developer.wordpress.org/reference/hooks/upload_dir/
	add_filter( 'upload_dir', function ( array $uploads ): array {
		$dir             = '/user-images';
		$uploads['url']  = $uploads['baseurl'] . $dir;
		$uploads['path'] = $uploads['basedir'] . $dir;

		return $uploads;
	} );

	return $errors;
}, 10, 3 );
By changing the file name and target dir, you can fine-tune this snippet to your case. After that, you can add the code to your theme's functions.php.
5.9) Updating the gallery field programmatically
To update the Gallery field programmatically, you can use the ACF update_field function. Since this field stores an array of attachment IDs, the data you pass must be an array of attachment IDs.
add_action('acf/init', function() {
    // For the gallery field, pass an array of attachment IDs
    update_field('my_gallery_field', [123, 456], 1); // Replace 123 and 456 with the attachment IDs and 1 with the target post id
});
If you need to update the Select field on a user or term object, you must add the appropriate prefix, just as shown in the "loading" field value section.
Note: You should call the update_field function inside the acf/init action, or in any hooks that happen later.
6. Querying by the ACF Gallery field
When working with the ACF Gallery field, you might need to find items with a specific image or attachment. Unlike displaying the gallery, querying items by these values can be more complex due to varying storage locations for ACF fields.
Here’s how to handle queries depending on where the Gallery field values are stored:
6.1) By postmeta (Post, Page, Any CPT)
Using Advanced Views Framework:
If you're using the AVF: Pro edition, querying by ACF Gallery field values is straightforward with Meta Queries. You need to create a Card, choose the target Gallery field in the Meta Fields tab, and define the desired value. It can be a static id or pointer to another field. Then the framework will take care of the rest.
Using WP_Query
For custom queries, you can use the built-in WP_Query class:
$args = array(
    'post_type' => 'post', // Replace with your custom post type if needed
    'post_status' => 'publish',
    'posts_per_page' => -1, // Retrieve all posts
    'meta_query' => array(
        array(
            'key'   => 'your_gallery_field', // Replace with your ACF Gallery field key
            'value' => '10', // Target image ID as a string (since it's stored in a serialized array)
            'compare' => 'LIKE', // Use LIKE to search within the serialized array
        )
    )
);

// Execute the query
$query = new WP_Query($args);

// Loop through the results
foreach($query->get_posts() as $post){
    // Process each WP_Post object here
    // For example, you might display the post title or other details
    echo '<h2>' . get_the_title($post->ID) . '</h2>';
}
6.2) By termmeta (Terms)
Here we need to employ the WP_Term_Query class:
$args = array(
    'taxonomy'   => 'category', // Replace with your taxonomy
    'meta_query' => array(
        array(
            'key'     => 'your_image_field', // Replace with your custom field key
            'value'   => '10', // Target image ID as a string
            'compare' => 'LIKE', // Use LIKE to search within the serialized array
        )
    )
);

// Execute the query
$term_query = new WP_Term_Query($args);

// Loop through the results
foreach ($term_query->get_terms() as $term) {
    // Process each WP_Term object
    // Example: echo $term->name;
}
6.3) By usermeta (user profile)
In this case, we need to use the WP_User_Query class:
$args = array(
    'meta_query' => array(
        array(
            'key'     => 'your_image_field', // Replace with your custom field key
            'value'   => '10', // Target image ID as a string (since it's stored in a serialized array)
            'compare' => 'LIKE', // Use LIKE to search within the serialized array
        )
    )
);

$user_query = new WP_User_Query($args);

// Loop through the results
foreach ($user_query->get_results() as $user) {
    // Process each WP_User object
    // Example: echo $user->user_login;
}
6.4) Inside ACF Blocks
ACF Blocks save their data as JSON in the post_content. This data cannot be queried directly. However, if you enable the "Save in Meta" feature for ACF Blocks, the field values are also saved in post meta, allowing you to query them similarly to other postmeta fields.
7. Related Gallery field filters and hooks
ACF offers a variety of filters and hooks that enable you to modify field data and behavior, extending WordPress's core hooks functionality. You can utilize the standard add_action and add_filter functions to attach custom code to these hooks.
Below are some of the most commonly used hooks along with the ACF Gallery field type:
7.1) acf/upload_prefilter
The acf/upload_prefilter allows you to perform custom validation on an attachment. For example, with the Image field, you can use this filter to set up a field-specific upload directory, as demonstrated earlier:
// https://www.advancedcustomfields.com/resources/acf-upload_prefilter/
add_filter( 'acf/upload_prefilter/name=gallery', function ( array $errors, array $file, array $field ): array {
	// https://developer.wordpress.org/reference/hooks/upload_dir/
	add_filter( 'upload_dir', function ( array $uploads ): array {
		$dir             = '/user-images';
		$uploads['url']  = $uploads['baseurl'] . $dir;
		$uploads['path'] = $uploads['basedir'] . $dir;

		return $uploads;
	} );

	return $errors;
}, 10, 3 );
7.2) acf/load_field
The acf/load_field filter allows you to modify the field settings before it is displayed on the editor's screen. This filter is particularly useful for dynamically adjusting the field's configuration, such as setting default values, changing labels, or customizing available options.
add_filter('acf/load_field/name=my_gallery_field', function (array $field): array {
    // Define allowed image sizes
    $allowed_sizes = ['thumbnail', 'medium'];

    // Modify the field to only allow the specified image sizes
    $field['preview_size'] = 'thumbnail'; // Set a default preview size
    $field['library'] = 'all'; // Allow images from the entire library (or set to 'uploadedTo' for only images attached to the current post)

    // Optional: restrict the field to specific image sizes if ACF supports this in your version
    if (!empty($allowed_sizes)) {
        $field['mime_types'] = implode(',', $allowed_sizes);
    }

    return $field;
});
7.3) acf/render_field
The acf/render_field action allows you to add custom HTML before or after a field's input on the editor's screen in the WordPress admin. This can be particularly useful for adding custom-styled text, icons, styles, or additional interactive elements to enhance the field's functionality.
// todo replace field key with yours
add_action('acf/render_field/key=field_123456789abc', function (array $field):void {
	// todo your custom HTML
	echo '<div class="my-custom-class">Custom field-related element</div>';
});
Note: By default, the acf/render_field action is triggered after the field input has been printed. If you need to print your HTML before the input, you should set the priority number to 9 or lower in the third argument of the add_action WordPress function.
7.4) acf/validate_value
Use the acf/validate_value filter to validate the values entered into the field. You can ensure that the entered value meets specific criteria:
add_filter('acf/validate_value/name=my_image_field', function($valid, $value, array $field) {
    if (true !== $valid) {
        return $valid; // Skip validation if there is an existing error
    }

    // todo your custom validation
    if (false === my_custom_value_validation($value)) {
        $valid = 'Invalid value selected';
    }

    return $valid;
}, 10, 3);
7.5) acf/validate_save_post
The acf/validate_save_post action allows you to perform custom form validations before saving ACF fields. This is particularly useful when you need to validate one field's value based on another field's input or enforce specific rules across multiple fields.
add_action( 'acf/validate_save_post', function () {
    // Get the uploaded gallery images IDs from ACF field
    $gallery_ids = $_POST['acf']['field_gallery_id'] ?? []; // Replace with your Gallery field key

    if ( empty( $gallery_ids ) ) {
        return;
    }

    $min_width  = 800; // Set minimum width requirement
    $min_height = 600; // Set minimum height requirement

    foreach ( $gallery_ids as $image_id ) {
        // Get the image metadata
        $image_meta = wp_get_attachment_metadata( $image_id );

        // Check if the image meets the required dimensions
        if ( $image_meta['width'] < $min_width || $image_meta['height'] < $min_height ) {
            // Add a validation error if the image does not meet the criteria
            acf_add_validation_error( 'field_gallery_id', 'Each image in the gallery must be at least 800x600 pixels.' );
            break; // Stop checking further images once an error is found
        }
    }
} );
Tip: To find the field key, navigate to the ACF field group in the WordPress admin. Click on the Screen Options button at the top right corner of the page, then check the Field Keys option. Once enabled, the field keys will be displayed next to each field name in the group.
7.6) acf/save_post
The acf/save_post action is triggered when the current item (page/product/user) is saved. You can use it to perform any additional actions, e.g. updating related data.
add_action( 'acf/save_post', function ( $post_id ) {
    // Retrieve the gallery field value (replace with your actual gallery field key)
    $gallery_ids = get_field( 'project_gallery', $post_id ); // Field key for gallery

    if ( ! $gallery_ids ) {
        return;
    }

    foreach ( $gallery_ids as $image_id ) {
        // Fetch the current related posts
        $related_posts = get_field( 'related_posts', $image_id );

        // If there are no related posts, initialize as an array
        if ( ! $related_posts ) {
            $related_posts = [];
        }

        if ( true === in_array( $post_id, $related_posts, true ) ) {
            continue;
        }

        // Add the current post ID to the related posts array
        $related_posts[] = $post_id;

        // Update the related posts field with the new array
        update_field( 'related_posts', $related_posts, $image_id );
    }
} );
Thank you for reading! to our monthly newsletter to stay updated on the latest WordPress news and useful tips.

Stuck with development or facing an issue?
WPLake offers affordable on-demand website development and design.
No matter the size of your project - contact us now, and we'll get it done for you!
Frequently Asked Questions Test Your Knowledge
FAQ mode
/
Learning mode
- Can I display all CPT item galleries on a single archive page?
Yes, you can display all galleries for all Custom Post Type items on a single archive page. To do this, query all CPT items and display each gallery within the loop. You can use the Advanced Views Framework and create a Card, pointing to the View with the Gallery setup. Alternatively, you can manually write a WP_Query and display the gallery for each post.
- Can I mix images and videos in the same gallery?
Yes, you can mix images and videos in the same gallery. In the display loop, you need to check the file extension to determine whether to output an image or a video tag. You can use PHP's pathinfo function to check the file extension and display the appropriate media type accordingly as shown here.
Course navigation: ACF Plugin

Lesson #2
Time to read: 11 mins
Updated 25 Sep, 2024

Content links (94)
63.
splidejs.comAbout the Author