Mastering ACF Blocks for Gutenberg: Complete Guide with Code Snippets

Key Points at a Glance
- About ACF Blocks: ACF Blocks are custom Gutenberg blocks built using the ACF API, designed for developers to create personalized blocks easily.
- Comparison with Pure Gutenberg Blocks: ACF Blocks simplify the block creation process, requiring only basic web knowledge, whereas Pure Gutenberg blocks demand strong React skills.
- Block Registration: ACF handles essential tasks like registering the block in the Gutenberg library and rendering it in the editor.
- Data Storage: ACF Blocks store data as a JSON string within the HTML content, saved as an HTML comment in the post_content field of the wp_posts table.
- Block Layout Control: Developers define a PHP callback for the block layout, allowing for custom markup similar to traditional theme templates.
- Custom Settings: ACF Blocks can utilize a wide range of ACF field types for settings, enhancing flexibility compared to standard Gutenberg blocks, which offer basic options.
Table of Contents
Gutenberg is the next-generation WordPress editor that replaced the Classic editor, bringing a major shift in how content is created. Initially released as a plugin, it eventually became part of the WordPress Core. ACF Blocks, on the other hand, are custom Gutenberg blocks built using the ACF API, allowing developers to create personalized blocks with ease and flexibility.
Unlike the Classic editor, which is focused on plain text with simple image embedding, Gutenberg is a visual editor built with React, allowing editors to edit and style content in a more interactive way.
Every WordPress installation comes with a block library that includes a variety of pre-built elements, called core blocks. These range from simple blocks like paragraphs, images, and embeds, to more complex ones like the Query Loop.
However, this default set only covers the basics, which can limit you when trying to create advanced, unique page layouts. If you feel like pre-built blocks are holding you back, you're not alone. The good news is you can create your own custom Gutenberg blocks.
This gives editors the freedom to tweak content while maintaining your desired layout. In this article, we’ll explore ACF Blocks, a Pro feature of the Advanced Custom Fields plugin.
1. Introduction to the ACF Blocks
Let's dive deeper into ACF Blocks and understand how they work.
The ACF Blocks feature allows us to create custom Gutenberg blocks effortlessly. ACF takes care of several critical tasks behind the scenes, including:
- Registering the block in the Gutenberg library
- Handling block rendering in the editor
- Providing settings for the block (via ACF fields)
- Managing data storage (saving field data and passing it to our front-end template)
Thanks to ACF managing all this heavy lifting, we can focus on designing our custom blocks and perfecting the layout without worrying about technical complexities.
Let's break down some core aspects of ACF Blocks:
1.1) Storage
By default, ACF Blocks store data as a JSON string within the HTML content of the page. This data is saved inside the post_content field of the wp_posts table as an HTML comment. Here's an example of how the data for an ACF block looks:
<!-- wp:acf/org-wplake-website-blocks-codesnippet-theme-classic-codesnippetthemeclassic
{"name":"acf/org-wplake-website-blocks-codesnippet-theme-classic-codesnippetthemeclassic",
"data":{"local_code-snippet__code-snippet":"\u003c?php\r\necho 'hello world';",
"local_code-snippet__language":"php"},"mode":"edit"} /-->
If this format seems unfamiliar, it's because Gutenberg follows a similar approach for storing block data. For example:
<!-- wp:paragraph -->
<p>Your text</p>
<!-- /wp:paragraph -->

<!-- wp:heading -->
<h2 class="wp-block-heading">Your heading</h2>
<!-- /wp:heading -->
However, unlike simple blocks such as paragraphs or headings, ACF blocks often have numerous arguments and settings. Instead of storing the direct HTML output, ACF saves a JSON string representing these arguments.
The key takeaway is that both ACF Blocks and standard Gutenberg blocks are stored as HTML strings inside the post_content field of the wp_posts table, ensuring a consistent storage format.
1.2) Block settings
Now that we’ve covered how ACF Blocks are stored, let’s explore the data stored inside them. While the ability to add custom Gutenberg blocks is powerful, it becomes much more valuable when combined with custom settings.
Take the example of creating a banner element. As you design the block’s layout, you need to fill it with dynamic content, like a background image, section title, and description. Hardcoding this content directly into the block would undermine WordPress’ flexibility as a CMS, making it impossible to reuse the block with different content across the site.
The challenge is that native Gutenberg blocks support only basic settings like text and number inputs, which are often too limited. This is where ACF shines. ACF Blocks can use any ACF field types as block settings, providing a wide range of options far beyond what standard Gutenberg offers.
In the banner element example, you could use an ACF Image field for the picture, a WYSIWYG editor for the description, and a Text field for the title. The Advanced Custom Fields plugin allows you to leverage its extensive field types to create truly customizable blocks.
ACF also extends Gutenberg’s UI, handling the entire editing experience. Once you define the block’s settings with ACF fields, ACF automatically provides editors with a user-friendly interface to manage these settings, making block editing as simple as possible.
1.3) Block layout
ACF Blocks allow you to define a PHP callback that controls the block layout. This callback receives specific block settings as arguments, enabling you to access those settings as plain ACF fields using the get_field() function.
This flexibility lets you create any markup you need, similar to traditional theme templates. Additionally, you can utilize standard WordPress functions like get_post(), wp_get_attachment_image(), and others to load all the necessary data.
<?php
/**
 * Custom Block Template.
 *
 * @param array $block The block settings and attributes.
 * @param string $content The block inner HTML (empty).
 * @param bool $is_preview True during backend preview render.
 * @param int $post_id The post ID the block is rendering content against.
 *          This is either the post ID currently being displayed inside a query loop,
 *          or the post ID of the post hosting this block.
 * @param array $context The context provided to the block by the post or it's parent block.
 */


$title       = get_field( 'title' ) ?: '';
$description = get_field( 'description' ) ?: '';
$image       = get_field( 'image' ) ?: 0;

?>

<div>
    <p><?php
		echo esc_html( $title ); ?></p>
    <!--todo output any markup-->
</div>
Tip: While ACF Blocks require raw PHP templates and values processing, you can leverage the Advanced Views Framework, which provides smart templates that can be transformed into Gutenberg blocks (feature is available in the Pro version).
Advanced Views utilizes template engines (like Twig or Blade), automatically generating default markup for you. This approach streamlines the process, allowing you to focus on HTML and CSS rather than the underlying complexities.
2. ACF Blocks compared
In the introduction, we explored the fundamental concepts of ACF Blocks, providing insight into their inner workings. Now, let's compare ACF Blocks with other methods for developing custom WordPress pages to highlight their strengths and weaknesses.
2.1) ACF Blocks vs. pure Gutenberg blocks
It’s important to note that Gutenberg provides its own API and developer tools (available as an external npm package) for creating custom blocks. In fact, ACF Blocks act as a bridge, leveraging the native Gutenberg API under the hood.
While it’s possible to create Gutenberg blocks from scratch, the process is complex and time-consuming. Let’s break down how Pure Gutenberg Blocks and ACF Blocks compare in key areas:
| Item | Pure Gutenberg | ACF Blocks |
|---|---|---|
| React knowledge | Required. Since Gutenberg is a React-based editor, building custom blocks from scratch requires strong React development skills. | Not required. Only basic web knowledge, such as HTML, CSS, and PHP. |
| Number of layouts per block | Two. One of the more cumbersome aspects of native Gutenberg blocks is that you need two separate layouts: one in React (edit.js for the editor) and one in PHP (render.php for the front end). | One. The single PHP template is used for both editor and front. |
| Custom settings | Basic types. Gutenberg’s block attributes provide only basic configuration options. | Advanced types. ACF Blocks can use any ACF field types as block settings. |
| Block assets-compilation | Required. As Gutenberg is React-based, any changes you make to your block's JavaScript require a build step to compile the assets. | Not required (No editor-specific JS needed) |
Summary
This comparison table clearly demonstrates that ACF Blocks offer the simplest way to create custom Gutenberg blocks. They empower editors to manage content effortlessly while allowing developers to concentrate on the layout without getting bogged down by integration complexities.
2.2) ACF Blocks vs. classic Meta fields
While both ACF Blocks and classic pages using ACF metafields utilize the same set of fields, there are notable differences between them, primarily in how data is stored.
Although the field inputs appear the same for editors and code access remains consistent for developers, the key distinction lies in storage methods. ACF meta fields, along with classic meta fields, are stored in the postmeta table as separate records, whereas ACF Blocks are stored as a JSON string within the post_content field of the wp_posts table.
Let's examine their features side by side:
| Feature | ACF Fields | ACF Blocks |
|---|---|---|
| ACF Fields UI | Yes, classic ACF UI | Yes, classic ACF UI |
| Reusing Fields on a Single Page | No; fields cannot be reused unless wrapped in a repeater, limiting placement | Yes; blocks are modular, allowing reuse across the same page |
| Field Location | Template-controlled (hard-coded, cannot be modified by editors) | Editor-controlled |
| Default Storage | Postmeta | Post_content |
| Ability to Query by Fields (with Default Storage) | Yes, using meta DB queries | No; fields are saved as a single string |
| Optional Storage | Can utilize storage add-ons for performance improvements | ACF Blocks can store settings in postmeta enabling queries |
ACF field drawbacks
- Performance Impact:
ACF fields stored in postmeta lead to extra database queries, which may affect performance, especially with a large number of fields. - Template Control:
The appearance of fields is determined by the template, limiting editors' ability to manage content. - Limited Reuse:
The same set of fields cannot be reused multiple times on the same page. - Monolithic Approach:
Page templates are often monolithic, leading to repetitive and spaghetti code, along with potential naming or CSS conflicts.
ACF Blocks drawbacks
- CPT Limitations:
ACF Blocks cannot be used for CPT items without the Gutenberg editor. - Querying Limitations:
By default, ACF Blocks are stored as a string in a single cell, which makes querying impossible. However, this can be addressed by adjusting settings to store data in postmeta.
Benefits of ACF fields
- Querying:
You can easily query by meta fields. - Table Storage option:
Meta fields can be stored in a separate table for efficient querying and improved performance. - CPT Compatibility:
ACF fields can be utilized for Custom Post Type (CPT) items without requiring an editor.
Benefits of ACF Blocks
- Modular Approach:
ACF Blocks are modular, enabling easy reuse and minimizing conflicts. Editors can use the same blocks multiple times on a single page. - Better Performance:
Since all ACF Blocks are stored in the content, they do not require additional database queries, resulting in improved performance compared to classic ACF fields.
Conclusion
ACF Blocks provide a more flexible and optimized solution for building pages, while classic ACF fields excel for Custom Post Type items that need querying (such as filtering) and do not require editor interaction.
2.3) ACF Blocks vs. Flexible Content field
ACF is feature-rich, and its Pro version includes a unique Flexible Content field, which many use as a Gutenberg alternative.
| Item | ACF Blocks | Flexible Content field |
|---|---|---|
| Storage | post_content | postmeta |
| Editor-controlled layout | Yes, editors can combine ready blocks in any order | Yes, editors can combine layouts in any order |
| Reusing the same layout multiple times | Yes | Yes |
| Editor experience | Gutenberg-based | ACF-field based |
Both options offer flexibility for editors. The main advantage of ACF Blocks over the Flexible Content field is performance, as ACF Blocks do not use postmeta and do not trigger additional queries. (However, this benefit is true for the default installation and isn't actual if you're utilizing table-storage addons)
Conversely, the primary benefit of the Flexible Content field is its distraction-free editing experience, while Gutenberg is often criticized for its excessive interface, so ultimately, the choice between the two depends on your specific use case.
3. How to create an ACF block
Now, let's explore how to create a custom Gutenberg block using the ACF Blocks feature.
ACF Blocks are built on top of Gutenberg, which means you’ll need to manually create a block.json file and a render.php template for each block. While this allows for flexible block creation, it also requires familiarity with not just ACF but also core WordPress functions and classes. Manually writing markup and escaping data can be time-consuming, especially for more complex layouts.
To streamline the process, you can use the Advanced Views Framework. This WordPress framework provides smart templates that simplify both post queries and template creation by generating default markup and automatically loading properly escaped data into the template. This allows you to focus solely on the layout, skipping much of the manual setup.
Unlike drag-and-drop page builders, Advanced Views offers modular, template-engine-based (Twig or Blade) smart templates. This ensures full control over your markup while avoiding common issues like bloated global CSS or JavaScript files. The framework also natively supports all ACF field types, alongside other data sources.
The Pro version of Advanced Views can even automate the creation of Gutenberg blocks for your layouts, eliminating the need for manual actions entirely. In addition to ACF, the framework also supports Meta Box Blocks, meaning that once you've learned the tool, you can seamlessly apply your skills across different vendors.
Below are examples of creating ACF Blocks using both Advanced Views and custom code:
3.1) Using Advanced Views Pro
ACF does the heavy lifting compared to pure Gutenberg, just as Advanced Views simplifies the ACF block creation process even further. All we need to do is follow a few simple steps outlined in the AVF custom Gutenberg block documentation:
- Create the Block Settings ACF Group:
Before creating your block, set up an ACF field group that defines the block settings you want to provide to editors, such as background images, labels, and other custom fields. - Purchase and Activate Advanced Views Pro.
- Create a New Layout:
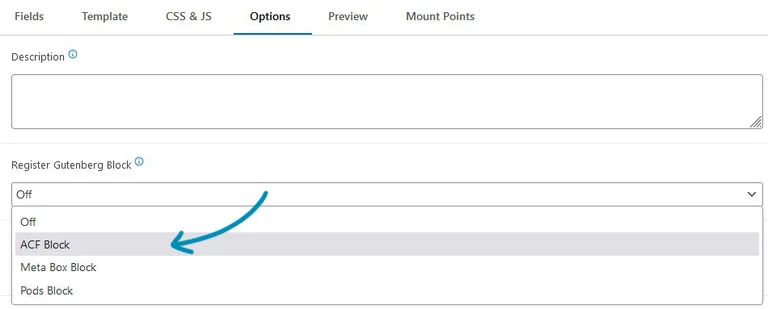
In the Advanced Views dashboard, create a new Layout and select your target fields (those from the ACF group) in the Fields tab. - In the Options tab, set the "Register Gutenberg Block" option to ACF Block and Save your View.
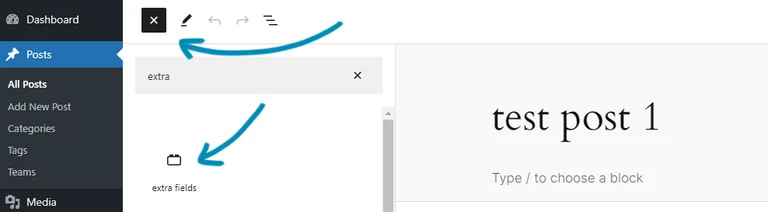
- Insert the block
Go to the desired post, page, or CPT item with the Gutenberg editor and add a new block. Select the View's corresponding block, which will appear in the block list under the same name as the View. - Populate the Block Fields and press Save.
- Visit the Page to see the result.
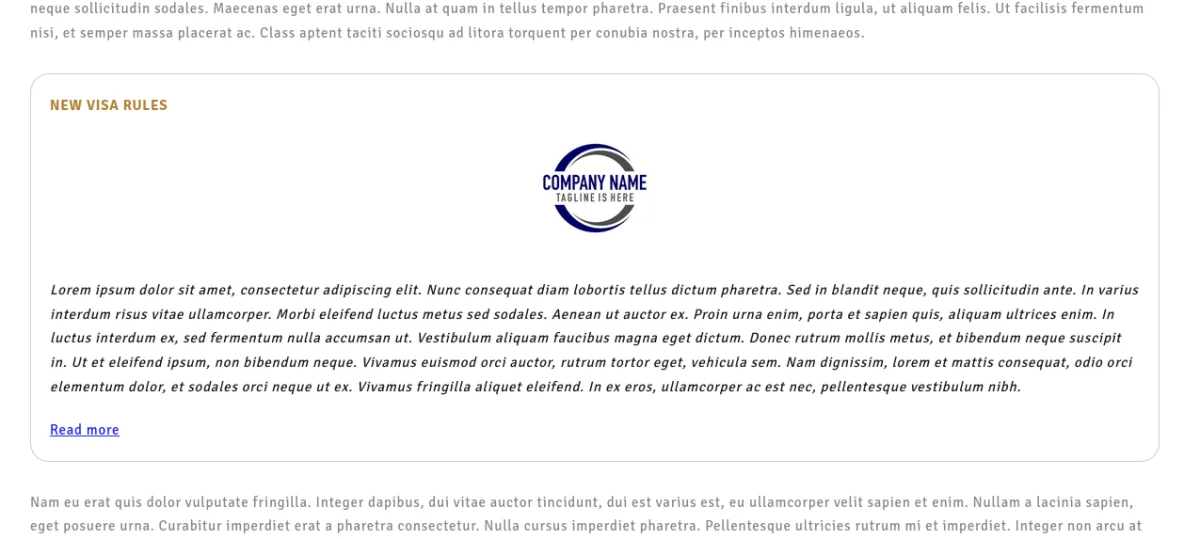
That's it! Advanced Views automatically generates the default markup, loads the fields, and registers the block for you. Now, you can customize the Layout’s template and apply your CSS rules to achieve the desired layout.
3.2) Using ACF Blocks API v2
As mentioned earlier, ACF takes care of much of the heavy lifting by handling the React-based complexities of Gutenberg for us. However, there are still a few manual steps required:
- Create a block folder inside your theme
First, create a dedicated folder for your block inside your theme. For example, blocks/banner. - Create a block.json file
Define the block’s settings and structure according to the Gutenberg API. This file will describe your block, including its name, category, icon, and other attributes. - Create the block template (PHP) and block styles (CSS)
Inside the block folder, create a PHP file (e.g., banner.php) to manage the layout and logic of the block, and a CSS file (e.g., banner.css) for styling. These files will handle the front-end appearance and functionality of the block. - Register the block
Use the WordPress register_block_type() function to register the block within your Gutenberg library. This ties everything together, ensuring your block is available in the Gutenberg editor.
Despite the simplicity of the process, some manual steps are necessary. However, if you’ve ever created a pure Gutenberg block from scratch, you’ll appreciate how much quicker and more streamlined this method is compared to the original approach.
Now, let’s walk through the steps in detail.
1. Create a block folder inside your theme
You can choose any folder structure you prefer. However, it’s a good practice to create a single sub-folder, such as blocks, and organize all your blocks inside it.
2. Create a block.json file
Within your target block folder (e.g., blocks/banner), create a block.json file. WordPress reserves the name of this file, so it should always be named block.json.
Add the following content to the file:
{
    "name": "acf/banner",
    "title": "Banner",
    "description": "A custom banner block with ACF fields.",
    "style": [ "file:./banner.css" ],
    "category": "formatting",
    "icon": "admin-comments",
    "keywords": ["banner"],
    "acf": {
        "mode": "edit",
        "renderTemplate": "banner.php"
    }
}
This JSON file contains settings required by WordPress for Gutenberg blocks, as well as ACF-specific options. Below is a breakdown of each argument and its options:
- name
Defines the block's unique identifier. This must be prefixed with acf/ for ACF blocks.
Example: acf/banner - title
The title that will be displayed in the block inserter.
Example: Banner - description
A brief description of the block's purpose or functionality. This helps users understand the block’s function in the inserter.
Example: A custom banner block with ACF fields. - style
Specifies the CSS file(s) associated with the block. Use the file: syntax to point to a local file.
Example: ["file:./banner.css"] - category
Determines which block category the block appears in within the inserter. WordPress has predefined categories, such as formatting, layout, widgets, embed.
Example: formatting - icon
Sets the icon shown in the block inserter. You can use any of the Dashicons, or specify a custom SVG icon.
Example: admin-comments - keywords
An array of keywords that will help users find the block by typing related terms in the block inserter.
Example: banner
Note: In this scenario, our block does not require any JavaScript code. However, if your block does require JavaScript, you can define the script argument with the path to the JavaScript file, exactly as you would with the style case.
ACF-related options
ACF-specific settings are included in the acf object. Here’s what each key in the acf object represents:
- mode
Controls the display mode of the block in the editor. The options are:
preview: Renders the block's front-end view directly inside the editor.
edit: Displays only the editing form (the ACF field inputs) for the block.
auto: Automatically switches between the preview and edit modes based on user interaction.
Example: edit - renderTemplate
Specifies the PHP file responsible for rendering the block's front-end template. The path is relative to the block folder.
Example: banner.php
These arguments form the essential structure for registering the block with both Gutenberg and ACF. While you can add other properties supported by Gutenberg (such as supports, attributes, or example), the ones listed above cover the most common use cases for custom blocks.
3. Create the block template (PHP) and block styles (CSS)
Now that we have the block.json set up, it's time to create the PHP template and the CSS styles for our custom block. These files will control the block's structure and style on both the editor and the front end. Although the block isn't fully registered yet (and we haven't added the ACF field settings), we can start by providing default content.
Here’s an example of a basic block template and styles for our "Banner" block:
banner.php (block template)
This file will handle the block's layout and content using PHP, rendering it on the front end and within the editor.
<?php
/**
 * Banner Block Template.
 *
 * @param array  $block The block settings and attributes.
 * @param string $content The block inner HTML (empty).
 * @param bool   $is_preview True during backend preview render.
 * @param int    $post_id The post ID the block is rendering content against.
 *                        This is either the post ID currently being displayed inside a query loop,
 *                        or the post ID of the post hosting this block.
 * @param array  $context The context provided to the block by the post or its parent block.
 */

?>
<div class='banner'>
    <p class='banner__title'>Title stub</p>
    <div class='banner__description'>Description stub</div>
</div>
banner.css (block styles)
Here, we’ll define the basic CSS styles for our block. These styles will apply to both the front end and the editor.
.banner {
    display: flex;
    flex-direction: column;
    gap: 10px;
}

.banner__title {
    font-size: 24px;
    font-weight: bold;
}

.banner__description {
    font-size: 16px;
    color: #555;
}
4. Register the block
Now that we have our folder structure, JSON file, PHP template, and CSS ready, the next step is to register the block with WordPress. For this, we'll use the register_block_type() function, which is part of the WordPress Block API.
However, since we are using ACF prefixed namespace (acf/), the block will be handled by ACF:
add_action( 'init', function (): void {
    register_block_type( __DIR__ . '/blocks/banner' );
} );
You can add this code to the functions.php file of your theme.
Testing the block
That’s it! Although we've created a basic demo block without any settings, we’ve successfully made a custom Gutenberg block using ACF.
Steps to test:
- Open the Gutenberg Editor:
Visit any post, page, or custom post type that uses the Gutenberg editor. - Search for Your Block:
In the block library (click the "Add Block" button), search for the Banner block by typing "Banner" or scrolling through the list. - Add the Block:
Once you find the Banner block, add it to your page or post. You’ll see the placeholder content (the title and description stubs we included). - Save and Preview:
Save or update the post, then visit the front end of the site to verify the block appears correctly.
Now that we’ve confirmed the block is working correctly, we can move on to adding dynamic ACF fields and settings. This will allow editors to customize the block’s content - such as uploading a background image or adding a title and description - directly from the editor.
Assigning block settings
Now that we’ve created a basic block, let’s make its content dynamic and editable by assigning ACF fields to it:
- Create a new ACF Group:
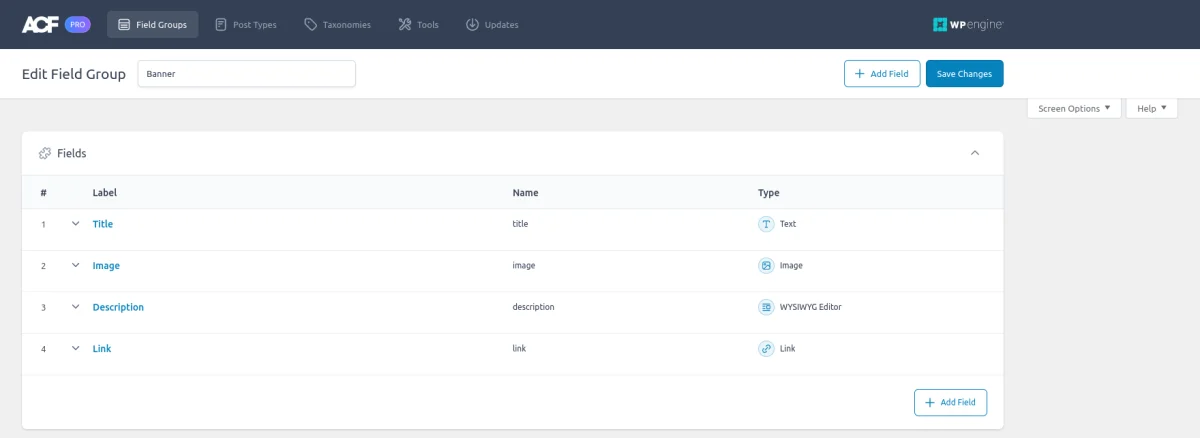
In your WordPress dashboard, go to ACF -> Field Groups -> Add New to create a new field group. - Add Fields for the Block:
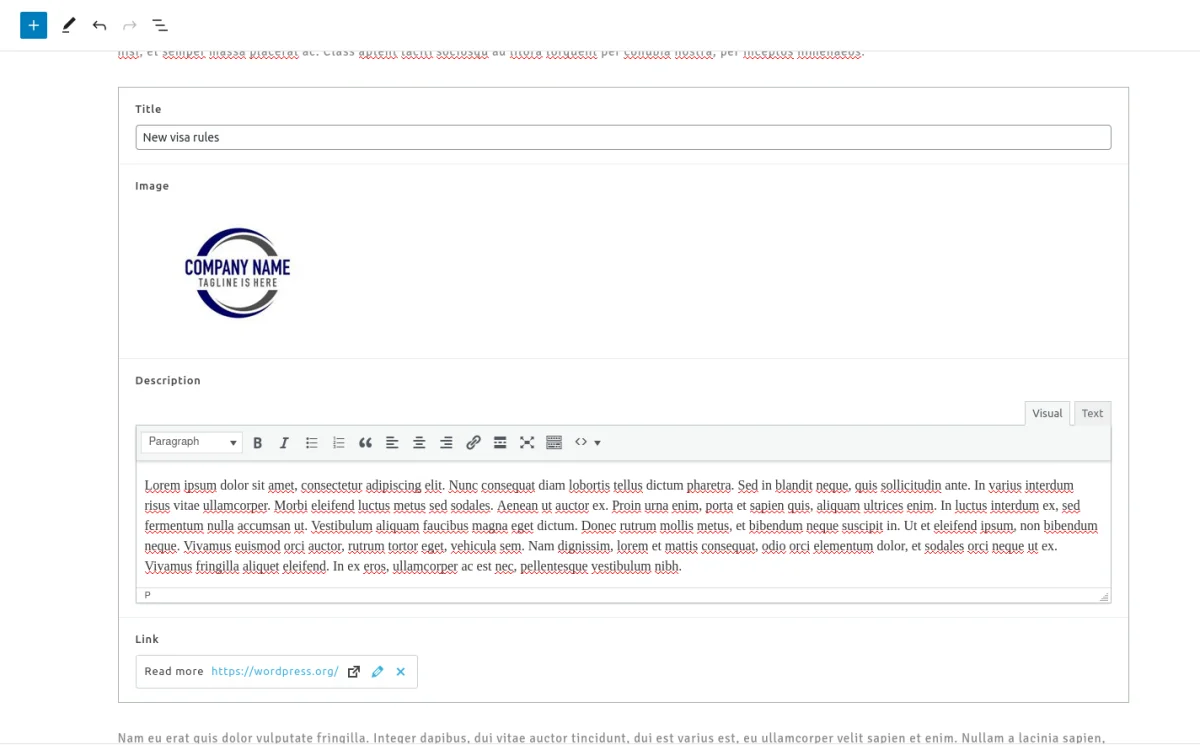
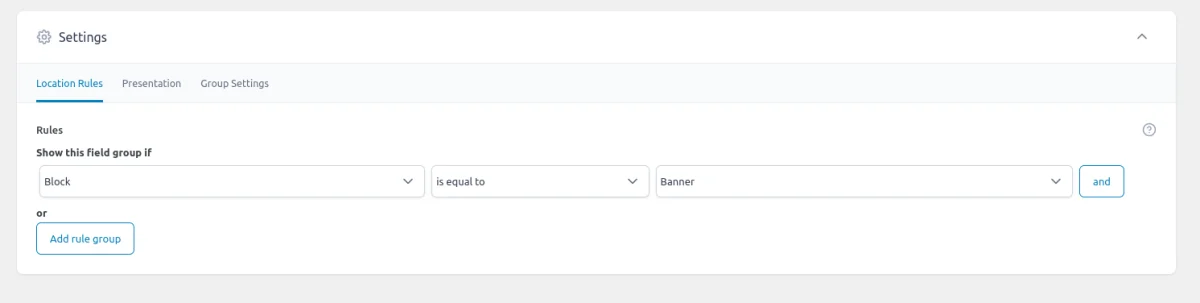
Add the fields that will be used in the block. In our Banner block example, the following fields will be used: Title (Text), Image (Image), Description (Text), Link (Link). - Set Location Rules:
In the Location section, configure the rule to apply the fields to the block. Set the condition to: Show this field group if: Block is equal to Banner. - Save the Field Group:
After defining the fields and setting the location rule, save the field group.
Modify the block's render template
Now that we have fields assigned, we’ll update the block's render template (banner.php) to display dynamic content. To retrieve the field values, we'll use the familiar ACF get_field() function. However, it's important to omit the second source argument (leave it empty or set to false) to ensure the data is pulled from the current block context.
Keep in mind that get_field() returns different data formats depending on the field type, so you may want to refer to the field types documentation for specific instructions.
Additionally, remember to escape all output for security, as demonstrated below:
<?php
/**
 * Banner Block Template.
 *
 * @param array $block The block settings and attributes.
 * @param string $content The block inner HTML (empty).
 * @param bool $is_preview True during backend preview render.
 * @param int $post_id The post ID the block is rendering content against.
 *          This is either the post ID currently being displayed inside a query loop,
 *          or the post ID of the post hosting this block.
 * @param array $context The context provided to the block by the post or it's parent block.
 */


$title = get_field('title') ?: '';
$description = get_field('description') ?: '';
$image = get_field('image') ?: 0;
$linkData = get_field('link');
$link = '';

$image = $image ?
    wp_get_attachment_image($image, 'full', false, [
        'class' => 'banner__image',
    ]) :
    '';

if ($linkData) {
    // if the 'target' is presented, it's a bool. We've to convert it into the HTML format
    $target = isset($linkData['target']) && $linkData['target'] ?
        '_blank' :
        '_self';
    // Each %s in the string will be replaced with the related argument
    $link = sprintf(
        "<a class='banner__link' href='%s' target='%s'>%s</a>",
        esc_url($linkData['url']),
        esc_html($target),
        esc_attr($linkData['title'])
    );
}

?>
<div class="banner">
    <p class="banner__title"><?php
        echo esc_html($title); ?></p>

    <?php
    echo $image; ?>

    <div class="banner__description"><?php
        echo esc_html($description); ?></div>

    <?php
    echo $link ?>
</div>
After updating the template, return to the page where the block is inserted, and you'll find that all the block fields are now editable! You can adjust the content directly from the Gutenberg editor.
Once you've saved your changes, visit the front-end to see the block displaying the editor-controlled content dynamically.
And that's it! You've successfully created a custom ACF block. Now, feel free to further customize the template and add any additional styles to fit your design needs.
3.3) Using ACF Blocks API v1 (not recommended)
In earlier versions of ACF, specifically ACF Blocks v1, blocks were registered using the acf_register_block_type() function instead of the block.json file and register_block_type(). However, starting with ACF 6.0, this method has been deprecated. ACF now recommends using the block.json approach as part of the ACF Blocks v2.
ACF notes that “Blocks registered with acf_register_block_type may not work with modern versions of WordPress.” While existing blocks using this method will still function, it’s important to understand that continuing to use it could pose risks in terms of compatibility with future WordPress versions.
That said if you're willing to accept that risk, using this function is simpler and faster than using the register_block_type() method.
Here's an example of how you can register the banner block using acf_register_block_type() call, added to your theme's functions.php file:
add_action('acf/init', function (): void {
    if (false === function_exists('acf_register_block_type')) {
        return;
    }

    acf_register_block_type([
        'name' => 'acf/banner',
        'title' => __('Banner'),
        'description' => __('A custom banner block with ACF fields.'),
        'render_template' => 'blocks/banner/banner.php',
        'category' => 'formatting',
        'icon' => 'admin-comments',
        'keywords' => ['banner',],
        'enqueue_style' => get_template_directory_uri() . '/blocks/banner/banner.css',
        'mode' => 'edit',
    ]);
});
As you can see, unlike the register_block_type method, this approach allows us to pass all block arguments directly, eliminating the need to create a JSON configuration for each block instance. The rest of the process, including creating the ACF Group, as well as the template and styles, remains identical to what we've described above:
Put the following code to the blocks/banner/banner.php file in your theme:
<?php
/**
 * Banner Block Template.
 *
 * @param array $block The block settings and attributes.
 * @param string $content The block inner HTML (empty).
 * @param bool $is_preview True during backend preview render.
 * @param int $post_id The post ID the block is rendering content against.
 *          This is either the post ID currently being displayed inside a query loop,
 *          or the post ID of the post hosting this block.
 * @param array $context The context provided to the block by the post or it's parent block.
 */


$title = get_field('title') ?: '';
$description = get_field('description') ?: '';
$image = get_field('image') ?: 0;
$linkData = get_field('link');
$link = '';

$image = $image ?
    wp_get_attachment_image($image, 'full', false, [
        'class' => 'banner__image',
    ]) :
    '';

if ($linkData) {
    // if the 'target' is presented, it's a bool. We've to convert it into the HTML format
    $target = isset($linkData['target']) && $linkData['target'] ?
        '_blank' :
        '_self';
    // Each %s in the string will be replaced with the related argument
    $link = sprintf(
        "<a class='banner__link' href='%s' target='%s'>%s</a>",
        esc_url($linkData['url']),
        esc_html($target),
        esc_attr($linkData['title'])
    );
}

?>
<div class="banner">
    <p class="banner__title"><?php
        echo esc_html($title); ?></p>

    <?php
    echo $image; ?>

    <div class="banner__description"><?php
        echo esc_html($description); ?></div>

    <?php
    echo $link ?>
</div>
Note: We used the same location as in the previous case, but you can place it anywhere within your theme. Just remember to adjust the render_template and enqueue_style options in the acf_register_block_type call accordingly.
Despite being registered differently, the editor interface for fields and the block behavior will remain identical to the block.json method. This is because both approaches utilize the same ACF API under the hood.
4. How to manage appearance in Gutenberg
In the previous chapter, we explored how to add an ACF block, focusing primarily on the front end. Not let's see how to make editor-targeted things.
4.1) ACF block editor-only template parts
As mentioned earlier, the block template is utilized for block previews in both the editor and on the front end. However, there is a way to determine the current rendering context and provide additional options and features.
While this is optional and you can use the same layout for both contexts, distinguishing between them can be beneficial. To achieve this, you can leverage the $is_preview variable, which is always passed to the block's render template. This variable is set to true only when the block is rendered in the Gutenberg editor.
You can use this variable to display editor-only elements or suggestions:
<?php
/**
 * Custom Block Template.
 *
 * @param array $block The block settings and attributes.
 * @param string $content The block inner HTML (empty).
 * @param bool $is_preview True during backend preview render.
 * @param int $post_id The post ID the block is rendering content against.
 *          This is either the post ID currently being displayed inside a query loop,
 *          or the post ID of the post hosting this block.
 * @param array $context The context provided to the block by the post or it's parent block.
 */

if (true === $is_preview) {
    echo 'This piece is displayed only for editors';
}
If you’ve defined supports in the block.json, you can also use the $is_preview check in conjunction with the get_block_wrapper_attributes() WordPress function:
<?php

$attributes = true === $is_preview ?
    get_block_wrapper_attributes() :
    '';

?>
<div class="banner" <?php echo $attributes; ?>>
    <!--todo your markup-->
</div>
4.2) ACF block editor-only styles and scripts
By default, an ACF block utilizes a single style file specified in the style argument of the block.json file. However, there may be instances where you want to include editor-only styles or scripts that are applied solely within the Gutenberg editor.
To achieve this, you can use the editorStyle and editorScript options, employing the file: prefix in the same manner as you did for the style argument:
{
    "name": "acf/banner",
    "style": ["file:./banner.css"],
    "editorStyle": ["file:./admin-banner.css"],
    "editorScript": ["file:./admin-script.js"]
}
5. ACF Block practical examples
Learning through practice is one of the best ways to grasp new concepts. Below, you'll find a list of repositories featuring ACF blocks that serve as real-life examples for your reference:
- Testimonials ACF Block: A block focused on showcasing testimonials.
- FAQ Accordion ACF Block: A block designed to display FAQs in an accordion format.
- SwiperJS Carousel ACF Block: A carousel block utilizing SwiperJS for enhanced interactivity.
- Flickity Carousel ACF Block: Another carousel option that leverages the Flickity library.
- Like ACF Block with WP Interactivity API: A block that allows users to "like" content using the WP Interactivity API.
- Starter Blocks Kit from WDS with Tailwind: A collection of starter blocks designed with Tailwind CSS for rapid development.
6. Advanced usage
Since ACF Blocks build on top of WordPress and Gutenberg's core features, you can take advantage of various native WordPress and Gutenberg APIs to enhance your block's functionality.
6.1) Interactivity API
The WordPress Interactivity API is a relatively new addition that enables the creation of declarative templates natively. By leveraging Preact, it offers server-side rendering (SSR) right out of the box, making it a powerful tool for creating dynamic user interfaces.
To enable support for the Interactivity API in your block, simply add "interactivity": true to the supports section of your block.json file.
Note: If you’re using the Advanced Views Framework, support for the Interactivity API is built-in and requires no additional changes.
6.2) Block supports
The WordPress Block Supports API allows developers to control various aspects of block behavior and appearance.
Controlling block supports
You define block supports in the block.json file of your ACF Block using the supports key. This is where you can enable or disable specific features that dictate how users interact with your blocks in the editor. Here's a breakdown of some key supports you can control:
{
    "name": "acf/banner",
    "supports": {
        "align": true,
        "html": false,
        "jsx": true,
        "mode": true
    }
}
Available block supports
Gutenberg offers a broad array of block supports, allowing developers to tailor the block behavior within the editor. Below is a review of some of the most useful block supports:
- align (boolean/array)
Controls alignment options for your block, allowing users to set it to left, right, center, wide, or full.
Default Value: true (enables all alignment options).
Customization: You can limit the alignment options by specifying an array of allowed values: ["left", "right", "full"] - html (boolean)
Determines whether users can edit the block’s HTML directly in the block editor.
Default Value: false (disables direct HTML editing). - jsx (boolean)
Indicates whether the block can leverage JSX for rendering. This is essential for using features like <InnerBlocks />.
Default Value: true (enables JSX rendering). - mode (boolean)
Allows users to toggle between edit and preview modes.
Default Value: true (enables mode toggling). - multiple (boolean)
Controls whether the block can be added more than once to the same post or page.
Default Value: true - inserter (boolean)
Determines whether the block appears in the block inserter panel.
Default Value: true (block appears in the inserter by default). - spacing (object)
Controls margin, padding, and block gap settings for your block, offering granular control over spacing. - color (object)
Provides control over background and text colors.
6.3) Block context
Since version 6.0, ACF supports the Gutenberg block context.
Block context allows parent blocks to supply values that can be accessed by their child blocks, enhancing the organizational structure and editorial experience. This means you can create complex nested ACF Blocks without directly linking them in code.
Key points:
- Downward data flow
Block context only flows from parent-to-child blocks, not vice versa. - Automatic updates
If the parent block’s field is updated, the child block will automatically re-render, ensuring the latest data is displayed. - Post ID and Type variables
ACF automatically passes down postId and postType through block context, making it easier to nest blocks in Query Loop blocks.
Defining context
Block context is specified in the block.json file of both provider and consumer blocks:
Provider block:
{
    "providesContext": {
        "acf/fields": "data"
    }
}
Consumer block:
{
    "usesContext": ["acf/fields"]
}
Accessing context value
In the child block’s template, you can access the parent block's values using the default $context variable:
<?php
/**
 * Custom Block Template.
 *
 * @param array $block The block settings and attributes.
 * @param string $content The block inner HTML (empty).
 * @param bool $is_preview True during backend preview render.
 * @param int $post_id The post ID the block is rendering content against.
 *          This is either the post ID currently being displayed inside a query loop,
 *          or the post ID of the post hosting this block.
 * @param array $context The context provided to the block by the post or it's parent block.
 */

echo $context['acf/fields']['an_example_field'];
Field keys vs. names
Use $context['acf/fields']['field_key'] to retrieve data. Use $context['acf/fields']['field_name'] only when you need to get the default field values. This ensures compatibility for both backend and frontend output.
Tip: To find the field key, navigate to the ACF field group in the WordPress admin. Click on the Screen Options button at the top right corner of the page, then check the Field Keys option. Once enabled, the field keys will be displayed next to each field name in the group.
6.4) InnerBlocks
The InnerBlocks component is a powerful tool in WordPress block development, allowing you to nest blocks inside other blocks. When building custom blocks using ACF, InnerBlocks opens up the possibility to create structured, nested content.
InnerBlocks is a React component that WordPress provides for developers to insert nested blocks into their custom blocks. This means that a parent block can contain a variety of child blocks, either allowing freeform content or following a pre-defined structure.
For instance, native WordPress blocks like Columns or Social Icons rely on InnerBlocks to handle the blocks nested inside them.
Key features of InnerBlocks:
- Flexible Block Nesting:
Developers can define block templates that automatically populate nested blocks when the parent block is inserted. This is especially useful for more complex layouts. - Parent-Child Relationships:
InnerBlocks supports parent and ancestor relationships, meaning you can control where certain blocks appear and which blocks they can contain. - Templates and Predefined Layouts:
You can pass a block template into InnerBlocks to streamline the editorial experience, so when a block is added, it can include pre-set child blocks.
Let’s see how our banner block, previously driven by ACF fields, can be transformed into a Gutenberg component-driven design, bringing it closer to the native Gutenberg blocks.
<?php
/**
 * Banner Block Template with InnerBlocks.
 *
 * @param array  $block The block settings and attributes.
 * @param string $content The block inner HTML (empty).
 * @param bool   $is_preview True during backend preview render.
 * @param int    $post_id The post ID the block is rendering content against.
 * @param array  $context The context provided to the block by the post or its parent block.
 */

// Support custom id values (for anchor links).
$block_id = '';
if ( ! empty( $block['anchor'] ) ) {
    $block_id = esc_attr( $block['anchor'] );
}

// Support custom class names.
$class_name = 'custom-banner-block';
if ( ! empty( $block['className'] ) ) {
    $class_name .= ' ' . $block['className'];
}

// Define a simple block template.
$inner_blocks_template = array(
    array(
        'core/heading',
        array(
            'placeholder' => 'Enter Banner Title...',
            'level'       => 2, // H2 heading
        ),
    ),
    array(
        'core/paragraph',
        array(
            'placeholder' => 'Enter banner description...',
            'fontSize'    => 'large',
        ),
    ),
    array(
        'core/image',
        array(
            'align'     => 'center',
            'sizeSlug'  => 'large',
            'className' => 'custom-banner-image',
        ),
    ),
    array(
        'core/button',
        array(
            'text'       => 'Learn More',
            'align'      => 'center',
            'className'  => 'custom-banner-button',
        ),
    ),
);

?>

<?php if ( ! $is_preview ) { ?>
    <div
        <?php
        echo wp_kses_data(
            get_block_wrapper_attributes(
                array(
                    'id'    => $block_id,    // Block ID
                    'class' => esc_attr( $class_name ),   // Custom class names
                )
            )
        );
        ?>
    >
<?php } ?>

    <!-- InnerBlocks to allow content editing inside the block -->
    <InnerBlocks
        class="custom-banner-block__innerblocks"
        template="<?php echo esc_attr( wp_json_encode( $inner_blocks_template ) ); ?>"
        allowedBlocks="<?php echo esc_attr( wp_json_encode( array( 'core/heading', 'core/paragraph', 'core/image', 'core/button' ) ) ); ?>"
        templateLock="false"  <!-- Set template lock to false to allow users to change the structure -->
    />

<?php if ( ! $is_preview ) { ?>
    </div>
<?php } ?>
Explanation of the code:
- Block ID and Class
We handle the anchor (custom ID) and className attributes to allow for custom IDs and classes in the block. - InnerBlocks Template:
This template includes basic blocks like Heading (for the banner title), Paragraph (for a description), Image (for adding a banner image), and Button (for a call-to-action). - InnerBlocks Rendering
We use InnerBlocks to allow the user to edit the banner content in the editor using the defined template.
The template parameter pre-defines the structure of the blocks, while allowedBlocks ensures only the specified blocks (heading, paragraph, image, button) can be added.
templateLock (false) allows editors to modify the block structure (e.g., delete or add more blocks).
Summary
As you can see, this shift places more control in the hands of the editor, giving them greater flexibility over the banner's design and content. The benefit of using InnerBlocks is that it allows editors to customize layouts directly, which can make the block more dynamic and adaptable.
However, this approach comes with trade-offs. The drawback is that we lose some control over the layout structure, which might lead to inconsistency if editors aren't familiar with design guidelines. Additionally, it demands a higher skill level from users to maintain the visual integrity of the content.
Therefore, using InnerBlocks is a case-specific decision, and in many cases, you might prefer sticking to predefined ACF fields to ensure tighter control over the design and functionality.
6.5) Postmeta storage for queryable ACF blocks
As we discussed in the introduction, ACF blocks, by default, follow the Gutenberg block principles and store their data within the post_content field of the wp_posts table. While this approach enhances performance, it comes with a significant drawback: you can't query specific values like you can with traditional meta fields.
In certain scenarios, querying by block values becomes necessary, especially when using blocks instead of conventional fields for specific reasons. Thankfully, starting from the ACF 6.3 release, ACF has introduced a feature that allows for postmeta storage. This means you can save block settings in postmeta, similar to standard meta fields.
To enable this feature, you need to set the usePostMeta flag inside the ACF section of your block.json file. Here’s how you can do it:
{
    "name": "acf/banner",
    "title": "Banner",
    // ....
    "acf": {
        "usePostMeta": true
    }
}
After enabling the usePostMeta feature, you can master WP_Query using these fields just like you would with plain meta fields. Each ACF field type has its own storage format, so check out our ACF Fields Tutorial List, where you’ll find field-specific guides.
6.6) Translation of ACF Blocks
When it comes to multilingual support, ACF Blocks can be divided into two main components: field labels (which editors interact with) and block content. The field labels and the entire field group can be translated using multilingual plugins like Polylang or WPML.
Check out the ACF-related pages in the WPML and Polylang documentation for detailed instructions on configuring translations.
On the other hand, the block content is part of the page itself, so it doesn't require any special handling. Instead, it is translated as usual by creating separate page versions for each language.
Thank you for reading! to our monthly newsletter to stay updated on the latest WordPress news and useful tips.

Stuck with development or facing an issue?
WPLake offers affordable on-demand website development and design.
No matter the size of your project - contact us now, and we'll get it done for you!
Frequently Asked Questions Test Your Knowledge
FAQ mode
/
Learning mode
- Can I register a block without fields?
Yes, you can register a block without fields. This is useful in scenarios like a "latest posts" block, where you simply want to render PHP within the block.
- Can I extend core blocks using ACF fields?
No, the ACF Blocks API does not support extending existing core blocks. You can create custom blocks, but extending core functionality isn’t possible.
- Do I need to write any JavaScript?
No, you don’t need to write any JavaScript. The ACF Blocks framework operates entirely in PHP. However, you can incorporate JavaScript if your block requires additional functionality, such as a carousel slider.
Course navigation: ACF Plugin

Lesson #9
Time to read: 26 mins
Updated 19 Sep, 2024
Content links (92)
About the Author

As for when to use it, let’s take this blog article as an example. The code snippets you see here are ACF blocks, each with two fields: the code itself and the programming language (like PHP or JavaScript). Right now, the usePostMeta option is off for those blocks, so the data is stored inside the post content. That means we currently can’t query for all blog articles that include PHP code. But if we ever needed that — for example, to introduce a "PHP snippets" blog category - we'd enable usePostMeta, and that would allow us to find all posts containing one or more PHP snippets.