ACF Options Page Feature

Key Points at a Glance
- ACF Options Page Overview: The ACF plugin includes a powerful feature called Options Pages, which allows for the creation of a dedicated page in the WordPress admin panel to manage global site settings and related fields efficiently.
- Data Storage Behind the Scenes: Unlike typical ACF fields associated with posts or pages stored in the wp_postmeta table, ACF options page fields are stored in the wp_options table, enabling better organization and retrieval of data.
- Two Setup Approaches: Administrators can add options pages using either the built-in UI provided by ACF Pro or by manually coding it using functions like acf_add_options_page(), offering flexibility in setup methods.
- Multilingual Support: Managing multilingual content poses a challenge for options page fields, as they are stored differently in the database. However, popular multilingual plugins like Polylang and WPML offer solutions to make these fields translatable.
- Display Methods: Options page fields can be displayed on the front end using Smart templates provided by plugins like Advanced Views or by coding PHP templates, allowing for customization based on user preferences and coding expertise.
Table of Contents
About the ACF Options Page
Advanced Custom Fields (ACF) plugin is one of the best plugins for managing meta fields and Custom Post Types (CPTs). Besides managing meta fields, it contains a row of other features, including the ACF Options Pages. This powerful feature allows you to create a dedicated page in your WordPress admin panel to manage global site settings and other related fields.
Let's imagine you have a website with a customizable theme, and you want to provide a centralized location where administrators can control site-wide settings. The ACF options page can be your solution.
You can attach any fields from its rich set - from simple field types like True/False options and images (e.g., logo) to complex ones like repeaters or even reuse existing groups using the Clone field, enabling you to easily manage site-wide options. The possibilities are endless!
Unlike the 'hard' coded way, by utilizing the options page, you streamline the management of these settings. And making it more convenient and efficient for administrators to maintain the site's look and feel.
Note: The options page is a Pro feature, and requires the Pro version of the Advanced Custom Fields plugin.
Behind the Scenes
To understand how the ACF options page works, it's essential to know how ACF stores data. While ACF typically stores fields associated with posts or pages in the wp_postmeta table of your WordPress database, in this case, the plugin handles options page fields differently. ACF stores the fields for the options page in the wp_options table. This separation allows for better organization and retrieval of data.
On the practice, for us it means only one change about getting values: you must define the "options" source as the get_field() second argument, instead of a post id.
How to setup
Adding an options page to your WordPress admin panel using ACF is a straightforward process. The process consists of two parts:
- Adding an options page
- Creating an ACF field group and 'attaching' it to the options page
1. Adding an options page
Let's begin with the first. Here we have 2 ways to achieve it: using the built-in feature, or coding. You can choose whatever is preferred by you.
Since version 6.2, ACF Pro includes a built-in UI for creating options pages. Previously, an addon was required for this UI solution. While the use of that addon is no longer as relevant as it once was, there are still other valuable ACF addons available.
Adding an options page using the built-in feature
Watch the official video below to see how to add a new options page using the plugin's UI.
Adding an options page manually
If you prefer the coding approach, then open your theme's functions.php file and paste the code snippet below. We use the acf_add_options_page() function to create the options page:
add_action('acf/init', function () {
    acf_add_options_page([
        'page_title' => 'Global Site Settings',
        'menu_title' => 'Site Settings',
        'menu_slug' => 'site-settings',
        'capability' => 'manage_options',
        'position' => 30,
        'icon_url' => 'dashicons-admin-generic',
    ]);
});
In this example, we create an options page titled "Global Site Settings" with a menu title of "Site Settings." The menu slug defines the URL of the options page. We set the capability to manage_options to ensure only administrators can access it. The position parameter determines the placement of the options page in the WordPress admin menu. Finally, the icon_url specifies the icon to display next to the options page in the menu. You can use any of the available dashicons by providing the corresponding class name.
Now save the changes to the functions.php file, and you're done! The options page will now appear in the WordPress admin panel. It's ready for you to add custom fields and manage global site settings.
2. Adding an ACF Group
Now it's time to assign fields to our options page.
Create a new field group in ACF and add the necessary fields.
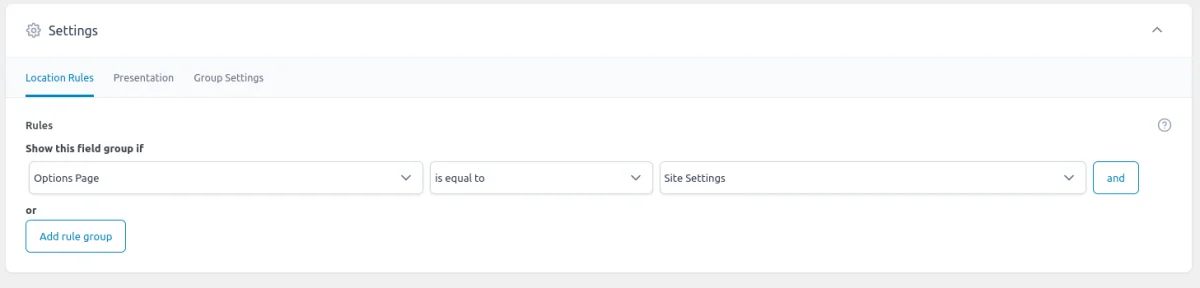
Then under the "Location" settings for the field group, select "Options Page" as the rule to display the fields on the options page. Just like it's shown in the screenshot below.
Save the field group, and you're done! Now you can visit your options page and see the fields from your group there.
How to display the fields
With the options page set up and fields assigned, it's time to showcase these fields on the front end of your website. Below, we'll outline two approaches: the first leverages Smart templates, while the second follows the classic, manual approach. You're free to opt for the method that suits your preferences.
A) Using Smart templates
Let's get familiar with the Advanced Views framework.
Advanced Views introduces smart templates for effortless content display. It comes with built-in post queries and automated template generation, enabling rapid development while maintaining flexibility.
Let's first clarify what we mean by 'templates' in the context of this plugin: Advanced Views templates are built on the Twig engine. You might be thinking, 'Not bad, but it still requires fetching fields via PHP and writing markup from scratch, not to mention reading Twig documentation'.
Here's where the plugin shines: "Smart templates". This means we don't have to fetch fields or create markup manually from scratch. The plugin provides a solid foundation that covers most use cases. If we require something specific, we can easily customize it. Isn't that nice?
Basics
Now, let's take a basic look at how it works.
The plugin introduces two new Custom Post Types (CPTs): ACF View and ACF Card.
- View for post data and Advanced Custom Fields
We create a Layout and assign one or more post fields, the plugin then generates a shortcode that we'll use to display the field values to users. We can style the output with the CSS field included in every View. - Card for post selections
We create a Post Selection and assign posts (or CPT items), choose a Layout (that will be used to display each item) and the plugin generates a shortcode that we'll use to display the set of posts. The list of posts can be assigned manually or dynamically with filters.
The plugin offers us the convenience of working with familiar WordPress CPTs while taking care of querying and automatically generating Twig markup templates. You can find more information about the plugin's benefits here.
To follow along; install the Advanced Views framework on your WordPress site and remember to activate it. You'll also need the ACF (free) plugin installed and active. Then continue to the next steps below.
When you activate the Advanced Views framework a new item appears in the admin menu, called "Advanced Views". The item has several sub-items, but in our case, we'll be working only with the one called "Advanced Views".
To display the fields from the options page, follow the instructions below:
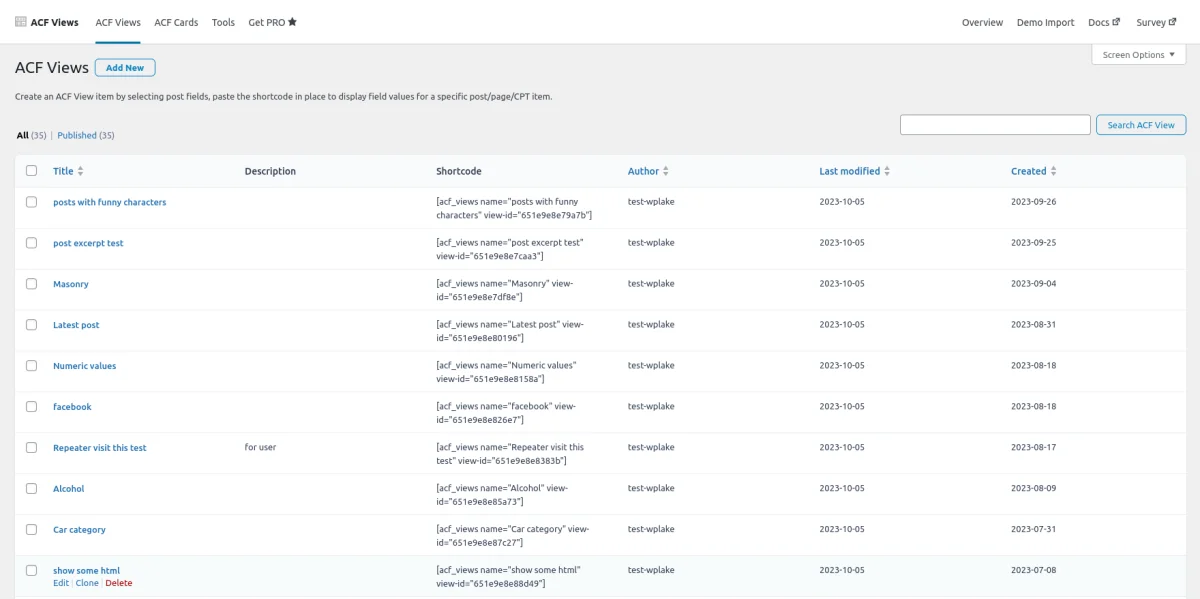
- Click on the "Advanced Views" menu item to access the Advanced Views page.
- Click the "Add New" button to create a new View.
- On the new page, give your View a descriptive name. For example, let's name it "Site Settings".
- Choose the fields you want to display from the dropdown menu.
- Press the "Publish" button to generate the shortcode for the View.
- Copy the generated shortcode and amend it, to pass the 'options' string to the 'object-id' parameter as the argument. So you shortcode will look like this: [acf_views view-id="5" name="Site Settings" object-id="options"]. But for sure, the view-id and name arguments will contain your specific values.
- Paste the shortcode in the appropriate location. This can be any Gutenberg page or even a widget. Remember to use the correct element, such as the shortcode block of the Gutenberg editor.
- Save and visit the page, to see the result.
- Congratulations! You have successfully displayed the fields from the options page.
Unlike using custom code, you don't need to worry about the field's name, type, or return format. The plugin automatically generates the HTML markup for you.
Additionally, you can apply CSS rules to style the output directly within the View. The CSS Code field can be found under the "Advanced" tab.
B) Using PHP code
While the Advanced Views framework provides an excellent solution for displaying fields from the options page, some developers may prefer a more hands-on coding approach. In such cases, using PHP code to retrieve and display the data is a viable option.
However, it's important to note that this method requires a higher level of coding knowledge and may not be as user-friendly for beginners. It involves using functions like get_field() to fetch the values from the options page fields and then manually echoing or manipulating them within your PHP template files.
Here's a simple example of how you can display an options page field using PHP code:
// the code below expects the 'Image URL' Return Format
$logoUrl = get_field('logo', 'options')?? '';
printf('<img src="%s" alt="logo">', $logoUrl);
You can use the same get_field() function, like in other cases, just passing the 'options' string as the second argument.
The complexity of this approach is that ACF has over 30 field types, and get_field's response depends not only on the field type but also on the field return format. Check the list of main field types to get specific how-to guides.
To get additional information, watch the video below and read the official ACF article.
So, while this approach offers more control and customization possibilities, it requires a deeper understanding of PHP and WordPress development, making it less accessible to those who prefer a more intuitive solution.
Multilingual support
This is an essential note for multilingual websites, which have (or will have) content in several languages.
As we mentioned in the Behind the Scenes chapter, ACF stores values of the option page fields in the wp_options table. This difference means that you can't translate them in the same way, like plain pages or posts, by creating 'another' post in a specific language.
It may sound scary, but don't worry, most of the multilingual plugins already took care of it.
For example, if you use Polylang, there is an addon that handles it. If you use WPML, the solution is built-in, and you just need to select the right translation option for your ACF group to make fields translatable.
Summary
The ACF options page feature empowers WordPress administrators to easily manage global site settings and related fields.
By creating a dedicated options page, you can streamline the customization process and enhance the overall user experience. Whether you choose to use the Advanced Views framework or opt for a PHP coding approach, the options page unlocks the potential to centralize and control essential aspects of your WordPress site.
Experiment with the options page and discover how it can make your website management more efficient and enjoyable.
Thank you for reading! to our monthly newsletter to stay updated on the latest WordPress news and useful tips.

Stuck with development or facing an issue?
WPLake offers affordable on-demand website development and design.
No matter the size of your project - contact us now, and we'll get it done for you!
Frequently Asked Questions Test Your Knowledge
FAQ mode
/
Learning mode
- What is an ACF options page?
An ACF options page is a dedicated page within the WordPress admin panel created using the Advanced Custom Fields (ACF) plugin, allowing administrators to manage global site settings and related fields efficiently.
- How are ACF options page fields stored?
Unlike typical ACF fields associated with posts or pages, ACF options page fields are stored in the wp_options table of the WordPress database, providing better organization and retrieval of data.
- How do I set up an ACF options page?
Setting up an ACF options page involves two main steps: adding the options page itself using either the built-in UI or coding approach, and creating an ACF field group to attach to it for managing fields.
- Does the ACF options page support multilingual websites?
Yes, although ACF options page fields are stored differently in the database, popular multilingual plugins like Polylang and WPML offer solutions to make these fields translatable, ensuring compatibility with multilingual websites.
- How can I display fields from the options page on the front end of my website?
Fields from the options page can be displayed on the front end using either Smart templates provided by plugins like Advanced Views or by manually coding PHP templates, offering flexibility in display methods.
Course navigation: ACF Plugin

Lesson #6
Time to read: 22 mins
Updated 22 Oct, 2024

Lesson #8
Time to read: 22 mins
Updated 01 Oct, 2024
Content links (25)
17.
twig.symfony.comAbout the Author