Mastering WooCommerce One-Page Checkout: A Guide

Key Points at a Glance
- Definition of One-Page Checkout: Explanation of what one-page checkout is and its purpose in simplifying the checkout process.
- Benefits of One-Page Checkout: Discuss how one-page checkout reduces friction, increases conversion rates, and decreases cart abandonment.
- Comparison with Multi-Page Checkout: Highlight the drawbacks of multi-page checkouts and the advantages of a streamlined, single-page process.
- Setting Up in WooCommerce: Steps to enable one-page checkout using built-in WooCommerce features or themes like Avada.
- Popular Plugins: Recommendations for one-page checkout plugins, including WooCommerce One Page Checkout by ThemeForest and WP Simple Pay (Stripe).
- Customization Tips: Advice on design, layout, and mobile optimization to ensure a user-friendly one-page checkout.
- Payment Gateway Integration: Importance of integrating and testing various payment gateways for a seamless checkout experience.
- Enhancing User Experience: Tips on minimizing required fields, using auto-fill features, and addressing common user concerns like security.
- Testing and Optimization: Emphasis on testing the checkout process across devices, optimizing performance, and using A/B testing for continuous improvement.
- Case Studies and Lessons Learned: Examples of successful implementations and key takeaways for applying best practices to your store.
Table of Contents
Introduction
In the world of eCommerce, optimizing the checkout process is crucial for boosting conversion rates and reducing cart abandonment. WooCommerce, a popular WordPress plugin, provides a powerful platform for online stores, and enhancing its checkout process can lead to significant improvements in sales. One of the most effective ways to streamline this process is by implementing a one-page checkout. This guide will explore the benefits, setup, customization, and optimization of WooCommerce one-page checkout, ensuring you can provide a seamless shopping experience for your customers.
What is One-Page Checkout?
Definition and Purpose
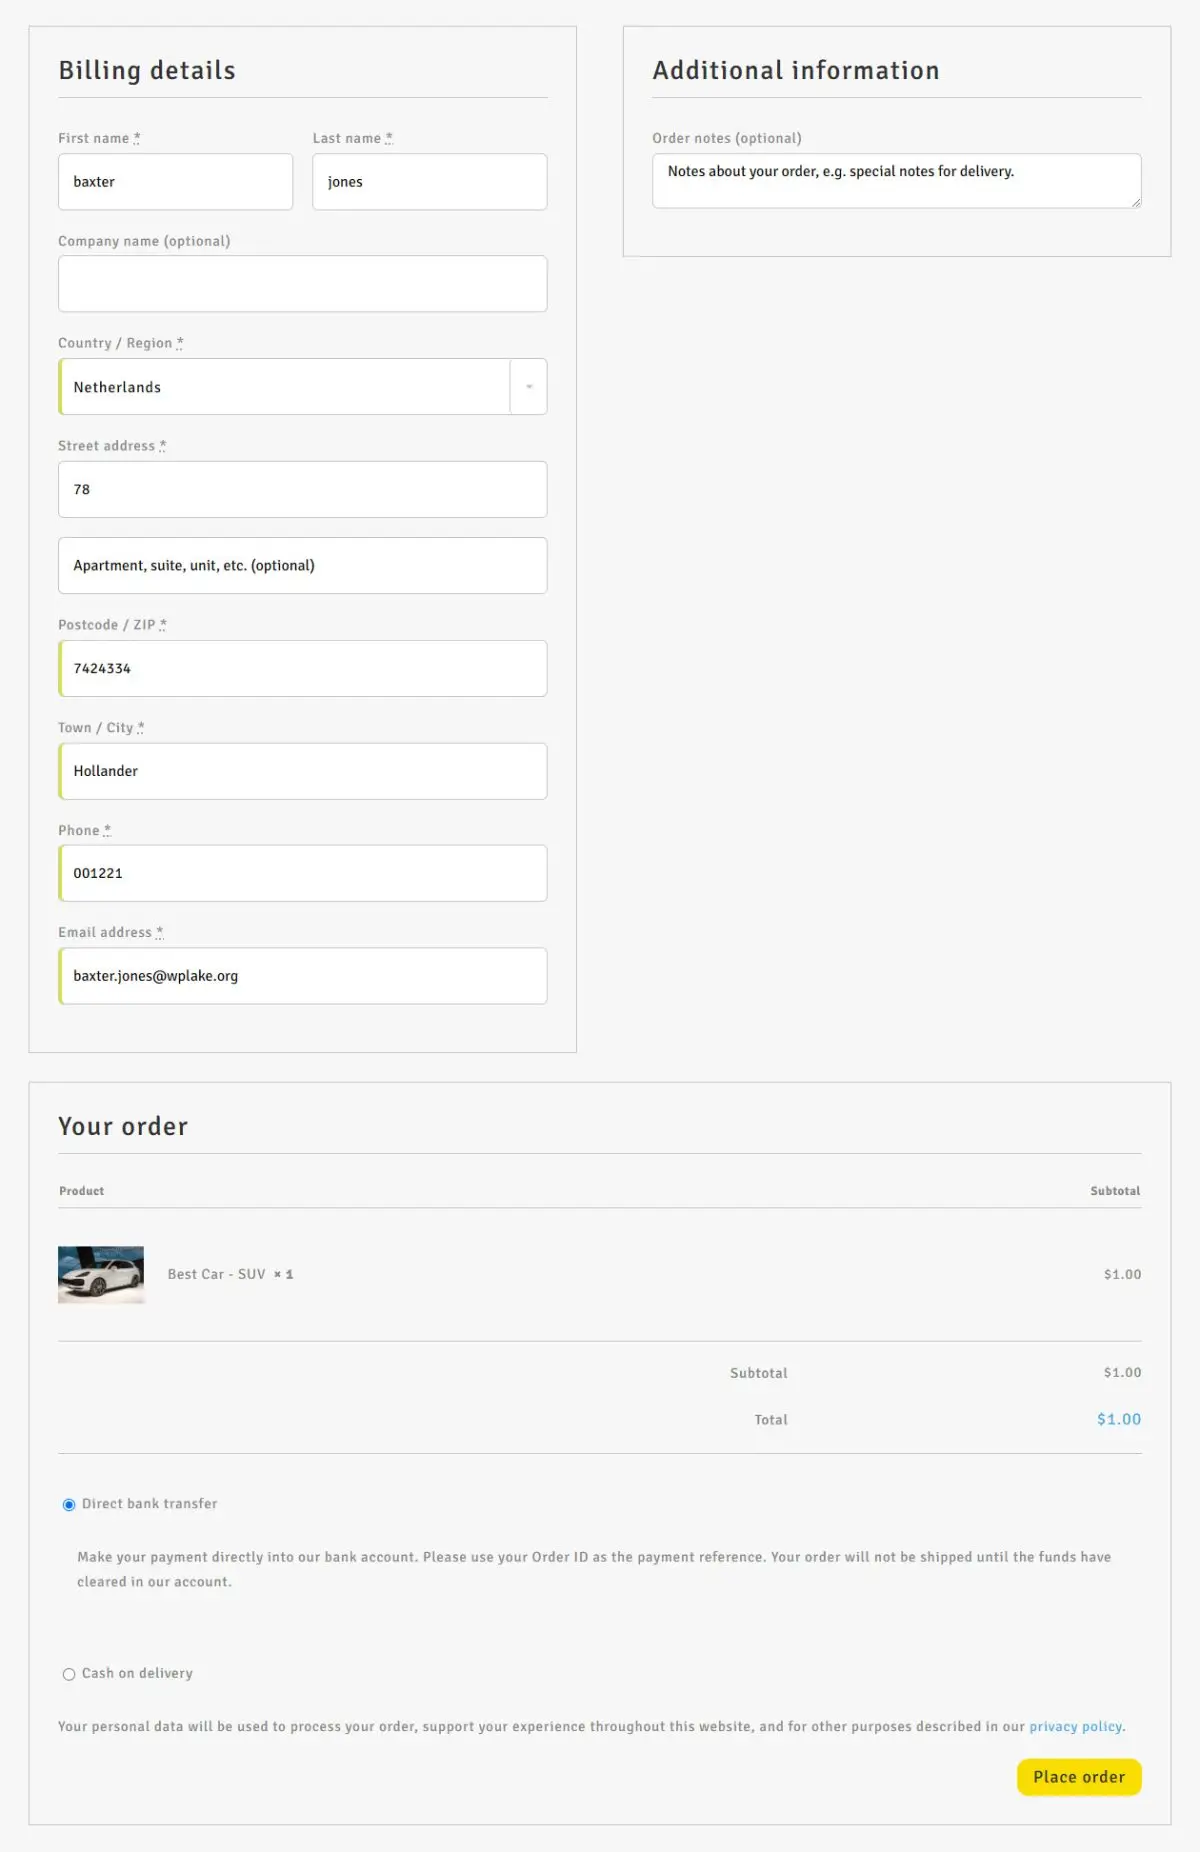
One-page checkout refers to a streamlined checkout process where all necessary information—such as shipping details, payment information, and order summary—is collected on a single page. This approach minimizes the steps a customer must take to complete a purchase, reducing friction and potentially increasing conversion rates.
Comparison with Multi-Page Checkout
In contrast, a multi-page checkout requires customers to navigate through several pages, each collecting different pieces of information. While multi-page checkouts can be useful for complex transactions, they often lead to increased cart abandonment due to the extended process. One-page checkouts simplify this experience by consolidating all elements into a single, easy-to-navigate page.

Setting Up a One-Page Checkout in WooCommerce
Using Built-In WooCommerce Features
While WooCommerce doesn’t offer a built-in one-page checkout by default, some themes and customizations allow you to enable a streamlined checkout experience. Check your WooCommerce theme settings for any built-in options for a simplified checkout process.
Using Avada Theme
The Avada Theme is one of those Professional themes that offer a multitude of additional options and layout building capabilities. Let's look at the One Page Checkout options.
Note: You'd need the WooCommerce plugin active to see the options in the Avada Theme.
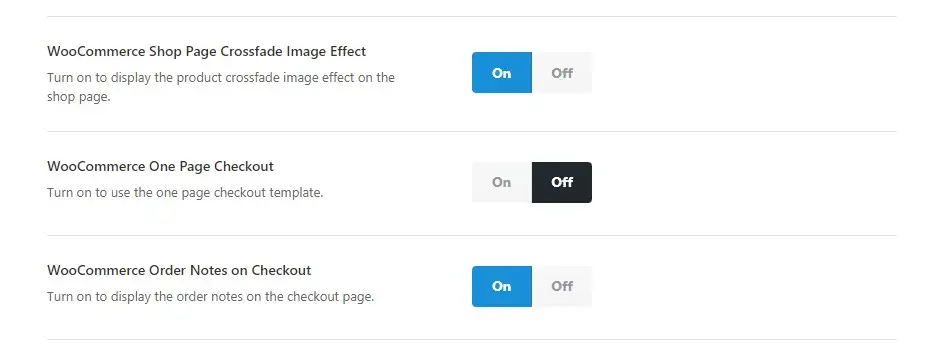
Visit the Avada > Options page, select the WooCommerce tab and scroll down until you see "WooCommerce One Page Checkout", turn it on.
Adding the Cart menu item (Avada)
Visit Appearance > Menus and select your Primary menu, look for the Menu tab "Avada Special Menu Items" and add "WooCommerce Cart" to the menu. Click "Avada Menu Options" for the Cart item, and turn on some optional features (which helps a lot with the UX).
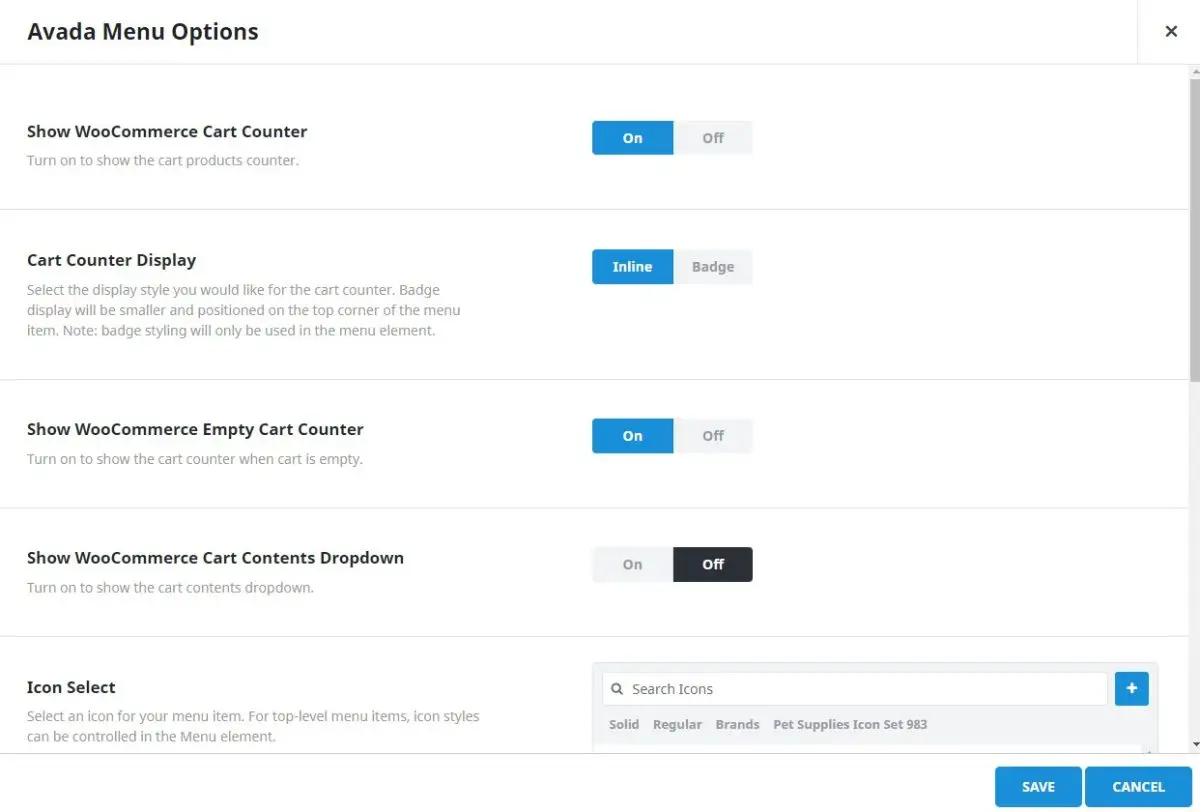
Essentially, if you have an informative cart menu, the potential customer won't get lost, which leads to a better user experience (UX).
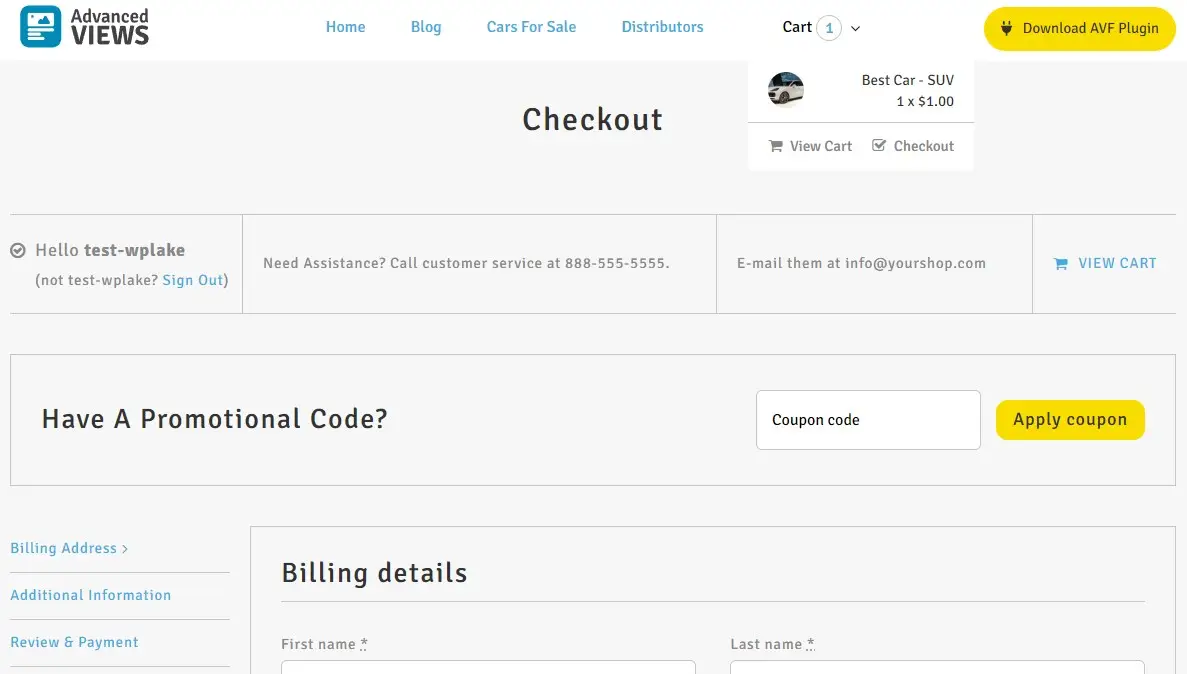
Cart menu in the website header.
Popular One-Page Checkout Plugins
To achieve a fully functional one-page checkout, consider using one of the many available plugins:
- WooCommerce One-Page Checkout by Motif Creatives
A paid plugin, that allows to enabling one-click buy and checkout options. It has two modes so besides the classical, the popup form is available as well. - WooCommerce One Page Checkout by ThemeForest
This plugin (paid) allows you to create a one-page checkout that integrates seamlessly with your WooCommerce store. Installation is straightforward, and the configuration options are user-friendly. - WP Simple Pay (Stripe)
Known for its simplicity, this plugin enables quick setup and offers customization options for a single-page checkout. Although it is labeled a Stripe payment gateway, it does offer customization and is compatible with some page builders.
To install a plugin, navigate to your WordPress dashboard, go to Plugins > Add New, search for the desired plugin, and click Install Now. Once installed, activate the plugin and follow the configuration instructions provided.
Choosing the Right Plugin
When selecting a plugin, consider factors such as ease of use, compatibility with your theme, and available customization options among other things like, is it actively being supported, are there recent forum issues and is it compatible with your version of WordPress. Compare features and read reviews to choose a plugin that best suits your needs.
Customizing Your One-Page Checkout
Design and Layout Customizations
Customization is key to ensuring that the one-page checkout aligns with your brand and meets user expectations. Most plugins offer design options to adjust the layout, colors, and typography. Customize the design, add it some upsell or cross-selling products to increase the cart value and modify the fields and sections to gather only essential information, and equally important ensure the layout is intuitive.
Optimizing for Mobile and Desktop
A responsive design is crucial for a positive user experience on both mobile and desktop devices. Test your one-page checkout across different devices to ensure it functions smoothly and looks appealing. As in most responsive design cases, the columns would need to "stack" one below another. Adjustments may be necessary to ensure that all elements are properly displayed and usable and that there isn't a huge amount of padding.
Integrating Payment Gateways
Configure and test various payment gateways to offer customers multiple payment options. Ensure that payment methods are integrated seamlessly into the checkout process, and consider offering popular options like credit cards, PayPal, and digital wallets. Although digital wallets and cryptocurrency usage isn't very popular among ordinary customers, it does offer an alternate payment method, and ideally if you're looking for a backup payment method then look at local payment providers that have a WP.org plugin available (which makes the setup considerably easier).
Below I've listed my top 10 list of very popular to not so popular (yet) plugins that I tend to use for my International and Local (South African) eCommerce sites:
- Stripe
- PayPal
- 2Checkout
- PayFast (SA)
- WigWag (SA)
- WooCommerce Payments
- Peach Payments (Africa)
- PayStack (Africa)
- DPO (Africa)
- PayGate (South Africa)
This list my be skewed towards my favourites and also it depends heavily on the options, the fees charged and overall support behind the development. So a good piece of advise to you is to do your homework, read the documentation, see the API capabilities and currencies supported, make sure it's offered in your currency and in your region and that at the end of the day (when you have some orders) that you can withdraw the funds to your bank account.
Multi-currency options
It's also worthwhile taking note that you may need a multi-currency WooCommerce setup, which means that customers/ users can select their preferred or local currency and that could save some currency conversion costs and helps with clarity. Most users can easily convert USD ($) to their local currency but beyond that it becomes too tricky, so let them switch and do the conversion for them.
Enhancing User Experience
Streamlining the Checkout Process
To further reduce friction, minimize the number of required fields and use auto-filling features where possible. Implement real-time validation to help customers correct errors as they enter information. With this in mind, think of Autocomplete Google Address for integrating the incredible feature for completing user addresses, it also minimizes the user errors and leads to less delivery issues. See Checkout field Manager to add, re-order or hide billing and shipping checkout fields.
Addressing Common User Concerns
Security is a top concern for online shoppers. Ensure that your checkout page uses SSL encryption to protect customer data (visitors know to look for the little lock in the address bar ![]() ). Include trust signals, such as security badges and clear refund and return policies, to reassure customers.
). Include trust signals, such as security badges and clear refund and return policies, to reassure customers.
Testing and Optimization
Testing the Checkout Process
Before going live, thoroughly test the checkout process to identify any usability issues or bugs. Conduct tests on various devices and browsers to ensure compatibility, and do a test payment on the live API of your chosen Payment Gateway. Also if you're getting spam orders either because you have a guest checkout or EFT (bank transfer) payment option then look into reCAPTCHA, but be warned that misconfiguration can lead to no checkout forms being submitted.
Performance Optimization
Improve checkout speed by optimizing your site’s performance. Compress images, leverage browser caching, and minimize the use of heavy scripts (like Autocomplete Google Address), don't clutter the checkout with too many distracting elements or options, if the user made it this far then don't make the journey more arduous and a fast-loading checkout page enhances the user experience and reduces abandonment rates.
Measuring Success and Making Improvements
Tracking Key Metrics
Monitor key performance indicators (KPIs) such as conversion rates and cart abandonment rates to gauge the effectiveness of your one-page checkout. Use analytics tools to track these metrics and identify areas for improvement.
Gathering and Analyzing Customer Feedback
Collect feedback from customers to understand their experiences and identify pain points. Use surveys or feedback forms to gather insights and make data-driven improvements.
A/B Testing for Checkout Improvements
Consider conducting A/B tests to compare different versions of your one-page checkout. Although it's also advised to do this when you have a lot of regular traffic, if you're only getting a few hundred visitors a month, then hold on until there are a few thousand. Test various elements, such as layout changes or different field arrangements, to determine what works best for your customers.
Common Issues and Troubleshooting
Addressing Technical Problems
Be prepared to troubleshoot common issues, such as plugin conflicts or errors. Check for compatibility issues between your theme, plugins, and WooCommerce, and consult support forums or documentation for solutions and most importantly, do all the testing in a development environment and only launch the features to live when it's working, and then (which goes without saying) test it all again.
User Experience Problems
If users report difficulties with the checkout process, address these concerns promptly. Conduct usability testing to identify and fix any issues related to user experience.
Case Studies and Examples
Successful Implementations
Explore case studies of businesses that have successfully implemented one-page checkout. Analyze their strategies and learn from their experiences to apply similar techniques to your store, and please don't just look at the big players in the industry like Amazon, eBay and AliExpress, look at local sites too and look for sites similar to yours and then implement good ideas and avoid having too much. Remember 'less is more'.
Lessons Learned
Review the lessons learned from these case studies to understand best practices and potential pitfalls. Use these insights to refine and enhance your own one-page checkout process.
Conclusion
Incorporating a one-page checkout into your WooCommerce store can significantly enhance the shopping experience for your customers, leading to higher conversion rates and reduced cart abandonment. By following the steps outlined in this guide—setting up, customizing, and optimizing your checkout process—you can create a seamless, user-friendly experience that supports your eCommerce goals.
Additional Resources
Further Reading and Tools
Explore additional resources and tools to further enhance your WooCommerce checkout experience. Look at other ways to improve your websites shopping experience, either by adding fields to your shop overview page or product pages.
Community and Support
Join WooCommerce forums and social media groups for support and to share experiences with other store owners.
Thank you for reading! to our monthly newsletter to stay updated on the latest WordPress news and useful tips.

Stuck with development or facing an issue?
WPLake offers affordable on-demand website development and design.
No matter the size of your project - contact us now, and we'll get it done for you!
Frequently Asked Questions Test Your Knowledge
FAQ mode
/
Learning mode
- What is a one-page checkout in WooCommerce? A: A one-page checkout allows customers to complete thei
A one-page checkout allows customers to complete their entire purchase on a single page, including entering shipping details, payment information, and reviewing their order. This streamlined process can reduce cart abandonment and improve conversion rates.
- How can I set up a one-page checkout in WooCommerce?
You can set up a one-page checkout in WooCommerce using certain themes with built-in options (like Avada) or by installing a dedicated one-page checkout plugin, such as WooCommerce One Page Checkout.
- What are the advantages of using one-page checkout over multi-page checkout?
One-page checkout simplifies the purchase process by reducing the number of steps a customer must take, leading to lower cart abandonment rates and higher conversion rates compared to multi-page checkout.
- Which plugins are best for creating a one-page checkout in WooCommerce?
Some popular plugins for one-page checkout include WooCommerce One Page Checkout and WP Simple Pay (Stripe). These plugins offer various customization options and are user-friendly.
- Can I customize the design of my one-page checkout?
Yes, most one-page checkout plugins and themes allow you to customize the layout, colors, and fields to match your brand. You can also add upsell or cross-sell products to enhance the user experience and increase cart value.
- How do I ensure my one-page checkout works well on mobile devices?
To optimize your one-page checkout for mobile, ensure the design is responsive, test it on various devices, and adjust elements to display properly on smaller screens. Stacking columns and minimizing padding are common adjustments.
- What payment gateways can I integrate with a one-page checkout?
You can integrate various payment gateways like Stripe, PayPal, PayFast, and others. Ensure the gateways are seamlessly incorporated into the checkout process and offer multiple payment options for customers.
- How can I test my one-page checkout before going live?
Test the checkout process on different devices and browsers to ensure compatibility. Conduct test payments using the live API of your chosen payment gateway and consider adding reCAPTCHA to prevent spam orders.
- What should I do if customers experience issues with the one-page checkout?
If customers report problems, troubleshoot for plugin conflicts or errors, and consult support forums. Usability testing can help identify and resolve issues related to the user experience.
- How can I measure the success of my one-page checkout?
Monitor key metrics like conversion rates and cart abandonment rates using analytics tools. Gather customer feedback and conduct A/B testing to continuously optimize and improve the checkout experience.
Course navigation: WooCommerce Plugin

Lesson #2
Time to read: 5 mins
Updated 02 Dec, 2025

Lesson #4
Time to read: 5 mins
Updated 13 Aug, 2024
Content links (11)
About the Author