Mastering WooCommerce Product Fields with Advanced Views
Key Points at a Glance
-
Why displaying delivery time, stock, and brand details improves buying confidence.
- Where WooCommerce stores product data (core, taxonomy, meta).
- Using ACF, MetaBox, and Pods to add custom product fields.
- Creating and customizing product layouts using Twig templates.
- Filtering products by featured and on-sale attributes.
- Combining filters and conditionals for dynamic displays.
- Performance tips for efficient product layouts.
- Using multiple Layouts and Post Selections on one page.
Table of Contents
When running a store on WooCommerce, one of the most powerful ways to stand out and convert more visitors is to go beyond the basics. Customers don’t just want the name and price — they want clarity: “Is it in stock? When will it arrive? What makes this special?”
By displaying product-fields like brand, delivery time, warranty or stock status directly in your listing, you help the shopper decide fast and confidently. And that’s where Advanced Views comes in.
There are two main ways to display extra product fields:
- Use traditional PHP (or built-in WooCommerce shortcodes) to code or embed fields manually.
- Use Advanced Views to build dynamic, field-rich layouts without heavy custom code.
In this article I’ll walk you through both methods, show you how to assign fields and filters, talk about real benefits, and highlight how upgrading to Pro unlocks major control. Let’s dive in.
Why extra fields (and layouts) matter
Before we jump into how, let’s review why.
- Better user experience: If a product listing says “Ships in 3-5 days” or “Brand: Patagonia” right under the title, the visitor doesn’t have to click through to get that info. You reduce friction.
- Trust and transparency: Showing stock status, delivery time or warranty builds confidence. Less cart abandonment.
- SEO advantage: Additional structured product data (brand, specs, delivery) gives search engines more to work with and helps you target long-tail queries.
- Better control and layout coherence: Whether you’re showing “Featured products”, “On Sale”, or “Products for Brand X”, controlling how fields display and how items filter means you can design exactly how the shop behaves for you — not the other way around.
So yes, more fields + good layout = more clarity + higher conversion + better SEO.
Method 1: Coding / WooCommerce shortcodes (the “classic” way)
If you’re comfortable with PHP or want full control (and don’t mind writing code) this method works well.
1. Add custom product fields
Let’s say you want to add a field delivery_time (e.g., “Ships in 3-5 days”) to your WooCommerce products.
- Use a plugin like Advanced Custom Fields (ACF), MetaBox or Pods to create a field group assigned to the “Product” post type.
- Or, programmatically add a meta field in your theme’s functions.php. For example (from WooCommerce docs):
<acf-view-692d742a33b4c class="{{ _view.classes }}acf-view acf-view--id--{{ _view.id }} acf-view--object-id--{{ _view.object_id }}">

	{% if post_title_link.value %}
		<a target="{{ post_title_link.target }}" class="acf-view__post-title-link" href="{{ post_title_link.value }}">
			{{ post_title_link.linkLabel|default(post_title_link.title) }}
		</a>
	{% endif %}

	{% if post_featured_image_link.value %}
		<a target="{{ post_featured_image_link.target }}" class="acf-view__post-featured-image-link" href="{{ post_featured_image_link.href }}">
			<img class="acf-view__post-featured-image-link-image" src="{{ post_featured_image_link.value }}" width="{{ post_featured_image_link.width }}" height="{{ post_featured_image_link.height }}" alt="{{ post_featured_image_link.alt }}" decoding="{{ post_featured_image_link.decoding }}" loading="{{ post_featured_image_link.loading }}" srcset="{{ post_featured_image_link.srcset }}" sizes="{{ post_featured_image_link.sizes }}">
		</a>
	{% endif %}

	{% if regular_price.value %}
		<p class="acf-view__regular-price">
			{{ regular_price.value }}
		</p>
	{% endif %}

	{% if sale_price.value %}
		<p class="acf-view__sale-price">
			{{ sale_price.value }}
		</p>
	{% endif %}

	{% if stock_quantity.value %}
		<p class="acf-view__stock-quantity">
			{{ stock_quantity.value }}
		</p>
	{% endif %}

	{% if delivery_time.value %}
		<p class="acf-view__delivery-time">
			{{ delivery_time.value }}
		</p>
	{% endif %}

</acf-view-692d742a33b4c>
Great — you now have “delivery_time” stored and ready to display.
2. Display fields on product pages or archives
For example, in your theme’s loop or single-product.php, you might output:
echo '<h3>' . get_the_title() . '</h3>';
echo '<p class="brand">Brand: ' . esc_html( get_post_meta( get_the_ID(), 'brand', true ) ) . '</p>';
echo '<p class="delivery">Delivery: ' . esc_html( get_post_meta( get_the_ID(), 'delivery_time', true ) ) . '</p>';
You can of course include built-in WooCommerce meta fields such as _price, _sale_price, _stock_status.
3. Use existing WooCommerce shortcodes
WooCommerce has its own shortcodes (e.g., [products]), for example:
[products limit="8" columns="4" category="hoodies" on_sale="true"]This will show 8 “hoodie” items that are on sale. You can’t directly display custom meta fields via this shortcode, so you would still need the coding method or a plugin to extend what shows.
Benefits & Limitations
Benefits:
Lean reliance: no add-on plugin needed (beyond ACF/MetaBox if you choose).
Limitations:
No way to show custom fields with standard woo shortcodes. Every time you change a layout, you would edit template files.
Filtering/sorting by custom meta becomes heavy + requires custom WP_Query logic.
Method 2: Using Advanced Views (my preferred way)
If you ask me, this is the way to go for most store owners/marketers. With Advanced Views, you get the benefit of dynamic layouts, custom fields, filtering, sorting, pagination (in Pro) — all without heavy code.
What is Advanced Views?
Advanced Views is a WordPress plugin that enables you to display posts, CPTs (custom post types), custom fields, taxonomies, built-in WordPress fields and WooCommerce product fields with flexible layouts. It supports ACF, MetaBox, Pods, WordPress and WooCommerce product fields out of the box.
Basically, it bridges “I want a nice layout” with “I want full control”.
Why I lean this way (and you will too)
- You don’t need to edit templates every time you want a new layout. Assign fields, style the layout, shortcode it.
- You can fully customise the template — adjust the structure, tweak the styling, and match it to your site’s design.
- You can reuse the same Layout across pages and even inside page-builders or Gutenberg blocks.
- It’s lighter than a full drag-and-drop builder for this purpose — more focused on content display.
- It supports filtering by meta value or taxonomy (in Pro), so building things like “Only featured brand X on sale” becomes straightforward.
Step-by-step: Building a Layout in Advanced Views
Let's look at how to start.
- Install and activate the Advanced Views plugin. (If you plan to use the Pro features, upgrade when your ready, you won't lose the items you created.)
- Create a new Layout. Let's name it 'product'.
- Assign the fields you want to display:
- Built-in fields from Group 'Post & Products fields': featured image with link, title with link, regular price and sale price.
- Product fields from Group 'Product specific fields': regular price, sale price.
- Custom fields (via ACF/MetaBox/Pods) such as brand, delivery_time, warranty_period
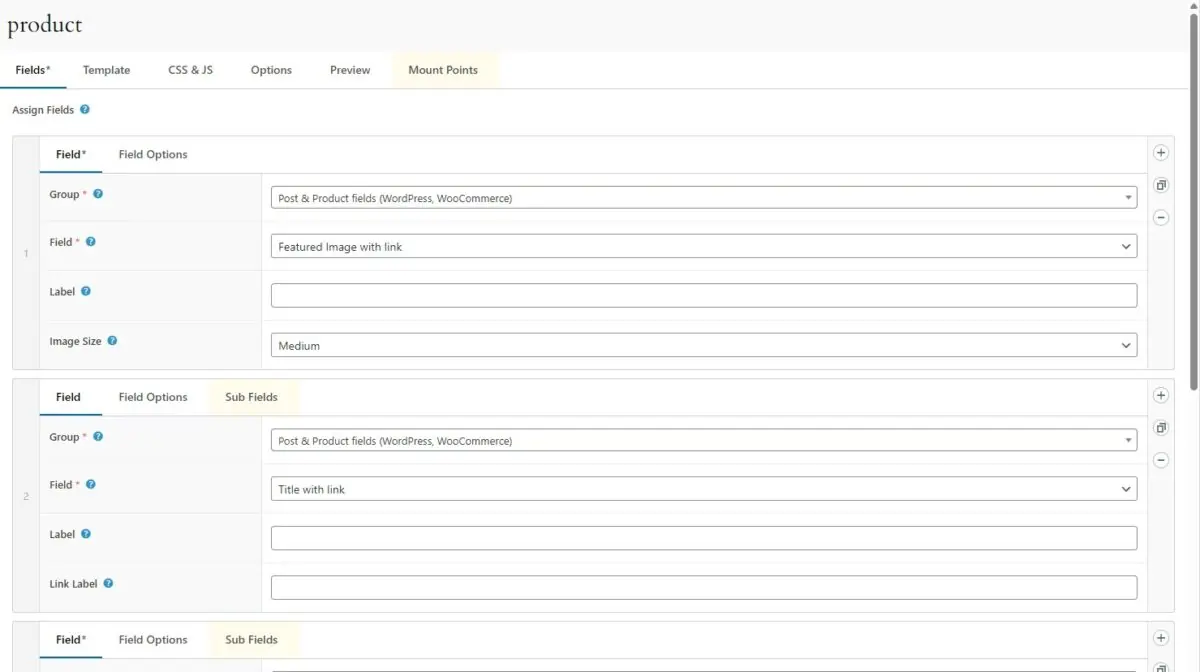
- Reorder how you want them to appear in a preview or template region by dragging the field rows, or edit the default template after publishing.
- Publish your Layout and switch to the Template tab
- (Optional) Edit the automatically generated Twig (or Blade) template if you like. For example:
<acf-view-692d742a33b4c class="{{ _view.classes }}acf-view acf-view--id--{{ _view.id }} acf-view--object-id--{{ _view.object_id }}">

	{% if post_title_link.value %}
		<a target="{{ post_title_link.target }}" class="acf-view__post-title-link" href="{{ post_title_link.value }}">
			{{ post_title_link.linkLabel|default(post_title_link.title) }}
		</a>
{% endif %}


	{% if post_featured_image_link.value %}
		<a target="{{ post_featured_image_link.target }}" class="acf-view__post-featured-image-link" href="{{ post_featured_image_link.href }}">
			<img class="acf-view__post-featured-image-link-image" src="{{ post_featured_image_link.value }}" width="{{ post_featured_image_link.width }}" height="{{ post_featured_image_link.height }}" alt="{{ post_featured_image_link.alt }}" decoding="{{ post_featured_image_link.decoding }}" loading="{{ post_featured_image_link.loading }}" srcset="{{ post_featured_image_link.srcset }}" sizes="{{ post_featured_image_link.sizes }}">
		</a>
	{% endif %}

	{% if regular_price.value %}
		<p class="acf-view__regular-price">
			{{ regular_price.value }}
		</p>
	{% endif %}

	{% if sale_price.value %}
		<p class="acf-view__sale-price">
			{{ sale_price.value }}
		</p>
	{% endif %}

	{% if stock_quantity.value %}
		<p class="acf-view__stock-quantity">
			{{ stock_quantity.value }}
		</p>
	{% endif %}

	{% if delivery_time.value %}
		<p class="acf-view__delivery-time">
			{{ delivery_time.value }}
		</p>
	{% endif %}

</acf-view-692d742a33b4c>
Above is the Default template that was generated after publishing my layout.
- Select all the code in the Default template field (Ctrl+a) and copy it into the Custom template field.
- Edit the template and include the currency symbol for prices.
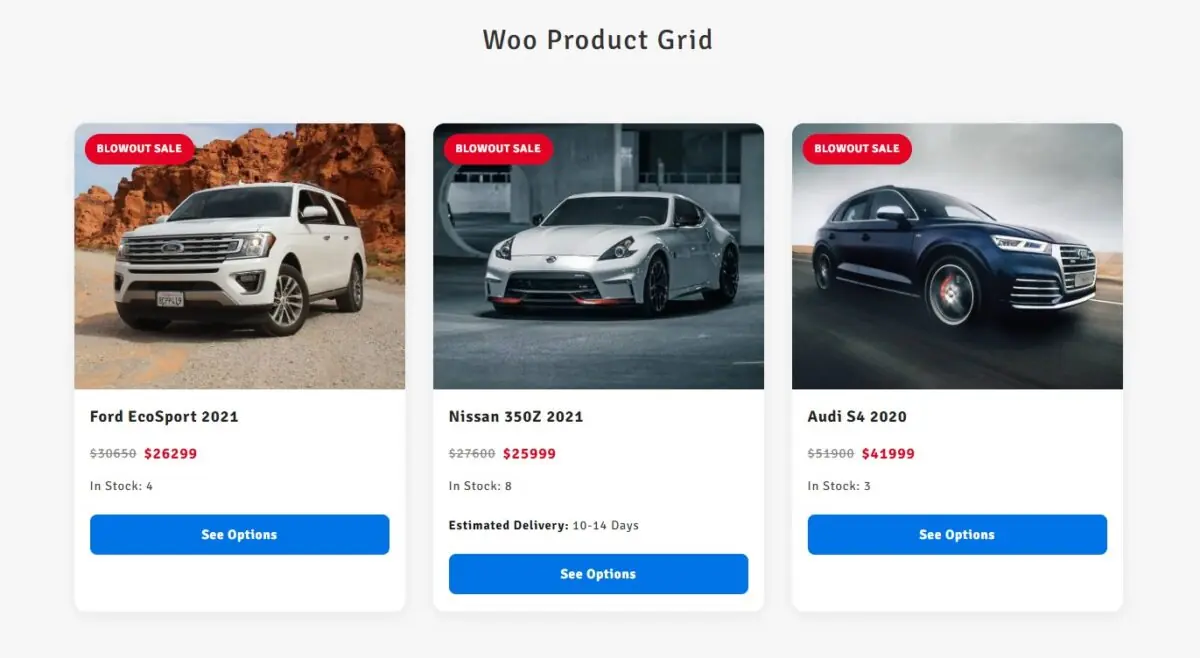
So you'll have something like this in your Custom template:
<acf-view-692d742a33b4c class="{{ _view.classes }} product-card acf-view acf-view--id--{{ _view.id }} acf-view--object-id--{{ _view.object_id }}">

    {% if sale_price.value %}
        <div class="product-card__badge">Blowout Sale</div>
    {% endif %}

    {% if post_featured_image_link.value %}
        <a target="{{ post_featured_image_link.target }}" class="product-card__image-link" href="{{ post_featured_image_link.href }}">
            <img class="product-card__image"
                src="{{ post_featured_image_link.value }}"
                width="{{ post_featured_image_link.width }}"
                height="{{ post_featured_image_link.height }}"
                alt="{{ post_featured_image_link.alt }}"
                decoding="{{ post_featured_image_link.decoding }}"
                loading="{{ post_featured_image_link.loading }}"
                srcset="{{ post_featured_image_link.srcset }}"
                sizes="{{ post_featured_image_link.sizes }}"
            >
        </a>
    {% endif %}

    <div class="product-card__content">

        {% if post_title_link.value %}
            <a target="{{ post_title_link.target }}"
               class="product-card__title"
               href="{{ post_title_link.value }}">
                {{ post_title_link.linkLabel|default(post_title_link.title) }}
            </a>
        {% endif %}

        <div class="product-card__prices">
            {% if regular_price.value %}
                <span class="product-card__regular-price">${{ regular_price.value }}</span>
            {% endif %}
            {% if sale_price.value %}
                <span class="product-card__sale-price">${{ sale_price.value }}</span>
            {% endif %}
        </div>

        {% if stock_quantity.value %}
            <p class="product-card__stock">In Stock: {{ stock_quantity.value }}</p>
        {% endif %}

        {% if delivery_time.value %}
            <p class="product-card__delivery">
                <span class="label">Estimated Delivery:</span> {{ delivery_time.value }}
            </p>
        {% endif %}

        {% if post_title_link.value %}
            <a target="{{ post_title_link.target }}"
               href="{{ post_title_link.value }}"
               class="product-card__button">See Options</a>
        {% endif %}
    </div>

</acf-view-692d742a33b4c>
Displaying list or grid of products
Use the Layout in different ways, I like creating Post Selections and using those shortcodes on my Shop page. I'd create multiple Post Selections with the same Item Layout, but then each with it's own set of rules, then styling using CSS.
A few ways to query products:
- Use the Layout for a Post Selection.
- Use the Layout shortcode (From Advanced Views) in a Query Loop block (built-in for WordPress).
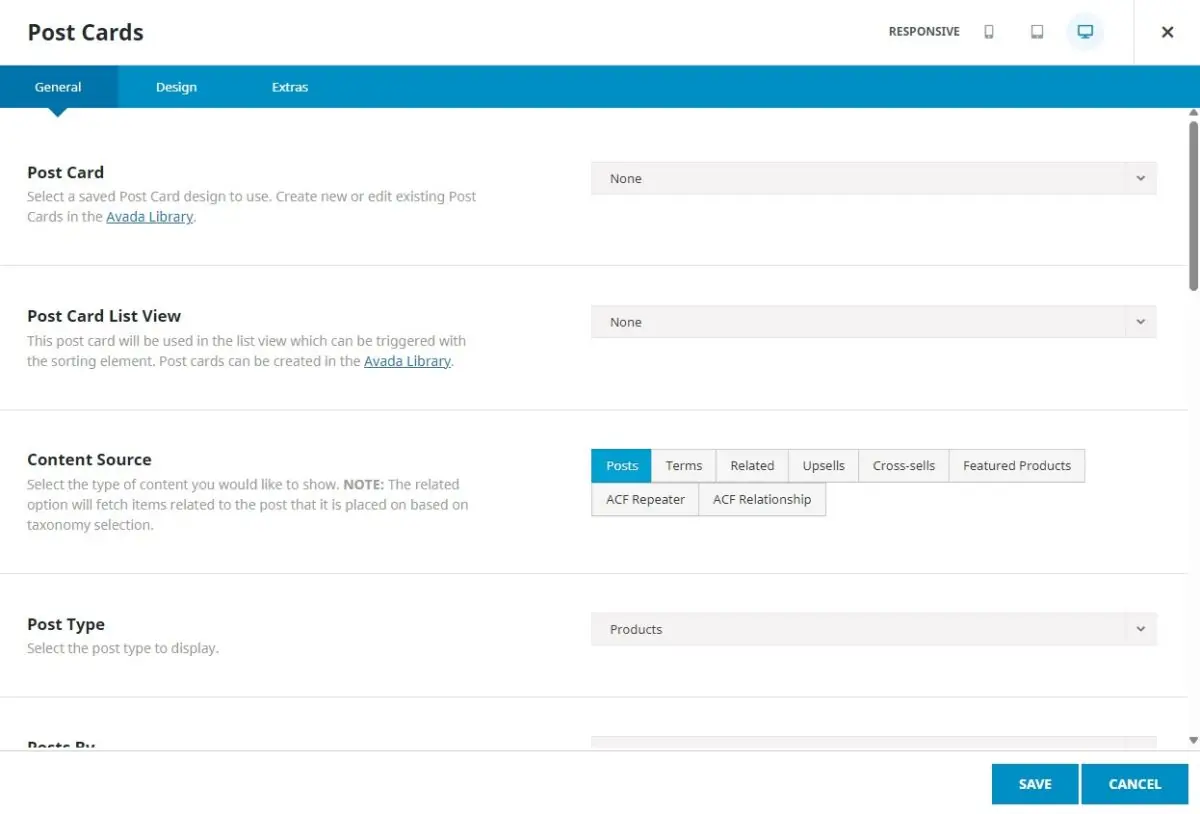
- Use the Layout shortcode in Avada Post Card and then query with Post Card element.
Filtering, Sorting, Pagination (Pro)
In most cases you're likely trying to display lots of products, and if the page only shows 9 items, then you'll want some interactivity so the user can navigate to all the products, or at least a way to load the items as the user scrolls, known as infinite scroll.
With Advanced Views Pro you'll unlock several powerful features:
- Meta Filter (Pro): Filter products by custom meta value
(e.g., brand = “Samsung” OR Sale price is bigger than 0). - Taxonomy Filter (Pro): Filter by taxonomy terms
(e.g., product_visibility = featured, product_cat = electronics). - Pagination / Infinite Scroll: Control number of items per page and enable ajax pagination.
The benefit of this is, you can build highly targeted product listings (e.g., a “Brand X On Sale” carousel) quickly. Your marketing team can reuse Layouts and tweak the Post Selection or clone Post Selections quite easily.
Real-world example: Featured Products Grid (Pro)
Let’s build a “Featured Products” grid. Featured products are determined by the visibility setting on each product, shown on the product list in the star (★) column. I find it easier to figure out how to filter or sort content items such as products by knowing where to edit things in the interface, it often also has the label which I look for.
How to setup your fields Layout
You can follow the same principle as earlier with Building a Layout in Advanced Views.
- Create a Layout and assign the fields of your choice, then Publish it.
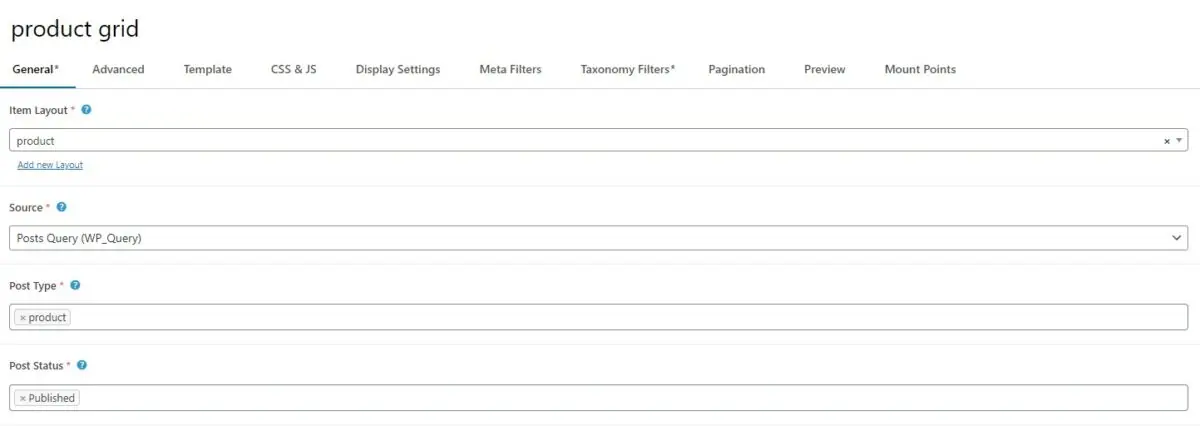
- Create a Post Selection and choose the Layout you created as the Item Layout. Select the Post Type, product ensuring we're only showing products in our grid (See image below).
Note: At this point you could already publish and use your Post Selection shortcode where you like, but to only show featured products we'll need to filter the results.
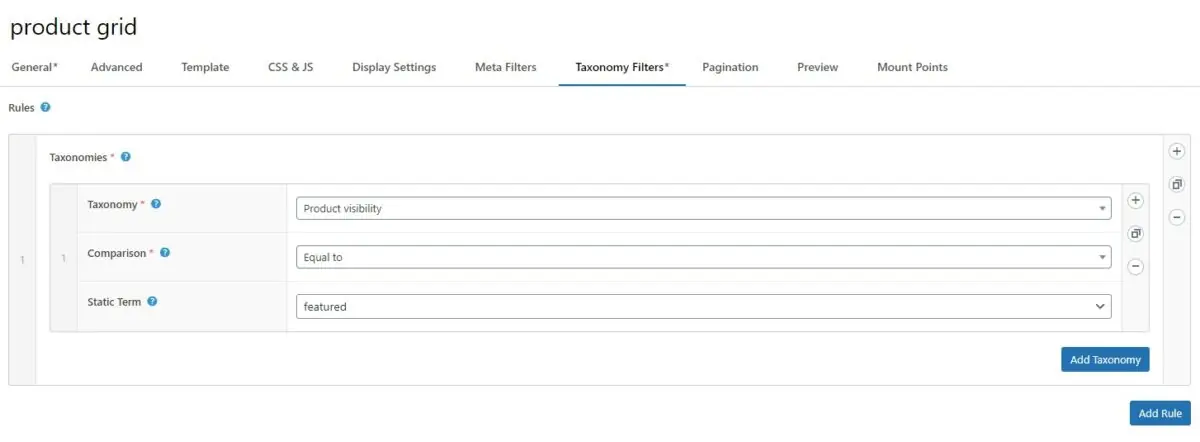
- Switch to Taxonomy Filters tab (in Pro), add a rule, add a taxonomy row, then select 'Product visibility, Equal to featured' for Taxonomy, Comparison and Static Term. Publish it.
- Copy the shortcode, and paste it into a page, or as in my case the Shop page as set in the Woo Settings > Products base page.
Real-world example: On-Sale Products Carousel (Pro)
Another great way to showcase a set of products is in a carousel. Let's get to it.
You can use the same Layout as before, or clone it and edit or start with a new Layout, it's up to you. For this how-to, I'm going to keep the same Layout, but if you're creating a new Layout, then just select that as the Item Layout in the Post Selection.
- Create a Post Selection (or clone your Featured items one). Then select the Item Layout and Post Type.
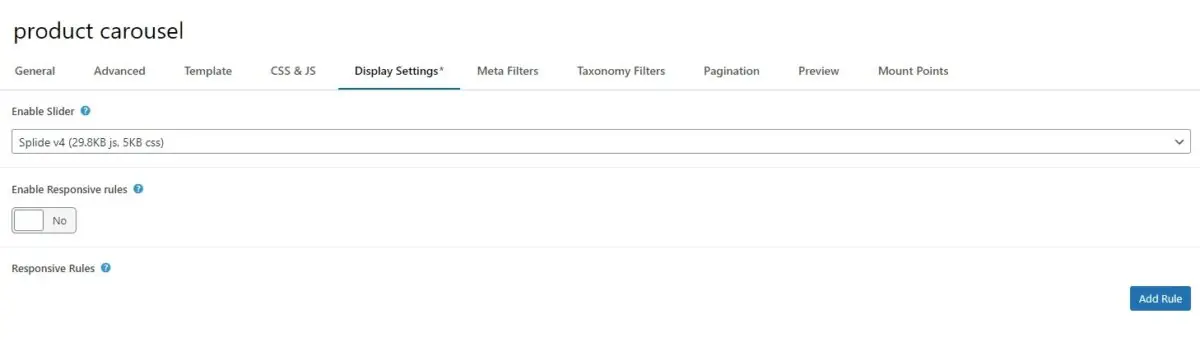
- Switch to Display Settings tab and Enable Slider by selecting 'Splide'. Publish it and copy the shortcode into place.
- That's it. You can add some CSS or modify the behaviour of the Splide slider in the JS Code field, both CSS Code and JS Code fields are under the CSS & JS tab.
Benefit: You create an eye-catching carousel of discounted items, increasing urgency and visibility—which is no more than an extra meta filter to show products with sale price bigger than 0 (see below).

Additional Benefits of Using Advanced Views
- Speed of setup: Instead of editing theme files each and every time, you create Layouts and Post Selections that you place inside your theme or page builder, and then only edit those Layouts and/or Post Selections in one place. (Kind of like how the Code Snippets plugin organises the extra code you need to run and you can edit them in one place).
- Reuse & consistency: The same Layout can be used in multiple places (homepage, landing page, category page) ensuring design consistency.
- Non-developers empowerment: Your marketing or content team can create or clone Layouts, change filters, or swap Layouts on Post Selections without needing deep PHP knowledge.
- Performance oriented: Advanced Views is built to query efficiently and supports caching strategies.
- Future-proofing: If you later add more fields (ACF, MetaBox, Pods), Advanced Views already supports those — so your layout system is built for growth.
- Better SEO structure: With more fields and controlled layouts, you’re presenting richer content to search engines and users.
When you might still use coding
I won’t pretend coding is for me or that I am any good at it or lie and say I don't use AI to help me — but there are situations where the classic method still wins:
- If you’re building a highly custom theme or checkout process where you need full control and minimal plugin dependency. Note: Although it's still a weak reason in my view, as I like order and as mentioned so many times before, Advanced Views does the heavy lifting without adding the bloat.
- If you want ultra-specific behaviour that no plugin currently supports. Another note: Without sounding facetious if the behaviour is super, ultra, too intense whatever you may call it and you can't find any solution or example online, then either you came up with a brilliant new thing or way of doing things (congrats!) or you're probably trying to do something that not logical, at least not WP logical, in that case I'd suggest re-evaluating the setup or the intended end result you're trying to achieve.
- If you have very few custom fields and simply want to hard-code them for ultra performance.
Performance & Optimization Tips
Whether you use coding or Advanced Views, keep these things in mind:
- Use image sizes appropriately: For grids use thumbnails, for hero sections use medium/large.
- Limit the number of items per page and use pagination to avoid long load times (FCP).
- Reuse Layouts rather than creating new ones each time.
- Clear caches after major layout/field changes.
- If filtering large product sets, consider backend caching or even a lightweight object cache.
Conclusion
So there you have it. Displaying detailed product fields on your WooCommerce store isn’t just a “nice-to-have” — it’s a strategic move. Whether you use the traditional PHP/shortcode route or (for great ease and control) decide to try Advanced Views, you’re giving your visitors the clarity they crave and boosting your own layout flexibility and hopefully boosting sales and decreasing that bounce rate.
With Advanced Views, you’re not just showing fields. You’re building dynamic, reusable, high-value content layouts: product grids, filters, brand lists, sale carousels—whatever fits your business.
And importantly: Advanced Views supports all kinds of fields from ACF, MetaBox, Pods, and WooCommerce and WordPress,= itself. So as your store grows and your data needs expand, you should be fairly sorted with implementing new ideas using the same methods above.
Let your data tell the story. Use your fields to sell smarter. And build an experience your customers love.
Thank you for reading! to our monthly newsletter to stay updated on the latest WordPress news and useful tips.

Stuck with development or facing an issue?
WPLake offers affordable on-demand website development and design.
No matter the size of your project - contact us now, and we'll get it done for you!
Frequently Asked Questions Test Your Knowledge
FAQ mode
/
Learning mode
- Can I display both regular and sale prices at once?
Yes. You can use Twig conditionals to show both prices and style the regular price with a strikethrough when a sale price exists.
- Where does WooCommerce store the featured product information?
Featured products are marked using the product_visibility taxonomy with the term featured.
- How do I show only on-sale items?
Filter products using the _sale_price meta key with a value greater than zero.
- Can I use custom fields from ACF, MetaBox, or Pods?
Absolutely. Any field you add to the product post type appears as a selectable meta field for display or filtering.
- Can I add multiple product sections on one page?
Yes. You can include several Layouts or Post Selections on a page — for example, one for Featured Products and another for On-Sale Products.
Related articles
Lesson #10
Time to read: 5 mins
Updated 02 Dec, 2025

Content links (11)
About the Author