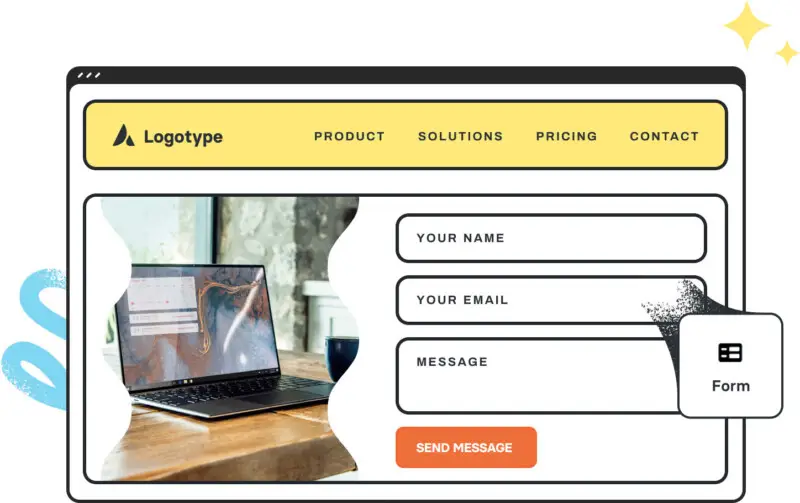
Avada Forms: Creating Dynamic Forms and Boosting Engagement
Key Points at a Glance
- Introduction to Avada Forms: Providing an overview of the Avada Forms plugin and its features, emphasizing its importance for enhancing communication and data collection on websites.
- Getting Started with Avada Forms: Outlining the process of installing and activating the Avada Forms plugin, guiding through the initial setup steps.
- Creating Your First Form: Offering a step-by-step guide to creating a form using Avada Forms, highlighting customization options available for designing layouts and adding form fields.
- Spam Protection Techniques: Discussing methods for mitigating spam submissions, including the use of captcha integration and other security measures provided by Avada Forms.
- Email Notifications: Explaining how to configure email notifications to receive alerts upon form submissions, enabling to stay informed and responsive to user interactions.
- MailChimp Integration: Demonstrating how to integrate Avada Forms with MailChimp for seamless subscriber management, allowing to grow email lists effortlessly.
- Tips for Effective Form Design: Sharing best practices for designing user-friendly and conversion-optimized forms, emphasizing simplicity, clarity, and mobile responsiveness.
Table of Contents
Introduction to Avada Forms
Avada Forms, which comes packaged with the Theme, is a versatile and user-friendly WordPress plugin designed to streamline the process of creating and managing forms on your website. Developed by ThemeFusion, the same team behind the highly popular Avada theme, Avada Forms offers a robust set of features to cater to a wide range of form-building needs.
Key Features:
- Intuitive Form Builder Interface: Avada Forms provides an intuitive drag-and-drop form builder interface, allowing users to effortlessly create customized forms without any coding knowledge.
- Wide Range of Form Fields: From basic text fields and checkboxes to advanced elements like file uploads and date pickers, Avada Forms offers a comprehensive selection of form fields to suit various data collection requirements.
- Customization Options: Users have the freedom to customize the design and layout of their forms to align with their website's branding and aesthetics. With options to adjust colors, fonts, and spacing, creating visually appealing forms is easy.
- Advanced Configuration Settings: Avada Forms empowers users with advanced configuration options such as validation rules and conditional logic. This enables the creation of dynamic forms that adapt based on user input, enhancing the overall user experience.
- Spam Protection Measures: To combat spam and ensure data integrity, Avada Forms offers built-in spam protection features. Users can integrate captcha verification and other security measures to prevent unwanted form submissions.
- Email Notifications: Stay informed about form submissions in real-time with customizable email notifications. Avada Forms enables users to configure email alerts for receiving notifications whenever someone submits a form on their website.
- Seamless Integration with Third-Party Services: Avada Forms offers seamless integration with popular third-party services such as MailChimp, enabling users to effortlessly sync form submissions with external platforms for further processing and analysis.
- Responsive Design: With mobile responsiveness built-in, forms created with Avada Forms adapt seamlessly to different screen sizes and devices, ensuring a consistent user experience across desktops, tablets, and smartphones.
Overall, Avada Forms provides a comprehensive solution for creating, customizing, and managing forms on WordPress websites. Whether you're collecting leads, gathering feedback, or facilitating user interactions, Avada Forms empowers you to create dynamic forms that engage your audience and drive results.
The Importance of Forms on a website
Forms play a crucial role in facilitating communication and data collection on websites.
Key reasons why forms are important:
- Engagement and Interaction: Forms provide an interactive way for website visitors to engage with the site owner or administrator. They allow users to submit inquiries, provide feedback, request information, or take specific actions, fostering two-way communication between the website and its audience.
- Lead Generation: Forms are effective tools for capturing leads and expanding your customer base. By offering downloadable resources, newsletter subscriptions, or contact forms, you can collect valuable contact information from interested visitors, enabling you to nurture relationships and convert leads into customers over time.
- Data Collection and Insights: Forms serve as valuable mechanisms for gathering data and insights about your audience. By asking targeted questions or conducting surveys, you can collect demographic information, preferences, opinions, and feedback, which can inform your marketing strategies, product development, and overall business decisions.
- Customer Support and Feedback: Users can use forms to facilitate customer support inquiries and submission of feedback. By providing a dedicated form for support requests or feedback submissions, you streamline the process for users to reach out with questions, issues, or suggestions, enabling you to address their needs promptly and improve the user experience.
Functional or Legal reasons:
- Transactional Processes: Forms are integral to facilitating various transactional processes on websites, such as order forms, registration forms, and payment forms. They provide a structured way for users to input necessary information and complete desired actions, such as making purchases, registering for events, or signing up for memberships.
- Compliance and Consent: Forms can be utilized to ensure compliance with regulations such as GDPR (General Data Protection Regulation) by obtaining explicit consent for data processing activities. By implementing consent checkboxes and opt-in forms, you demonstrate transparency and respect for user privacy, building trust and credibility with your audience.
- Feedback Loop and Continuous Improvement: By analyzing the data collected through forms, you gain valuable insights into user behavior, preferences, and pain points. This feedback loop allows you to identify areas for improvement, refine your offerings, and tailor your website content and functionality to better serve your audience's needs and expectations.
In summary
Forms are essential components of websites for facilitating communication, collecting valuable data, generating leads, providing support, enabling transactions, ensuring compliance, and driving continuous improvement. By leveraging forms effectively, website owners can enhance user engagement, gather actionable insights, and achieve their business objectives more effectively.
Installation and activation of Avada Forms
Installing and activating Avada Forms is a straightforward process.
Here's a step-by-step guide:
- Login to Your WordPress Admin Panel: Log in to the WordPress dashboard of your website using your administrator credentials.
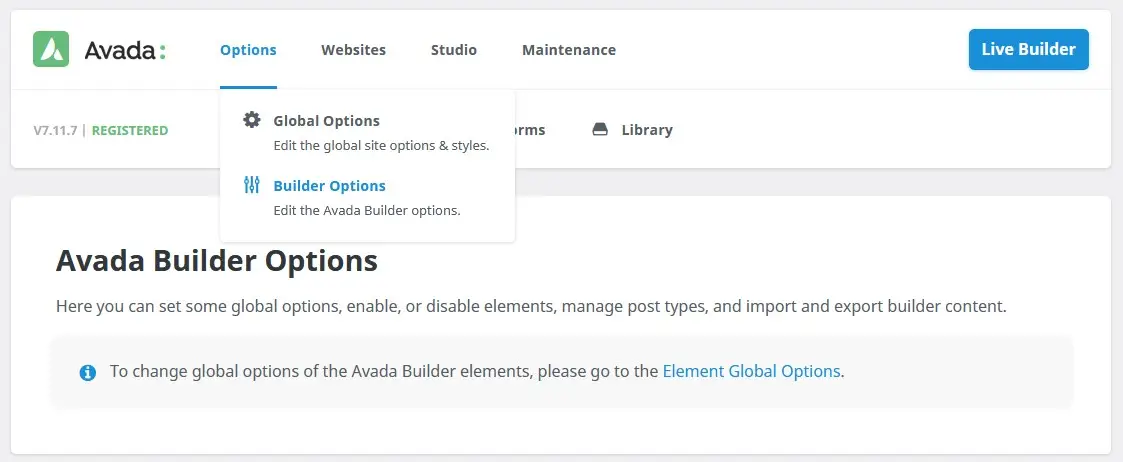
- Navigate to the Avada Options: Once logged in, locate and click on the "Avada > Options" link in the left-hand sidebar menu.
- Search for "form": From the submenu under "Options" search for the keyword "form" option. Once the results are shown, scroll down until you see ‘Post Types’ Avada Forms, then turn on the switcher. Then Save Changes.
- Refresh the Page: On the Options you’ll need to refresh the page to see the new “Forms” menu item. Navigate to the Forms to see the Form Builder page.
Note: there are usually default forms, but we’ll create a new form. - Start Creating Forms: With Avada Forms successfully installed and activated, you can now start creating forms for your website.
That's it! You've successfully installed and activated the Avada Forms plugin on your WordPress website. You can now create, customize, and manage forms to engage your audience and collect valuable data.
Creating Your First Form
Creating your first Avada Form is as simple as building a page section, but it entails adding fields to collect data and setting up actions to trigger notifications. With the form we’re creating we’d want to get some basic personal information have an option to subscribe to our MailChimp newsletter, and also have them agree to our sites’ Privacy Policy. Let’s dive in.
On the form builder page, Enter Your Form Name and click the “Create New Form” button. I’ve labelled my form “Enquiry”.
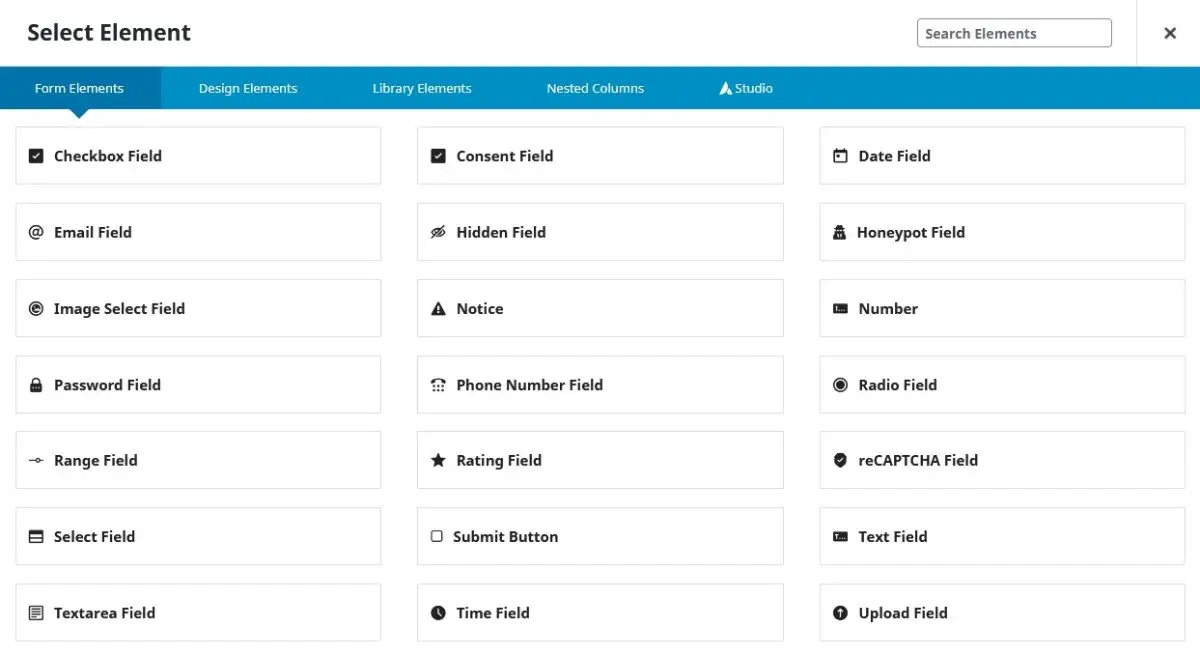
Turn on the Avada Builder if it isn’t active yet. Insert a Container with a 1/1 Column element, then in the column, add Elements. At this point you should see Form Field elements that you can select and add to the form.
Note: If you see the normal page builder elements for design and layout, then you’d need to turn on the form elements in the Theme Options. To do this, open a new tab and navigate to the Avada Theme Dashboard, hover on Options menu and click on Builder Options.
Scroll to the Avada Builder Elements and turn on the relevant elements, or simply select “Check All Elements” to turn them all on. At the very bottom, click Save Options. Switch back to your Form Builder tab and click “Update” to refresh the builder.
Adding fields to your Avada Form
Select ‘Text Field’, Insert Field Label “Name”, make it a required field and choose a field icon if you’d like, then click Save.
Add another Element, this time choosing ‘Email Field’, make it a required field and then Save.
Continue by adding another ‘Select Field’, which we plan on using as our Subject field with specific dropdown options and a conditional field for “other”. Insert the Field Label “Subject”, make it required, then for Options, let’s insert 4 options. “General Enquiry”, “Technical Support”, “Pre-Sale Question” and “Other”. Select a Field Icon if you’d like, then Save. Now add a ‘Text Field’, call it “Please specify (Other)”, make it required and then switch to the “Conditions” tab. Click on “Add New Logic” then select the Subject field with Equal to “other” condition and Save.
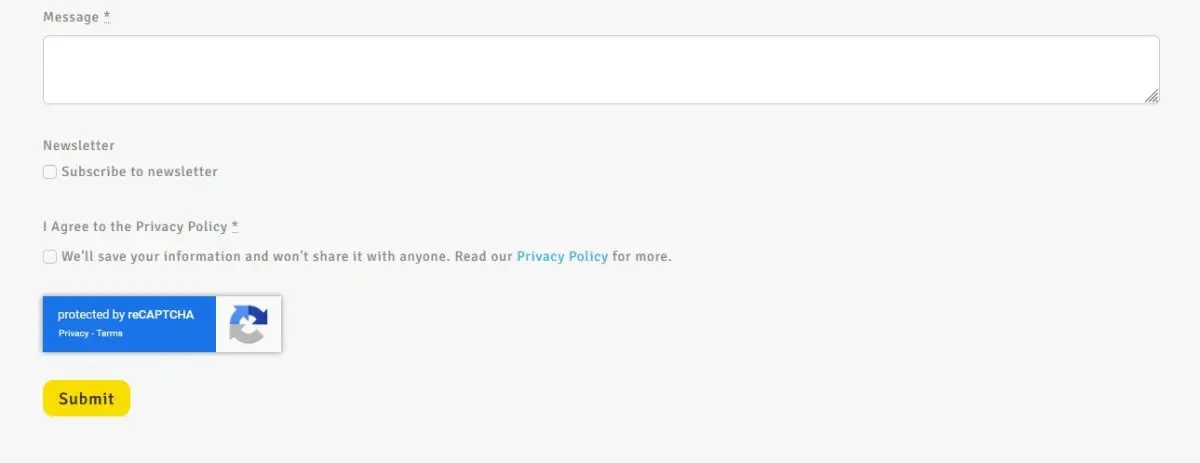
Add a Textarea Field with the label “Message”, this can also be a required field.
Note: If you select a field as Required, then there’ll be a field to fill in the “Empty Input Notice”. So if the user didn’t fill in the ‘Name’ field for example, then it will display the Notice Instead. This is great for customizing the tone of voice, it can be as friendly or as cold as your brand allows. For now I’ll leave my notice empty for the fields.
Add a Checkbox field and label it “Newsletter” with the single Option of ‘Subscribe to newsletter’.
Spam protection fields
Add another field, choose the “Honeypot Field” and then Save it. Then another field for “reCAPTCHA”, and another for “Consent”. For the Consent field give it the label of “I Agree to the Privacy Policy”, consent type can remain on “Checkbox” with default state “Unchecked” and make it Required. We want users who submit the form to know what we’ll do with their personal information. Then fill or paste the “Description”, you can add HTML for a link to your Privacy Policy page too. Then Save.
Finally add in the “Notice field”, and save. I am happy with the default Success and Error message, but you can of course edit it. Then the all important “Submit Button”, where you have options to change the design.
At this stage you can drag and drop the fields into a specific order, but try and keep the Subject and it’s conditional field “Please specify (Other) together. Then “Update” to save the form.
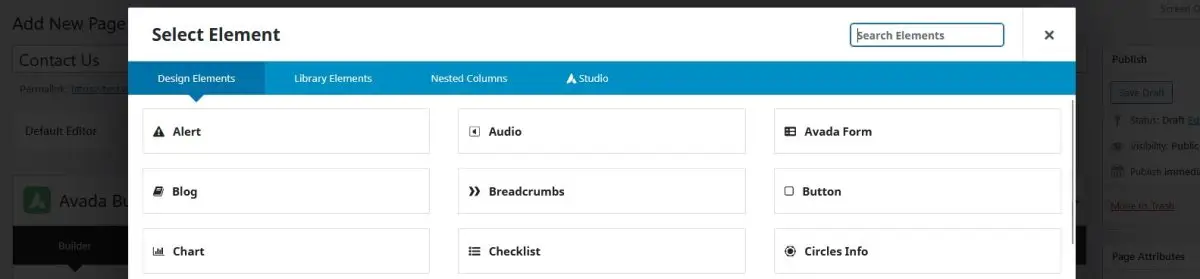
You can now add the form to a page or post template by using the “Avada Forms” page builder element. Select your form from the list of forms and then Save and Publish your page. Adding the Avada Form on a page will allow you to preview what you've done.
In my case I've added the form to the Contact us page, where the page will also have the contact details of the company along with a Google Map, so users have no trouble getting in contact or finding the physical location.
Spam Protection Techniques
In our form, we've incorporated both the Honeypot field and reCAPTCHA protection to mitigate spam submissions.
Visit the Avada Options, search for “captcha”, and choose V3 and insert the Site Key and Secret Key provided by Google reCAPTCHA, then Save Changes.
Honeypot Field
A honeypot field is a technique used in web forms to detect and prevent spam submissions without requiring any action from the user. It's essentially a hidden field added to a form that is invisible to human users but can be detected by bots.
Here's how it works:
- Invisible Field: The honeypot field is added to the form markup but is hidden from human users using CSS or other techniques. This means that regular users won't see or interact with the field when filling out the form.
- Bait for Bots: Bots that are programmed to automatically fill out and submit forms often scan the HTML code of web pages to identify form fields. When they encounter a form with a honeypot field, they may attempt to fill it out along with the visible fields.
- Detection: Since the honeypot field is invisible to human users, any data submitted in this field is likely generated by a bot. The form processing script can then check if the honeypot field has been filled out and reject the submission if it has, as legitimate users wouldn't have interacted with it.
- Spam Prevention: By including a honeypot field in a form, website owners can effectively filter out spam submissions without requiring users to solve a captcha or perform any additional actions. This helps maintain the user experience while still protecting against automated spam attacks.
In summary, a honeypot field is a hidden form field used to catch and block spam submissions from bots by tricking them into revealing themselves. It's a simple yet effective method of spam prevention that adds an extra layer of security to web forms.
Google reCAPTCHA v3
Google reCAPTCHA v3 is a version of Google's reCAPTCHA service that is designed to detect abusive traffic on websites without requiring any interaction from users.
Here's how it works:
- Integration: Website owners integrate Google reCAPTCHA v3 into their web pages by adding a script provided by Google. This script generates a unique site key and secret key pair, which are used to authenticate requests and communicate with Google's servers.
- Page Load: When a user visits a page with reCAPTCHA v3 enabled, the reCAPTCHA script runs in the background automatically without displaying any visible challenge to the user.
- Risk Analysis: As the user interacts with the website, reCAPTCHA v3 assesses their behavior and assigns a risk score to the user and their actions based on various factors such as mouse movements, keyboard inputs, and browsing patterns.
- Score Evaluation: The risk score ranges from 0.0 to 1.0, with higher scores indicating a higher likelihood that the user is a bot or engaging in abusive behavior. Website owners can define a threshold score above which they consider the user to be suspicious or malicious.
- Action Based on Score: Depending on the assigned risk score, website owners can implement custom logic to handle the user's interaction. For example, they may choose to block access, require additional verification, or allow the interaction to proceed as normal.
- Continuous Learning: Google reCAPTCHA v3 continuously learns from interactions across the web to improve its ability to accurately assess user behavior and distinguish between legitimate users and abusive bots.
In summary, Google reCAPTCHA v3 operates silently in the background, analyzing user behavior to assign a risk score that helps website owners identify and mitigate potential threats from bots and abusive traffic, without disrupting the user experience with explicit challenges.
Email Notifications
Emails can be tricky, and email delivery even more so. Therefore, it's crucial to keep track of any email sending issues. Emails lacking SPF and DKIM authentication typically end up in the recipient's spam/junk folder, highlighting the importance of having these DNS records in place. At WPLake, we employ the FluentSMTP plugin to configure the SMTP of our WordPress site. This ensures that when our website sends emails, they are routed through the Zoho Mail server using their API.
Set up notifications
Go back to your Form builder, and switch to the “Notifications” tab, click Add Notification. Let’s label this as “Admin” as it’ll be used to send the site admin an email about the user form submission. For email use the specific email, or leave empty to use the WordPress admin, then scroll down to Email Subject and insert the subject field name in square brackets i.e. [subject]. Continue by adding the Email From Name and Sender Email and for Email Message add [all_fields] tag to include all fields that were filled.
Add another Notification, this time for the “User”, this time adding a personalised message instead of the [all_fields] tag to reassure the user that you’ll attend to their enquiry.
Switch to the “Confirmation” tab and if you’d like to redirect the user to a thank you page, then select that option. Alternatively you can insert the Notice message to display within the “Notice” field of your form, also known as the Success Message.
Lastly double check the Privacy tab to ensure what you mentioned about user data in your Privacy Policy is being adhered to. Click Update to save your form.
Go to the page with your form and do a test submission, check that Mailchimp has added the contact to the correct list and see how the email notification looks.
MailChimp Integration
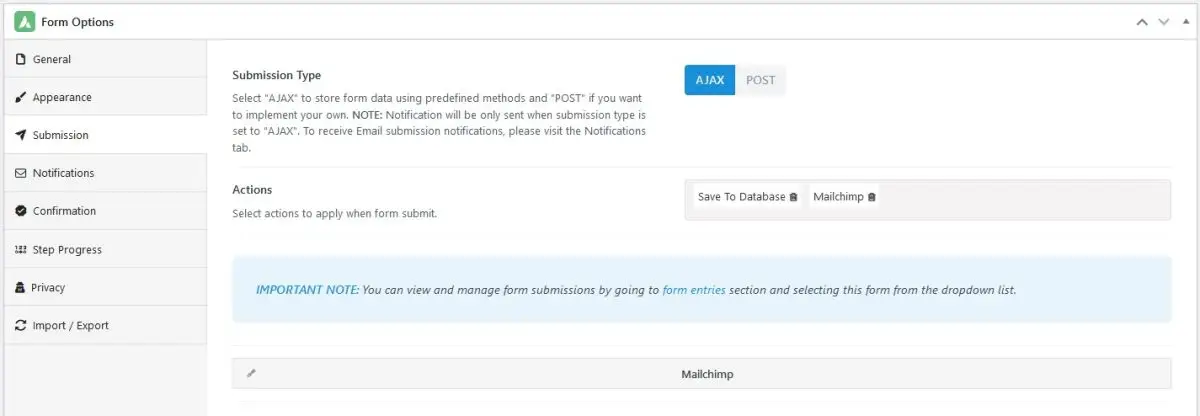
If you plan on also integrating Mailchimp, then go to Avada Settings, and search for Mailchimp, select the “API Key” option, and paste your API Key. Follow the steps in the doc to get your API key. Then Save Changes.
Edit the “Enquiry” form we built a moment ago and scroll to the bottom until you get Form Options. Switch to the ‘Submissions’ tab, and for actions select “Save to Database” and “Mailchimp”. Click the Pen icon to edit the Mailchimp action, usually defaults to “None” but let’s select “Create/Update Contact”, then select the Mailchimp list, often referred to as the Audience, add tags if you have specific Audience/ Subscriber tags. And Lastly for “Form Consent” choose the “Newsletter” field of our form. Then “Update” your form, and preview the page you placed your form on.
Tips for Effective Form Design
Below are several recommendations for crafting forms that are both user-friendly and optimized for conversion:
- Keep it Simple: Minimize the number of form fields to only include essential information. Long forms can overwhelm users and increase abandonment rates.
- Use Clear Labels: Clearly label each form field to indicate what information is required. Use descriptive and concise labels to avoid confusion.
- Prioritize Field Order: Arrange form fields logically, with the most important fields at the top. Consider the natural flow of information and group related fields together.
- Optimize for Mobile: Ensure your forms are mobile-responsive and easy to use on smartphones and tablets. Use larger text and input fields to accommodate touchscreen users.
- Provide Inline Validation: Offer real-time feedback to users as they fill out the form by validating their input immediately after each field or on submission. This helps prevent errors and guides users through the process.
- Use Smart Defaults: Pre-fill form fields with default values whenever possible to streamline the process for users. However, make it easy for users to overwrite default values if needed.
- Include Clear Call-to-Action (CTA): Use a prominent and actionable CTA button to indicate what action the user should take next. Use compelling language that encourages conversions, such as "Submit," "Sign Up," or "Get Started."
- Optimize Form Layout: Organize your form layout in a single column format for easy scanning and completion. Use whitespace effectively to improve readability and visual clarity.
- Progress Indicators: For multi-step forms, provide clear progress indicators to inform users about their current position in the process and how many steps are remaining.
- Test and Iterate: Regularly test your forms with real users to identify any usability issues or areas for improvement. Analyze form analytics to track conversion rates and optimize performance over time.
Mobile Responsive layout
When optimizing your form layout for mobile responsiveness, make sure that the form elements adjust seamlessly to different screen sizes. This ensures that users can interact with the form easily on mobile devices without any usability issues. You can achieve this by using larger touch targets, adjusting spacing and alignment, and employing a single-column layout to accommodate smaller screens.
By following these best practices, you can design forms that are user-friendly, intuitive to use, and optimized for driving conversions on your website.
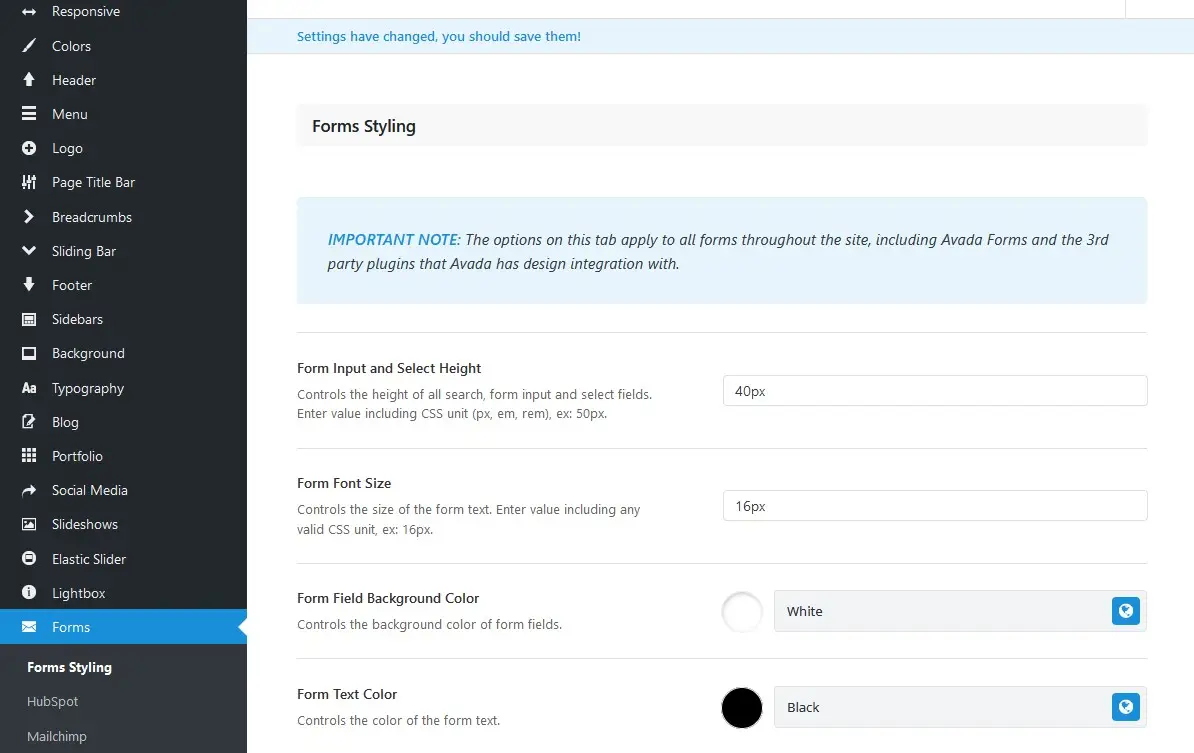
To adjust your Avada Form styling go to Avada > Options and click on Forms in the left menu. Note that these style can be overridden on the page when placing the Avada Form element.
Conclusion
In conclusion, mastering Avada Forms empowers you to revolutionize your website's engagement and data collection strategies. By leveraging its intuitive features and implementing best practices, you can create dynamic forms that not only foster meaningful communication but also drive conversions and growth. Remember, forms are not just static elements on a webpage; they are powerful tools that bridge the gap between you and your audience. So, embrace the potential of Avada Forms, and watch as your website flourishes with enhanced interaction, insight, and success.
Thank you for reading! to our monthly newsletter to stay updated on the latest WordPress news and useful tips.

Stuck with development or facing an issue?
WPLake offers affordable on-demand website development and design.
No matter the size of your project - contact us now, and we'll get it done for you!
Frequently Asked Questions Test Your Knowledge
FAQ mode
/
Learning mode
- What is Avada Forms?
Avada Forms is a versatile WordPress plugin that allows you to create and manage forms on your website with ease. It offers a user-friendly interface and a wide range of features for designing customizable forms.
- Is Avada Forms compatible with my WordPress theme?
Avada Forms is designed to seamlessly integrate with the Avada theme, and unfortunately it isn't available and doesn't work with other WordPress themes.
- Can I customize the design of my forms with Avada Forms?
Absolutely! Avada Forms provides extensive customization options, allowing you to personalize the design and layout of your forms to match your website's branding and aesthetics.
- Does Avada Forms offer spam protection features?
Yes, Avada Forms includes built-in spam protection measures such as captcha integration and honeypot fields to prevent spam submissions and maintain data integrity.
- Can I receive email notifications when a form is submitted?
Yes, Avada Forms allows you to configure email notifications to receive alerts whenever a form is submitted on your website, keeping you informed and responsive to user interactions.
- Is MailChimp integration supported with Avada Forms?
Absolutely! Avada Forms offers seamless integration with MailChimp, enabling you to sync form submissions with your MailChimp account and grow your email list effortlessly.
- Are Avada Forms mobile-responsive?
Yes, Avada Forms are optimized for mobile devices, ensuring a seamless user experience across all screen sizes and devices.
- Do I need coding knowledge to use Avada Forms?
No, Avada Forms features an intuitive drag-and-drop form builder interface that does not require any coding knowledge. You can create and customize forms easily with just a few clicks.
Course navigation: Avada Theme
Lesson #1
Time to read: 11 mins
Updated 13 Mar, 2026

Lesson #3
Time to read: 10 mins
Updated 23 May, 2024
Content links (12)
2.
gdpr-info.euAbout the Author