WordPress Plugin Publishing: Step By Step Guide
Key Points at a Glance
- Plugin Creation: Creating a WordPress plugin involves simple steps like creating a folder and a main file with necessary header comments, such as Plugin Name, Description, Version, and Author.
- Publishing Preparation: Before publishing, ensure your plugin has a unique name, complete header information in the main file, and a readme.txt file to provide details about your plugin.
- Code Requirements: Your plugin's code must adhere to certain standards, including being available under the GPLv2 license or later, maintaining readable code, and ensuring safe output (echo) by sanitizing variables.
- Submitting Your Plugin: Once your plugin is ready, you can submit it to the WordPress.org repository for review, which typically takes 1-5 working days. Expect detailed feedback if there are violations, but approval is likely if your code meets standards.
- First Commit: After approval, you'll receive instructions to commit your plugin to the WordPress SVN repository. This involves adding your plugin files, choosing banners and icons, and making the initial commit.
- Updating Your Plugin: For future updates, follow a similar process of updating plugin files, committing changes to SVN, and releasing a new version with incremented version numbers following the Major.Minor.Patch convention.
Table of Contents
Review
Everybody, who is familiar with WordPress, uses plugins from its repository. It's a very simple and easy way to extend default capabilities. If you were developing or customizing a theme, then how many times have you copied the same code from a previous website to a new one? How many times did you get an idea that your current feature would be helpful for others? If you've had similar thoughts then in this article we’ll show, in a real example, how to publish your own WordPress plugin. We hope after reading you won't look at this as a too complex task.
Those, who already have knowledge about publishing plugins, can use the article as a reminder for future publications. Also, we’ll share a couple of tricky things that you'll need to pay attention to.
1. Plugin creation
Note: If you already have experience with plugin creation then feel free to skip this section.
In this article, we'll use an example with our plugin to show you how to publish WordPress plugin in practice. So we’ll use our plugin Advanced Views. The plugin allows to display selected ACF fields or Posts anywhere using shortcodes, HTML markup is created automatically by the plugin. You can read about the benefits of the shortcode approach here.
Down the line, don’t forget to replace this name with your own plugin name.
For those of you who are completely new at creating your own plugin below a short overview.
WordPress plugins for your website are located in the /wp-content/plugins folder. And every plugin has its own folder.
Fortunately, when creating a plugin you won't have as many steps as when you're creating a theme. So you just need to create a new folder in the /wp-content/plugins directory and a single file inside. Usually, the file has the same name as the folder.
In our example, it’ll be /wp-content/plugins/acf-views/acf-views.php.
In the file, add the following 'header' comment. It’s necessary to include this in any plugin, as it lets WordPress know there's a plugin there.
<?php
/*
Plugin Name: Advanced Views
Description: Display ACF fields and Posts using shortcodes.
Version: 1.0.0
Author: WPLake
*/
Each line has a format: “Name: Value”. If you’ve copied our header, simply change the values to yours. See all header requirements.
That’s it. After that, your plugin has been created. Now you can visit your admin plugin page to see the new plugin in the list and you can also activate it. Obviously, the plugin does nothing yet, so after the header comment you should add your code and all your features. (Best regards, your captain)
The main plugin file can have (include/require) other files that should be placed in the same folder. More details about creating a plugin can be found here.
2. Publishing preparation
At this time, the plugin which you would like to share with the world would already be created and tested by yourself.
Now let’s prepare the plugin for publishing:
1. Check the plugin name
Firstly, you have to choose a unique name that isn’t used by other plugins. To check if a name is available, copy https://wordpress.org/plugins/search/my-plugin/ and insert your plugin name instead of 'my-plugin'. Paste into your browser bar, and if you see a page with search results, just like with the my-plugin case - it’s good news, the name is available. If you see the plugin’s page, as in the case with Advanced Views then it means the name is already in use and you have to choose another name.

2. Insert plugin file headers
Secondly, fill the main plugin file headers as completely as possible. The minimum required values are Plugin Name, Version, and Author. See the full list of header requirements.
<?php
/*
Plugin Name: Advanced Views
Plugin URI: https://wplake.org/acf-views/
Description: Display ACF fields and Posts using shortcodes.
Version: 1.0.8
Author: WPLake
Author URI: https://wplake.org
*/
3. Create a readme.txt file
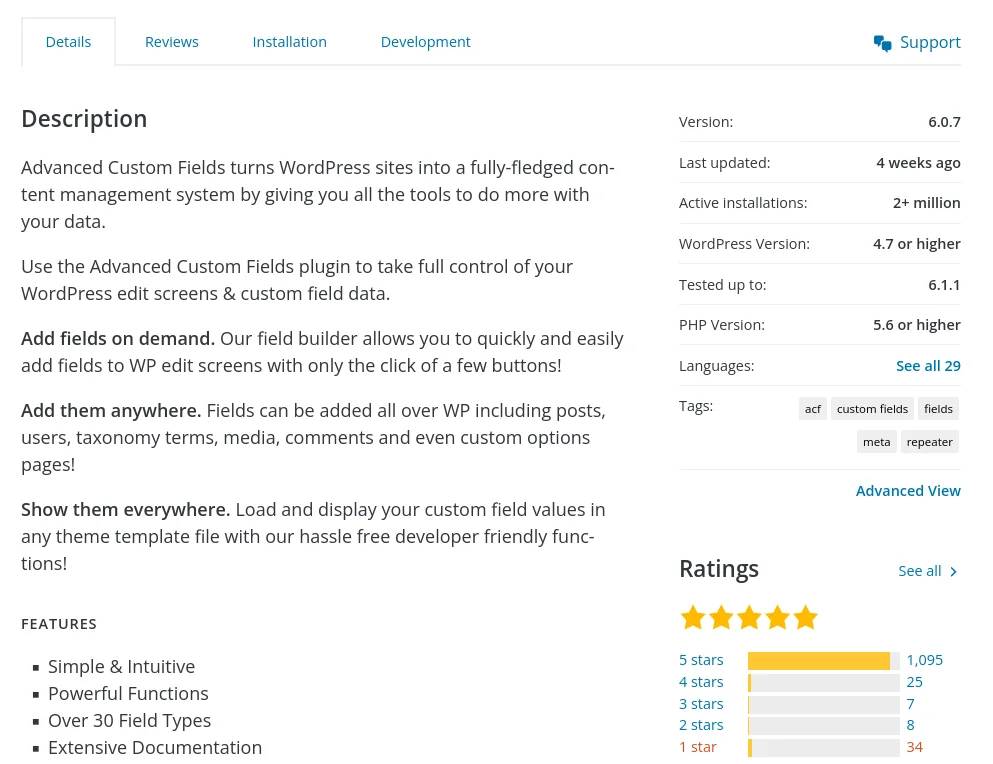
Readme.txt is our main opportunity to share information about your plugin with the world. WordPress parses this file, and this content will be displayed exactly as is on your plugin page. So WordPress automatically parses it, you’ll have no admin panel on Wordpress.org to edit the content. See the ACF plugin page for another example.
Below is our readme.txt sample, required sections are :
main (with your plugin name and data), description (about), and changelog (short data about your updates, at the beginning there'll only be one line)
=== Advanced Views - Display ACF fields and Posts using shortcodes ===
Contributors: wplake
Tags: acf, display custom fields, display posts, acf views, shortcode, custom fields in frontend, show acf fields, get field values, get posts
Requires at least: 5.5
Tested up to: 6.1
Requires PHP: 7.4
Stable tag: 1.7.20
License: GPLv2 or later
License URI: https://www.gnu.org/licenses/gpl-2.0.html

The plugin allows to display selected ACF fields or Posts anywhere using shortcodes, HTML markup is created automatically by the plugin.

== Description ==

The plugin allows to display selected ACF fields or Posts anywhere using shortcodes, HTML markup is created automatically by the plugin.

Note: "Advanced Views" plugin requires [Advanced Custom Fields](https://wordpress.org/plugins/advanced-custom-fields/) plugin to be enabled on your website (either Free or Pro version).

== Changelog ==

= 1.0.1 (2022-06-09): =
- Screenshots, plugin's version
Here's a full list of all available readme options.
At this time, we’ve managed to go through all the main steps. So now let’s talk about the plugin’s code.
4. Check requirements for the plugin’s code
Here's the list of all requirements. All authors must check this list before they decide to publish a WordPress plugin, to make sure the plugin follows the standards. Overall the list has about twenty items. But the most important is far less, these are as follows:
License
Your code must be available under GPLv2 or later. That means you allow others to use and modify your code with the condition that they keep the original information about the author (You) and these rights (to use and modify for other people).
In reality, it means you shouldn’t use code parts with a closed license in your plugin. E.g. if you’ve written a feature on behalf of or as a request from a client, ask permission from them before using that code in the plugin.
Code Quality
Your code must be readable. Remember that your code will probably be read by other people. Usually with the goal to understand how it works. Sometimes to clarify something, or to extend it further. For that reason don’t use pointless names of variables, classes, and functions, like $asdre or function werlsdf().
Overall, be a good person coder and use the same code structure that you'd like to see in other plugins. Read what must a good WordPress developer know to check and improve your knowledge.
Safe Output (echo)
This is a very important point. Because WordPress requires ‘late’ data clearing from plugins.
What does it mean?
Let’s say you have $_GET variable - email, and you need to display it somewhere on a page. Most likely, you’ll do something like this :
$email = sanitize_text_field($_GET['email']?? '');
// ...
echo "<h3>Hi, {$email}</h3>";
However, it’ll be wrong. You need to know that WordPress has its own coding rules to decrease the number of vulnerable plugins. Because often it's a reason behind the hacking of WordPress websites. So, by WordPress rules for plugins regardless of the fact that you’ve already cleared a variable before or not, you MUST sanitize any variable in the output too. So use esc_attr, esc_html functions, and in this case, the output must be :
echo sprintf("<h3>Hi, %s</h3>",esc_html($email)) Don’t be lazy, search for ‘echo’ and check all your outputs. Often, during the plugin creation, this step is often overlooked. And if you’ve skipped this step you’ll be notified about it. Also, the WP will have paused the review of your plugin until you’ve fixed it.
Composer Packages
Another rule, from us personally.
Unfortunately, WordPress doesn’t provide a solution yet for the common usage of composer dependencies between plugins. In this way, a plugin can use one version of a dependency, and another plugin can use another version of the same dependency. Believe us, it happens more often than you can imagine.
As a result, a user will experience a critical error and the website will be down. If you use composer dependencies in your plugin, make it non-conflict by using PHP-Scoper.
In short, it’s a tool that will add your namespace to all dependency files, and instead of namespace Dependency\Folder; it will be namespace YourNamespace\Dependency\Folder;
In this way, we avoid the conflict, and different plugins may use the same dependency even with different versions. Furthermore, PHP-Scoper does it for you automatically, and the installation and setup are pretty easy and fast. Read more about using the PHP-Scoper tool for WordPress plugins.
3. Submitting your plugin
At last, we’ve reached the most solemn and exciting moment. It’s time for assaulting the WP repository sending a request for placing your plugin on WordPress.org.
So to receive approval to publish your WordPress plugin, you send a request (with your attached plugin) and the WordPress.org team manually reviews it. But don't worry, It’s totally free and pretty easy.
First of all, you’ve to sign up on WordPress.org, in case you haven't already. Then confirm your email and visit the special request page.
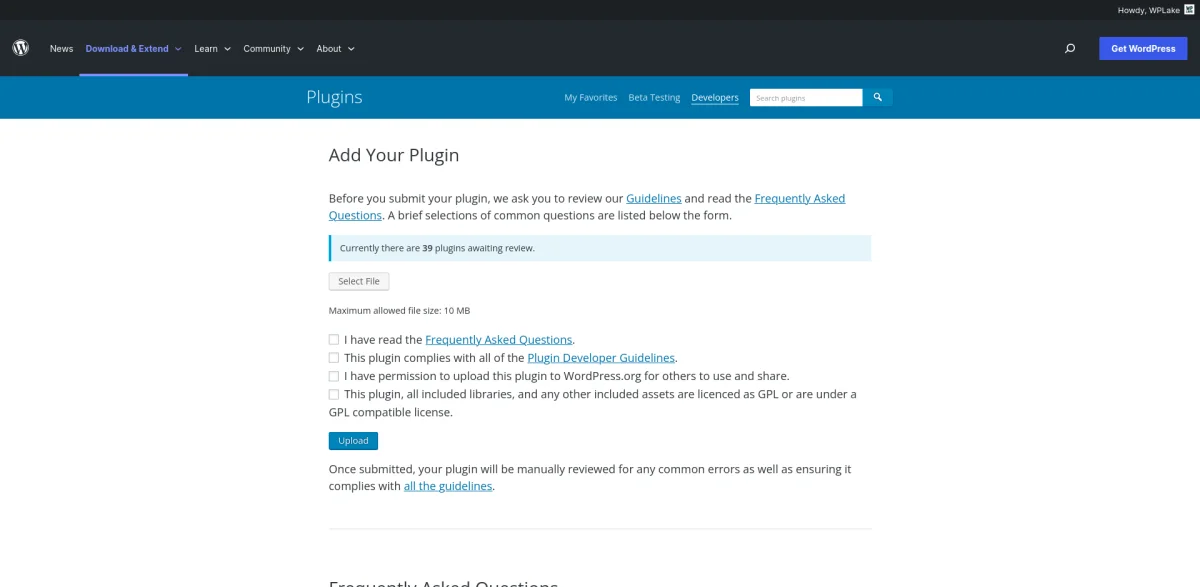
Here you can upload your archive with the plugin. Overall, the archive is an ordinary archive, but includes a folder of your plugin, not only files without the plugin common folder. Then WordPress will do parsing of the archive and will display your plugin name that it will have in the WordPress repository. In our case it’s acf-views. Also, it'll display a notice, that the plugin name can NEVER be changed once approved. So please think twice, before pressing the submit button.
After submitting, the plugin will go through a manual review, which usually takes 1-5 working days. Then you’ll be notified about the approval or rejection of your request. In fact, if your plugin isn’t malicious and your code quality is decent then you’ll never get rejected.
Reviewer's feedback
If the reviewers have noted some violation of rules, then you’ll be notified about it with details, and requested to fix and submit an amended copy. E.g. we had a notice about safe echo, as we had cleared variables in the receiving time, not at the output time.
However, if you followed all the points about plugin preparation from this article then reviewers should have no questions for you. Also, we would like to reassure you, that communication with WordPress reviewers is always an exciting experience, at least for us XD.
We can honestly say, we've very rarely met such great support. Even if your plugin has some drawbacks then these will be noted in detail in the reviewer's feedback. So you’ll immediately understand what you’ve done wrong. We’ve never had a case, where a plugin was not published or the reviewing was paused without any clearly defined reason.
It means everybody can publish your WordPress plugin without fear to be rejected for unknown reasons. That's why we want to say a big thank you to the WordPress community
4. First commit
So you sent a request and waited a few long working days. As they'll probably feel very long for you. Then, at last, you’ve received a letter, an invitation to Hogwarts, a message that says your request is approved. It's exciting and means the WordPress team allows you to publish your WordPress plugin.
Congratulations, the plugin hosting request for Advanced Views has been approved.

Within one (1) hour your account (X) will be granted commit access to your Subversion (SVN) repository.

* SVN URL: https://plugins.svn.wordpress.org/acf-views
* Public URL: https://wordpress.org/plugins/acf-views

Once your account access has been activated, you may upload your code using a SVN client of your choice. If you are new to SVN (or the Plugin Directory) make sure to review all the links in this email.

To answer some common questions:

* You must use SVN to upload your code -- we are unable to do that for you
* Your SVN username is X and your password is the same as you use to log in to WordPress.org
* Your username is case sensitive
* SVN will not accept your email address as a username
* Due to the size of the directory, it may take 72 hours before all search results are properly updated

To help you get started, here are some links:

Using Subversion with the WordPress Plugin Directory:
https://developer.wordpress.org/plugins/wordpress-org/how-to-use-subversion/

FAQ about the WordPress Plugin Directory:
https://developer.wordpress.org/plugins/wordpress-org/plugin-developer-faq/

WordPress Plugin Directory readme.txt standard:
https://wordpress.org/plugins/developers/#readme

A readme.txt validator:
https://wordpress.org/plugins/developers/readme-validator/

Plugin Assets (header images, etc):
https://developer.wordpress.org/plugins/wordpress-org/plugin-assets/

WordPress Plugin Directory Guidelines:
https://developer.wordpress.org/plugins/wordpress-org/detailed-plugin-guidelines/

Block Specific Plugin Guidelines:
https://developer.wordpress.org/plugins/wordpress-org/block-specific-plugin-guidelines/

If you have issues or questions, please reply to this email and let us know.

Enjoy!

--
The WordPress Plugin Directory Team
https://make.wordpress.org/plugins
In the letter, the plugin SVN repository address will be declared. But don’t worry about SVN, it’s similar to Git. In addition, the letter will have a link to your plugin page on WordPress.org. You can save the letter for history. But don’t worry about losing it, all links on WordPress.org are identical. So you only need to remember your plugin's name and you’ll always be able to find your links again.
Copy the links below, and replace 'PLUGIN-NAME' with your plugin name at the end:
https://plugins.svn.wordpress.org/PLUGIN-NAME
https://wordpress.org/plugins/PLUGIN-NAME
We believe the name of your first love plugin won't easily be forgotten.
It’s time to release your plugin to the community
This part can only be done by you, not by the WordPress.org team, which means your plugin will only be available after the first commit.
Create a folder and clone the repository (svn should be installed on your machine):
svn co http://plugins.svn.wordpress.org/YOUR_PLUGIN_NAME_HEREthen
1. Copy files
Copy all your plugin files (without the common folder) to the trunk directory.
After that create a folder with your version (likely 1.0.0) in the tags directory and also add your plugin files there.
2. Choose a banner and icon
So it's time to think about a banner, that appears at the top of your plugin page on WordPress.org. Additionally, about a plugin icon, that appears on the WordPress search result page next to your plugin name. It can be any image you'd like, but no indecent pictures for sure xD. Also, you can add the banner in a couple of supported dimensions (772x250px width x height and 1544x500px) to the assets directory with the ‘banner’ label in the name.
It will therefore be banner-772x250.png and banner-1544x500.png (or jpg). Also, the icon will be icon-128x128.png and icon-256x256.png (or jpg).
3. Add the files to SVN
Then add the files to SVN with the commands:
svn add trunk/*
svn add tags/YOUR_VERSION_HERE
svn add assets/*
4. Commit
At last your first commit:
svn ci -m "v 1.0.0"Firstly, here the console will ask for your WordPress.org account name and password, paste them to authorize. Also committing will take some time, as svn isn’t as fast as git. So please wait some time until the command has finished.
Nice Job! Now you can visit your plugin page. After that, it's available for everyone, and you can install your plugin on any WordPress website directly via the admin panel (with Add new -> search).
5. Updating your plugin
After some time, you will likely want to add features or amend your plugin. For this goal, you have to release a new version. Fortunately, it's easy to make new releases. Because the steps are much easier and quicker than the scheme, that we used to publish a WordPress plugin. For instance, there will be no manual review.
FYI: WP uses an ordinary versioning and consists of 3 digits, like in npm or composer - Major.Minor.Patch.
For example 1.0.0 - with small changes we increase only the third digit, 1.0.1, with adding new features or middle updates we change the second digit, 1.1.0, and with really big or ‘revolutionary’ changes we update the first digit, 2.0.0.
In case with npm/composer, they use it to manage your further updates. E.g. if you use ‘1.0.0’ version, by default you receive only Minor and Patch updates, but not Major, because it’s supposed that Major can contain changes without back compatibility.
BUT WORDPRESS DOESN'T HAVE IT. It means you MUST provide back compatibility with previous versions. For this goal there are special hooks that are called in the updating process. You can use them for DATABASE updates or other changes, to provide moving from the previous Major version to a new one. But you don’t need to know them at this moment.
It’s time to release a new version.
For this goal you'll need to:
1. Update plugin files
Firstly, update the version in the main plugin file header (“Version: X”) to the new one (e.g. 1.0.2). And update “Stable tag: YOUR_VERSION_HERE” to the new one in the readme.txt file.
2. Update files in the SVN repository
Secondly, update the plugin files in the trunk folder and create a new folder with your new version number as a name in the tags folder. Then copy your plugin files there too.
3. Commit
Lastly, let's let svn know about the new files that we added and make a commit.
# 1. New files (modified are handled by default)
svn add tags/{x}
svn add --force trunk

# 2. Removed files
# 2.1) Check if there are removed files
svn status | awk '/^\!/ {print $2}'
# 2.2) if yes, handle them
svn status | awk '/^\!/ {print $2}' | sort -r | xargs svn delete

# 3. verify changes
svn status

# 4. Commit
svn ci -m "v. x"
Although the description of the commit can be any, we recommend that you use a version number as a description.
Summary:
You have to update the trunk directory, as it always keeps the latest version. And add a new folder, with your new version as a name and with the plugin files inside, to the tags directory.
But in case you just want to update the plugin information on the WordPress.org page, you can just update the readme.txt file in the trunk directory and commit in svn, without releasing a new version.
As you’ve noticed, we use the WordPress SVN repository ONLY for releasing new versions. Because it’s a release repository. So it’s prohibited to commit every change to the repository like with git. Read more about using subversion here. Otherwise, your repository will become very slow and will use a lot of space on the WordPress.org side. For this reason for plugin development, you need to create your own git repository and commit there as often as you need. While using the svn repository only for releasing new versions.
6. SVN
6.1) Useful commands
svn revert --recursive . // revert uncomitted local changes
svn update // pull changes from the remote repository
6.2) Troubleshooting
svn: E175012: Connection timed out
If your plugin contains hundreds of files, you may encounter a "Connection timed out" issue. This issue occurs on the client's (your) side when the server (wordpress.org) takes a very long time to process the input.
While this is unlikely to happen with an ordinary plugin, it may occur with extensive plugins. For example, contributors to the Gutenberg plugin (which is a part of WordPress but is also available as a plugin) have faced this issue.
To solve this problem, they have added a special timeout-increasing option to the commit command:
svn ci -m "v. x" --config-option=servers:global:http-timeout=3000In this command, 3000 is the number of seconds. Using this trick, you'll be able to bypass the timeout issue.
7. Final thoughts
You've learnt how to publish your own plugin in the WordPress repository. It allows you to share your plugin with people around the world. Also, we've shared knowledge about a couple of tricky things that you'll meet this way. But you can easily solve them using tips from this article.
We hope that now the task of publishing your own plugin doesn't seem so daunting. If you have something to share, don't hesitate - publish now! Who knows, perhaps your plugin will gain popularity and one day will join the Most Popular WordPress Plugins list.
Thank you for reading! to our monthly newsletter to stay updated on the latest WordPress news and useful tips.

Stuck with development or facing an issue?
WPLake offers affordable on-demand website development and design.
No matter the size of your project - contact us now, and we'll get it done for you!
Frequently Asked Questions Test Your Knowledge
FAQ mode
/
Learning mode
- How do I create a WordPress plugin?
To create a WordPress plugin, you need to create a folder in the /wp-content/plugins directory and include a main PHP file with necessary header comments like Plugin Name, Description, Version, and Author.
- What are the minimum requirements for plugin header comments?
The minimum required values for plugin header comments are Plugin Name, Version, and Author. However, it's recommended to include additional information like Plugin URI and Description.
- How do I check if a plugin name is available?
To check if a plugin name is available, you can visit https://wordpress.org/plugins/search/your-plugin-name in your browser. If you see search results, the name is available; if you see the plugin's page, the name is already in use.
- What is the importance of sanitizing output (echo) in plugin development?
Sanitizing output (echo) is crucial in plugin development to prevent vulnerabilities and potential hacking of WordPress websites. WordPress requires all variables to be sanitized in the output using functions like esc_attr and esc_html.
- How do I submit my plugin to the WordPress.org repository?
To submit your plugin to the WordPress.org repository, you need to sign up on WordPress.org, visit the plugin request page, upload your plugin archive, and await manual review by the WordPress.org team.
- What happens if my plugin submission violates guidelines?
If your plugin submission violates guidelines, you'll receive detailed feedback from reviewers, and you'll be requested to fix and resubmit an amended copy. However, following the preparation steps outlined in the article reduces the likelihood of rejection.
- What versioning scheme should I follow for plugin updates?
WordPress plugins use a versioning scheme of Major.Minor.Patch (e.g., 1.0.0), where the third digit is incremented for small changes, the second digit for adding new features, and the first digit for significant changes.
- How do I release a new version of my plugin?
To release a new version of your plugin, you need to update the version in the main plugin file header and the readme.txt file, update files in the SVN repository, and make a commit with the new version number.
- Can I update plugin information without releasing a new version?
Yes, you can update plugin information on the WordPress.org page without releasing a new version by updating the readme.txt file in the trunk directory and committing the changes to SVN.
Course navigation: WordPress Proficiency

Lesson #5
Time to read: 11 mins
Updated 20 Apr, 2024

Lesson #7
Time to read: 3 mins
Updated 25 Apr, 2024
Content links (23)
18.
wordpress.orgAbout the Author