ACF Clone Field: Complete Guide with Code Snippets

Key Points at a Glance
- Field Type: The ACF Clone field, exclusive to the Pro version, is a virtual connector rather than a traditional field type with its own inputs or values.
- Use Cases: Ideal for ensuring consistent layouts and reusable field groups across various sections of a WordPress site, such as a consistent Social Links section across different custom post types.
- Display Options: You can manage how cloned fields appear with two display options: 'Group' for nesting within a container, and 'Seamless' for integration into the existing layout.
- Prefix Setting: The Clone field maintains original field names but allows prefixing to prevent naming conflicts, though this may impact modularity.
- Code Integration: Use get_field() or the Advanced Views Framework to display cloned fields. Prefixes must be included in field names if the 'Prefix Field Name' setting is enabled.
- Querying: Cloned field values can be queried like standard ACF fields, with considerations for prefixes if applied.
Table of Contents
The ACF Clone field is a versatile field type in the Advanced Custom Fields plugin, available exclusively in the Pro version. Classified under the Layout group, the Clone field is distinct from traditional field types because it doesn’t hold its own inputs or values.
Instead, it acts as a virtual connector. This feature allows you to link and display other fields or entire groups within various contexts. Whether you’re working with nested groups or layout fields like Group or Repeater, the Clone field enables efficient management and reuse of field configurations across your WordPress site.
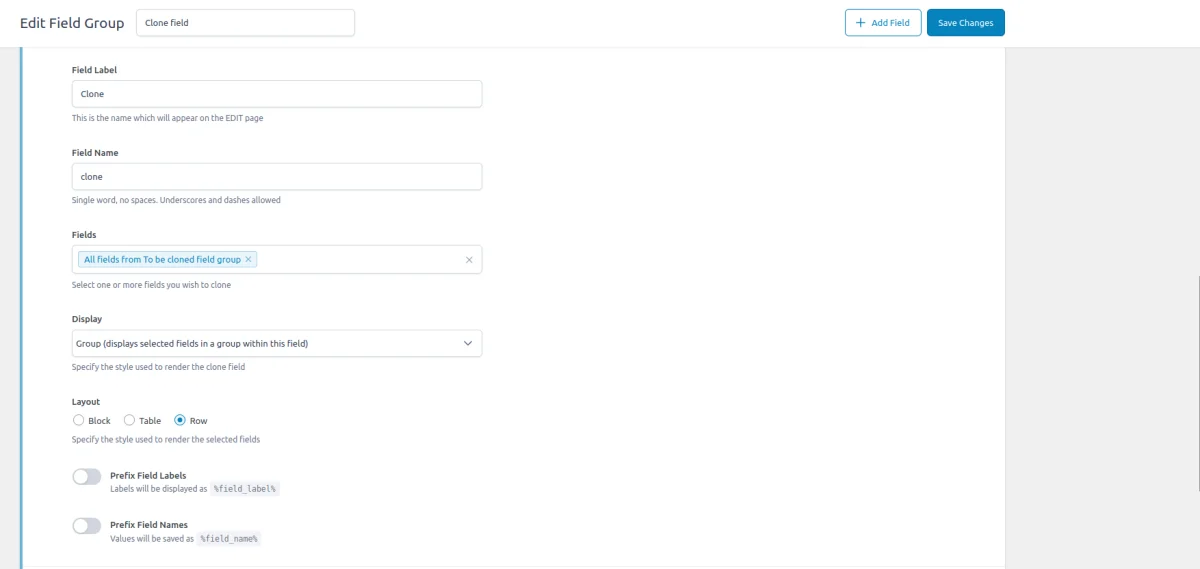
ACF Clone field UI
The Clone field lets you integrate fields or entire groups within another group or layout field effortlessly. By utilizing the 'Display' setting, you can manage the appearance of the cloned fields.
You have options such as 'Group,' which nests the cloned fields within a container, and 'Seamless,' which merges them seamlessly into the existing layout.

ACF Clone field-related addons
ACF addons can be an important part of the workflow, and there are several addons especially useful for the ACF Clone field:
- ACF Quick Edit Fields enhances the WordPress admin experience by adding Quick Edit functionality to Advanced Custom Fields. This plugin allows you to quickly view and edit ACF field values directly from the list views.
- ACF Tooltip enhances the user experience by managing lengthy instruction texts in ACF fields. Instead of cluttering the edit screen, this plugin allows you to add tooltips to field labels, keeping the interface clean and space-efficient.
- WPGraphQL for ACF allows you to expose ACF fields and field groups to GraphQL, enabling seamless querying of ACF data within your GraphQL queries.
1. ACF Clone field essentials
1.1) Field settings
- Fields:
Use this multi-select option to choose which specific fields you want to clone. Alternatively, you can select 'All fields from [x] group' to clone an entire group. This option ensures that all fields within the group remain synchronized, automatically updating if you add or remove fields later. - Display:
Control how the cloned fields appear with two options: 'Group,' which displays the fields within a container, and 'Seamless' which integrates them directly into the existing layout. - Layout:
Choose how the cloned fields are arranged with the 'Block,' 'Table,' or 'Row' layout options. - Prefix Field Labels (%field_label%):
Add a prefix to the labels of cloned fields to differentiate them from others. - Prefix Field Names (%field_name%):
Similarly, add a prefix to the names of cloned fields for better organization and clarity.
1.2) Field names in return value
The Clone field maintains the original field names of the cloned items, allowing you to interact with the "cloned" fields in code using the ACF get_field function or inside the smart templates just like ordinary fields.
The 'name prefix' setting is useful if you want to prevent name conflicts. For instance, suppose we have a 'Company' group and wish to clone the 'Contact details' group.
By default, field names remain identical, potentially leading to conflicts such as having another phone_number field within the same group. To mitigate this, you can set up a field prefix within the clone field settings. Consequently, cloned fields will be stored in the database with the prefix, such as clone_prefix_phone_number.
Tip: It's important to note that while the prefix setting offers a solution to potential naming conflicts, it's best used sparingly due to its impact on modularity. It's advisable to provide clear names by default.
Using the prefix may result in code that's unable to reuse existing functionality for displaying fields from the cloned group, as the names will have changed.
2. Use cases of the ACF Clone field
As previously mentioned, the ACF Clone field allows you to "link" fields not just within other groups but also within various field types, such as layout fields like Group, Repeater, or Flexible Content:
- Consistent layouts across different sections:
If your WordPress site has multiple sections that require the same set of fields (e.g., testimonials, team members, or product details), the Clone field can streamline your process. By cloning a group of fields, you ensure a consistent layout and data structure across various post types or pages, saving time and reducing errors. - Reusable field groups:
For fields that are used in several places but require slight modifications in each instance, the Clone field allows you to create a master set of fields and then clone them where needed. This approach ensures that updates to the master fields automatically propagate to all cloned instances, maintaining uniformity. - Simplified nested groups:
When dealing with complex layouts involving nested groups, the Clone field simplifies management. You can create a group of fields and then clone it into multiple parent groups or layout fields, avoiding the need to replicate field setups manually and reducing redundancy.
This functionality is incredibly versatile and offers numerous use cases beyond simply linking one group inside another.
3. How to use the ACF Clone field
To illustrate how the ACF Clone field can be utilized effectively, let’s look at a real-life example:
Imagine you’re developing a company listing website with two custom post types (CPTs): Companies and Members, which are connected through a Relationship field. Each CPT has its own unique layout and fields, but both require a consistent Social Links section. Additionally, you need to include this Social Links block in the footer across the entire site.
Without the ACF Clone field, you would need to create three separate blocks: one for the Companies CPT, one for the Members CPT, and one for the footer. Each of these would require its own styling and maintenance, which could become cumbersome.
By using the Clone field, we can streamline this process:
- Create a single 'Social Links' group:
First, define a comprehensive 'Social Links' field group that includes all the necessary fields and settings for social media links. - Set up a 'Social Links' layout:
Design a layout for the Social Links that fits your requirements. This layout will be used to display the social links consistently across different contexts. - Reuse the 'Social Links' group:
Utilize the Clone field to include the 'Social Links' group in each relevant location. You can clone this group in your Companies CPT, Members CPT, and site-wide footer. This approach ensures that any updates to the Social Links group are automatically reflected everywhere they are used, reducing redundancy and ensuring consistency.
Let's go through the steps in detail:
3.1) Creation of the origin group
To create a consistent Social Links section, start by defining a new ACF Group to contain all relevant fields. Since each item can feature multiple social links, use an ACF Repeater field within this Group. This allows editors to add multiple social links dynamically.
Inside the Repeater, include an ACF Link field for editors to specify the URL of each social media profile, and an ACF Select field to choose the corresponding social platform. Although using an ACF Image field would offer more flexibility for selecting different icons, opting for a fixed set of icons ensures consistency across the site.
For this example, we've defined the following options in the website (select) field:
instagram : Instagram
facebook : Facebook
x_com : X.com (Twitter)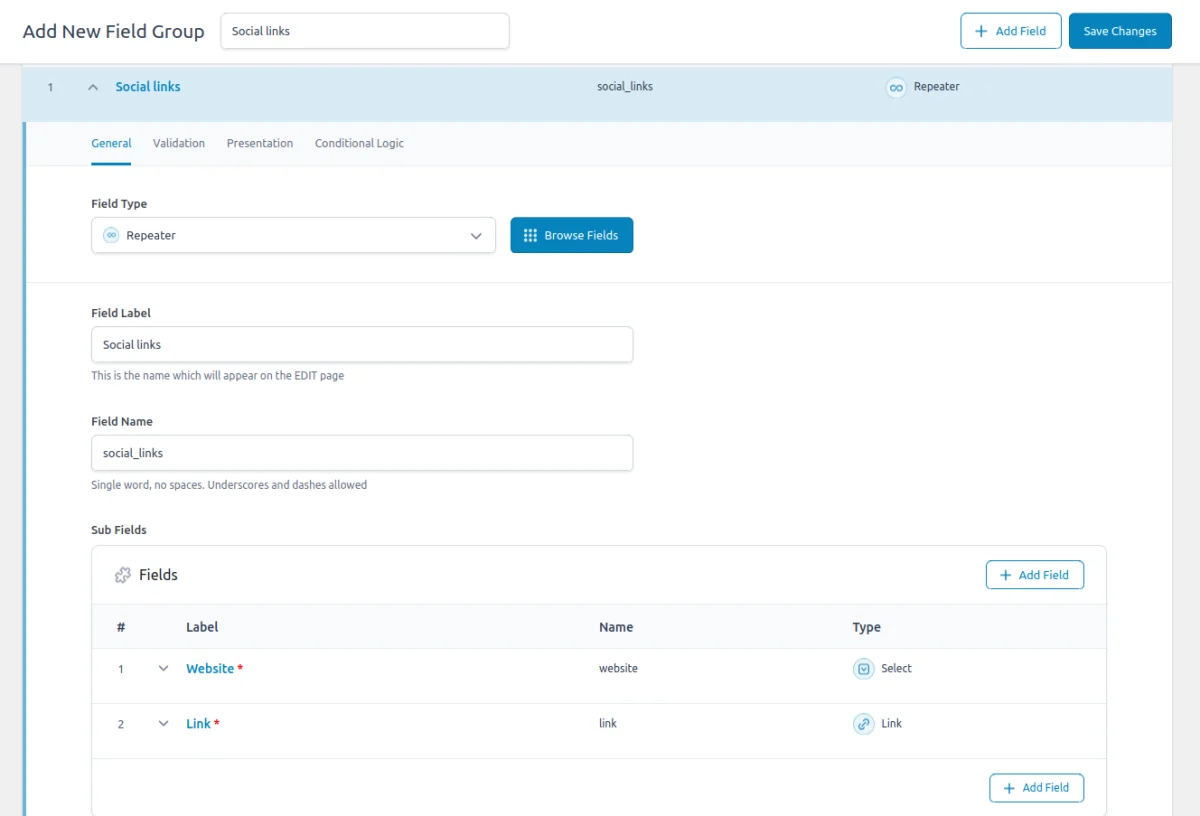
3.2) Setting up the element's layout
To create a layout for your group, we need to load and display the field values properly. We can start by referring to the documentation for ACF's Repeater, Select, and Link fields to understand the structure of their returned data. This will help us craft the appropriate markup for displaying these fields.
For a streamlined development process, consider using the Advanced Views Framework. This tool simplifies querying and displaying ACF field values while allowing you full control over the markup. It supports all standard ACF field types out of the box and handles complex fields, such as Clone, in its Pro edition.
Here are code snippets for both using Advanced Views Framework and manual get_field() calls:
Using Advanced Views Framework
To set up your social links layout with the Advanced Views, follow these steps:
- Create a Layout:
Start by creating a new Layout in AVF. In the Fields tab, select the social Repeater field that contains your social links. - Configure Subfields:
Switch to the Subfields tab within the Field Settings. Here, choose the website (Select) and link (Link) fields that you want to display. - Publish the View:
Once you’ve configured the fields, click Publish to save your Layout. - Insert the View:
Copy the generated shortcode for your Layout and paste it into the target locations on your site. Alternatively, you can create a custom Gutenberg block.
AVF will automatically generate default template markup for your View. You can customize this markup according to your needs. For this example, we used the following:
{% if repeater.value %}
    <div class="acf-view__social-links">

        {% for item in repeater.value %}
            <a target="{{ item.link.target }}" class="acf-view__social-link" href="{{ item.link.value }}">
                {% if 'instagram' == item.website.value %}
                    <svg class="acf-view__social-icon" xmlns="http://www.w3.org/2000/svg" viewBox="0 0 448 512">
                        <path d="M224.1 141c-63.6 0-114.9 51.3-114.9 114.9s51.3 114.9 114.9 114.9S339 319.5 339 255.9 287.7 141 224.1 141zm0 189.6c-41.1 0-74.7-33.5-74.7-74.7s33.5-74.7 74.7-74.7 74.7 33.5 74.7 74.7-33.6 74.7-74.7 74.7zm146.4-194.3c0 14.9-12 26.8-26.8 26.8-14.9 0-26.8-12-26.8-26.8s12-26.8 26.8-26.8 26.8 12 26.8 26.8zm76.1 27.2c-1.7-35.9-9.9-67.7-36.2-93.9-26.2-26.2-58-34.4-93.9-36.2-37-2.1-147.9-2.1-184.9 0-35.8 1.7-67.6 9.9-93.9 36.1s-34.4 58-36.2 93.9c-2.1 37-2.1 147.9 0 184.9 1.7 35.9 9.9 67.7 36.2 93.9s58 34.4 93.9 36.2c37 2.1 147.9 2.1 184.9 0 35.9-1.7 67.7-9.9 93.9-36.2 26.2-26.2 34.4-58 36.2-93.9 2.1-37 2.1-147.8 0-184.8zM398.8 388c-7.8 19.6-22.9 34.7-42.6 42.6-29.5 11.7-99.5 9-132.1 9s-102.7 2.6-132.1-9c-19.6-7.8-34.7-22.9-42.6-42.6-11.7-29.5-9-99.5-9-132.1s-2.6-102.7 9-132.1c7.8-19.6 22.9-34.7 42.6-42.6 29.5-11.7 99.5-9 132.1-9s102.7-2.6 132.1 9c19.6 7.8 34.7 22.9 42.6 42.6 11.7 29.5 9 99.5 9 132.1s2.7 102.7-9 132.1z"/>
                    </svg>
                {% elseif 'facebook' == item.website.value %}
                    <svg class="acf-view__social-icon" xmlns="http://www.w3.org/2000/svg" viewBox="0 0 512 512">
                        <path d="M512 256C512 114.6 397.4 0 256 0S0 114.6 0 256C0 376 82.7 476.8 194.2 504.5V334.2H141.4V256h52.8V222.3c0-87.1 39.4-127.5 125-127.5c16.2 0 44.2 3.2 55.7 6.4V172c-6-.6-16.5-1-29.6-1c-42 0-58.2 15.9-58.2 57.2V256h83.6l-14.4 78.2H287V510.1C413.8 494.8 512 386.9 512 256h0z"/>
                    </svg>
                {% elseif 'x_com' == item.website.value %}
                    <svg class="acf-view__social-icon" xmlns="http://www.w3.org/2000/svg" viewBox="0 0 512 512">
                        <path d="M389.2 48h70.6L305.6 224.2 487 464H345L233.7 318.6 106.5 464H35.8L200.7 275.5 26.8 48H172.4L272.9 180.9 389.2 48zM364.4 421.8h39.1L151.1 88h-42L364.4 421.8z"/>
                    </svg>
                {% endif %}
            </a>
        {% endfor %}

    </div>
{% endif %}
In this code, we print the social links in the loop and define a social SVG icon (fontawesome) depending on the item's website (select) field value.
To style the layout, you can add CSS rules directly in the CSS Code field of the Layout settings. AVF will automatically enqueue these styles on the pages where your Layout is used.
Using custom code
In this case, we'll need to manually load the field values, considering the specific return format of each field type. We used the following code:
<?php

$rows = get_field('repeater');

if ($rows) {
    echo '<div class="acf-view__social-links">';

    foreach ($rows as $row) {
        $link = $row['link'];
        $website = $row['website'];
        $link_url = esc_url($link['url']);
        $link_target = esc_attr($link['target']);

        echo '<a target="' . $link_target . '" class="acf-view__social-link" href="' . $link_url . '">';

        if ('instagram' === $website) {
            echo '<svg class="acf-view__social-icon" xmlns="http://www.w3.org/2000/svg" viewBox="0 0 448 512">
                    <path d="M224.1 141c-63.6 0-114.9 51.3-114.9 114.9s51.3 114.9 114.9 114.9S339 319.5 339 255.9 287.7 141 224.1 141zm0 189.6c-41.1 0-74.7-33.5-74.7-74.7s33.5-74.7 74.7-74.7 74.7 33.5 74.7 74.7-33.6 74.7-74.7 74.7zm146.4-194.3c0 14.9-12 26.8-26.8 26.8-14.9 0-26.8-12-26.8-26.8s12-26.8 26.8-26.8 26.8 12 26.8 26.8zm76.1 27.2c-1.7-35.9-9.9-67.7-36.2-93.9-26.2-26.2-58-34.4-93.9-36.2-37-2.1-147.9-2.1-184.9 0-35.8 1.7-67.6 9.9-93.9 36.1s-34.4 58-36.2 93.9c-2.1 37-2.1 147.9 0 184.9 1.7 35.9 9.9 67.7 36.2 93.9s58 34.4 93.9 36.2c37 2.1 147.9 2.1 184.9 0 35.9-1.7 67.7-9.9 93.9-36.2 26.2-26.2 34.4-58 36.2-93.9 2.1-37 2.1-147.8 0-184.8zM398.8 388c-7.8 19.6-22.9 34.7-42.6 42.6-29.5 11.7-99.5 9-132.1 9s-102.7 2.6-132.1-9c-19.6-7.8-34.7-22.9-42.6-42.6-11.7-29.5-9-99.5-9-132.1s-2.6-102.7 9-132.1c7.8-19.6 22.9-34.7 42.6-42.6 29.5-11.7 99.5-9 132.1-9s102.7-2.6 132.1 9c19.6 7.8 34.7 22.9 42.6 42.6 11.7 29.5 9 99.5 9 132.1s2.7 102.7-9 132.1z"/>
                </svg>';
        } elseif ('facebook' === $website) {
            echo '<svg class="acf-view__social-icon" xmlns="http://www.w3.org/2000/svg" viewBox="0 0 512 512">
                    <path d="M512 256C512 114.6 397.4 0 256 0S0 114.6 0 256C0 376 82.7 476.8 194.2 504.5V334.2H141.4V256h52.8V222.3c0-87.1 39.4-127.5 125-127.5c16.2 0 44.2 3.2 55.7 6.4V172c-6-.6-16.5-1-29.6-1c-42 0-58.2 15.9-58.2 57.2V256h83.6l-14.4 78.2H287V510.1C413.8 494.8 512 386.9 512 256h0z"/>
                </svg>';
        } elseif ('x_com' === $website) {
            echo '<svg class="acf-view__social-icon" xmlns="http://www.w3.org/2000/svg" viewBox="0 0 512 512">
                    <path d="M389.2 48h70.6L305.6 224.2 487 464H345L233.7 318.6 106.5 464H35.8L200.7 275.5 26.8 48H172.4L272.9 180.9 389.2 48zM364.4 421.8h39.1L151.1 88h-42L364.4 421.8z"/>
                </svg>';
        }

        echo '</a>';
    }
    echo '</div>';
}
You should put this code into a separate PHP file inside your theme, and then enqueue in the target templates.
To style the layout, you can add CSS rules to the style.css file of your theme.
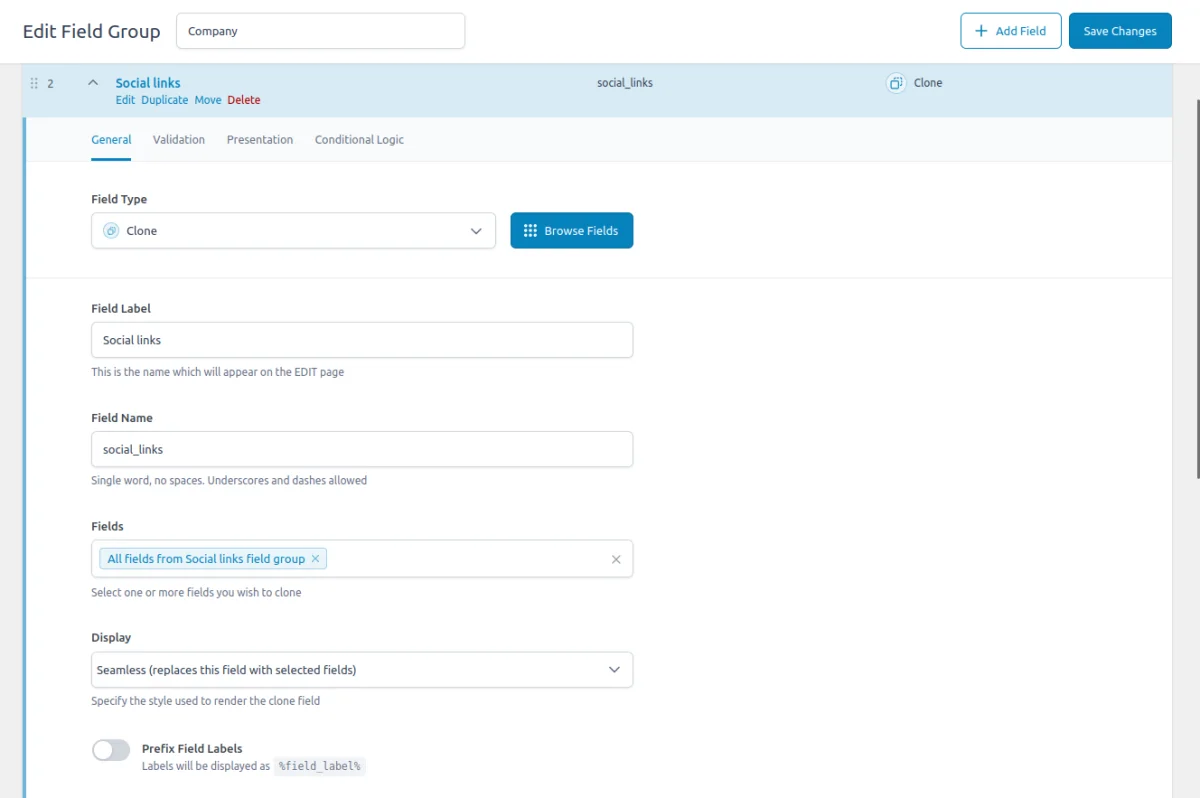
3.3) Reusing the group in target places
Now that everything is set up, you can easily reuse the Social Links group. Open the ACF Groups where you need to include the social links option - such as Company, Member, and Site Settings - and add a new field with the Clone type.
In the 'Fields' setting, choose 'All fields from the Social Links group' to link the entire group. This will ensure that all the fields from the Social Links group are cloned into the new group, as shown below:
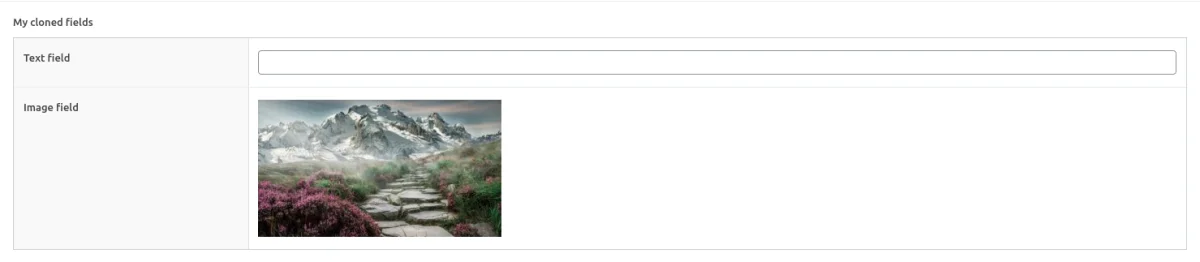
After adding the Clone field, visit the target locations where you’ve integrated the Social Links group. ACF will now display our repeater field as part of these groups, allowing you to populate it with data.

Save your changes, then open the target page to see the Social Links group displayed according to the layout you configured.
That’s it! You’ve successfully created a universal and consistent component that lets you control the group settings and visual appearance from a single location.
This is just one example - using the Clone field, you can build any number of reusable components, making your ACF setups more efficient and flexible.
4. ACF Clone field support in Themes and Builders
ACF is one of the most popular WordPress plugins, and it's supported by many page builders right out of the box. However, most of these integrations are basic, providing limited control over the layout or lacking support for advanced field types like Clone.
To achieve universal compatibility with any theme and page builder while gaining advanced control over your layout, consider using the Advanced Views Framework or custom code snippets as discussed in the following chapter.
Here's a snapshot of the built-in features offered by some of the most popular WordPress themes and page builders for displaying ACF Clone fields:
| Theme/Builder | ACF-related feature | ACF Clone type support |
|---|---|---|
| Astra | - | no |
| Avada | Dynamic Content | no (not declared) |
| Beaver | ACF Module | no (not declared) |
| Bricks | Dynamic data | no (not declared) |
| Divi | ACF Module | no (not declared) |
| Elementor | Dynamic Tags | no (not declared) |
| GeneratePress | - | no |
| Gutenberg | - | no |
| Kadence | Dynamic Content | no (not declared) |
| OceanWP | - | no |
| Visual Composer | Dynamic Content | no (not declared) |
| WPBackery | - | no |
While this list may seem brief, many themes come with their own page builders. Check your theme’s documentation for guidance on displaying ACF Clone fields, or refer to the universal methods outlined below for a more flexible approach.
5. Code snippets for the ACF Clone field
ACF functions and their responses are essentially wrappers around built-in WordPress features. This means that to load and display field values, you need to be familiar not only with ACF but also with core WordPress classes and functions. Additionally, writing markup from scratch and manually escaping data can be time-consuming.
To streamline development, you can use the Advanced Views Framework. This WordPress framework offers smart templates for the front end, simplifying post queries and template creation. It generates default markup and automatically loads the escaped data into the template, allowing you to focus on the layout itself.
Unlike drag-and-drop page builders, smart templates in Advanced Views are modular and based on a template engine (Twig or Blade), providing full control over the markup and helping you avoid the pitfalls of global CSS and JavaScript files. The framework natively supports all ACF field types, along with other data sources.
Note: AVF: Lite edition is free and supports all plain ACF field types, but Clone is a special virtual field, supported only in the AVF: Pro edition. The good news that Pro contains a lot of useful features, including an option for custom Gutenberg blocks, which allows to turn any element into the Gutenberg block without any React coding.
Below are examples for both Advanced Views Pro and custom code:
5.1) Loading and displaying a non-prefixed cloned field
Using Advanced Views Pro
If you’re using the Advanced Views Framework, the selected cloned fields will be automatically loaded into the template, just like other fields, simplifying your workflow.
Using custom code
When the "Prefix Field Name" setting is not enabled, you can access the cloned field values directly using their original field names. Since this field is a virtual connector and doesn't have its own value format, you should check the documentation for the cloned field type to see what value format is expected.
For instance, if you have an Image field within the cloned set, you would retrieve it with the following code:
$image = get_field( 'your_image_field' ); // from the current post
$image = get_field( 'your_image_field', 10 ); // from a specific post by ID
$image = get_field( 'your_image_field', 'option' ); // from the options page
$image = get_field( 'your_image_field', 'user_1' ); // from the user by ID
$image = get_field( 'your_image_field', 'category_2' ); // from the category term with ID 2
$image = get_field( 'your_image_field', 'genre_3' ); // from the custom genre term with ID 3

// prefer the function over manual markup creation, as WordPress makes srcset and sizes attributes there for you.
// arguments: id, size, icon, attributes
echo wp_get_attachment_image( $image['ID'], 'medium', false, [
	'class' => 'my-image',
] );
5.2) Loading and displaying a prefixed cloned field
When the "Prefix Field Name" setting is enabled, you need to include the prefix in the field name when calling the get_field() function. For example, if your clone's field name is clone, you should adjust the image retrieval code showcased above as follows:
$image = get_field( 'clone_your_image_field' ); // from the current post
$image = get_field( 'clone_your_image_field', 10 ); // from a specific post by ID
$image = get_field( 'clone_your_image_field', 'option' ); // from the options page
$image = get_field( 'clone_your_image_field', 'user_1' ); // from the user by ID
$image = get_field( 'clone_your_image_field', 'category_2' ); // from the category term with ID 2
$image = get_field( 'clone_your_image_field', 'genre_3' ); // from the custom genre term with ID 3

// prefer the function over manual markup creation, as WordPress makes srcset and sizes attributes there for you.
// arguments: id, size, icon, attributes
echo wp_get_attachment_image( $image['ID'], 'medium', false, [
	'class' => 'my-image',
] );
5.3) Updating the Clone field programmatically
To update the Clone field programmatically, you can use the ACF update_field function. Since this field is a virtual connector and doesn't have its own value format, you should check the documentation for the cloned field type to see what value format is expected. For the cloned ACF Relationship field, it's an array of post IDs:
add_action( 'acf/init', function () {
	// Replace 'my_relationship_field' with your field name, 100 and 200 with your chosen post ids,
	// and 1 with the source post ID (where the value will be updated)

	// 1. for clone field without the 'prefixed' option:
	update_field( 'my_relationship_field',
		[ 100, 200 ],
		1
	);

	// 2. for clone field with the 'prefixed' option:
	update_field( 'my_clone_field_my_relationship_field',
		[ 100, 200 ],
		1,
	);
} );
If you need to update the Clone field on a user or term object, you must add the appropriate prefix, just as shown in the "loading" field value section.
Note: You should call the update_field function inside the acf/init action, or in any hooks that happen later.
6. Querying by the ACF Clone field
The ACF Clone field does not alter the way values are stored. Each cloned field is saved to the database just like any other ACF field, with each field having its own separate database record. This means you can query cloned field values as you would with standard ACF fields.
Note: If the "Prefix Field Names" option is enabled, you need to include the prefix in your queries. Specifically, instead of using your_field_name, you should use {your_clone_field_name}_{your_field_name}.
Here’s how to handle queries depending on where the cloned field values are stored:
6.1) By postmeta (Post, Page, Any CPT)
Using Advanced Views Framework:
If you're using the AVF: Pro edition, querying by the cloned field values is straightforward with Meta Queries. You need to create a Post Selection, choose the target cloned field in the Meta Fields tab, and define the desired value. It can be a static id or pointer to another field. Then the framework will take care of the rest.
Using WP_Query
For custom queries, you can use the built-in WP_Query class:
$args = array(
    'post_type' => 'post', // or your CPT
    'post_status' => 'publish',
    'posts_per_page' => -1, // means unlimited
    'meta_query' => array(
        array(
            'key'   => 'your_field_name',
            'value' => 'my_value', //  target field value
        )
    )
);
$query = new WP_Query($args);
foreach($query->get_posts() as $post){
 // todo WP_Post $post
}
6.2) By termmeta (Terms)
Here we need to employ the WP_Term_Query class:
$args = array(
    'taxonomy'   => 'category', // Replace with your taxonomy
    'meta_query' => array(
        array(
            'key'     => 'your_field_name',
            'value' => 'my_value', //  target field value
        )
    )
);

$term_query = new WP_Term_Query($args);

foreach ($term_query->get_terms() as $term) {
    // Process each WP_Term object
    // Example: echo $term->name;
}
6.3) By usermeta (user profile)
In this case, we need to use the WP_User_Query class:
$args = array(
    'meta_key'     => 'your_field_name',
    'meta_value'   => 'my_value', //  target field value
);
$user_query = new WP_User_Query($args);

foreach ($user_query->get_results() as $user) {
    // Process each WP_User object
    // Example: echo $user->user_login;
}
6.4) Inside ACF Blocks
ACF Blocks save their data as JSON in the post_content. This data cannot be queried directly. However, if you enable the "Save in Meta" feature for ACF Blocks, the field values are also saved in post meta, allowing you to query them similarly to other postmeta fields.
7. Related Clone field filters and hooks
ACF offers a variety of filters and hooks that enable you to modify field data and behavior, extending WordPress's core hooks functionality. You can utilize the standard add_action and add_filter functions to attach custom code to these hooks.
Since this field is a virtual connector and doesn't have its own value format, you should check the documentation for the cloned field type to see what field settings are supported.
Below are some of the most commonly used hooks along with the ACF Clone field type:
7.1) acf/load_field
The acf/load_field filter allows you to modify the field settings before it is displayed on the editor's screen. This filter is particularly useful for dynamically adjusting the field's configuration, such as setting default values, changing labels, or customizing available options.
add_filter('acf/load_field/name=my_cloned_field', function (array $field): array {
    // Modify the field settings as needed
    $field['instructions'] = 'Please select related posts.';

    return $field;
});
7.2) acf/render_field
The acf/render_field action allows you to add custom HTML before or after a field's input on the editor's screen in the WordPress admin. This can be particularly useful for adding custom-styled text, icons, styles, or additional interactive elements to enhance the field's functionality.
add_action('acf/render_field/key=field_123456789abc', function (array $field): void {
    // Your custom HTML
    echo '<div class="my-custom-class">Custom field-related element</div>';
});
Note: By default, the acf/render_field action is triggered after the field input has been printed. If you need to print your HTML before the input, you should set the priority number to 9 or lower in the third argument of the add_action WordPress function.
7.3) acf/validate_value
Use the acf/validate_value filter to validate the values entered into the field. You can ensure that the entered value meets specific criteria:
add_filter('acf/validate_value/name=my_cloned_field', function($valid, $value, array $field) {
    if (true !== $valid) {
        return $valid; // Skip validation if there is an existing error
    }

    // Custom validation: Ensure the number of selected posts is greater than 3 and less than 6
    $num_selected_posts = is_array($value) ? count($value) : 0;

    if ($num_selected_posts < 3 || $num_selected_posts > 6) {
        return 'Please select between 3and 6 posts.';
    }

    return $valid;
}, 10, 3);
7.4) acf/validate_save_post
The acf/validate_save_post action allows you to perform custom form validations before saving ACF fields. This is particularly useful when you need to validate one field's value based on another field's input or enforce specific rules across multiple fields.
add_action('acf/validate_save_post', function () {
    // Get the cloned field values from ACF fields
    $clone_1 = $_POST['acf']['field_cloned_id_1'] ?? '';
    $clone_2 = $_POST['acf']['field_cloned_id_2'] ?? '';

    if (empty($clone_1) && empty($clone_2)) {
        acf_add_validation_error('field_cloned_id_1', 'At least one Relationship field must be defined.');
        acf_add_validation_error('field_cloned_id_2', 'At least one Relationship field must be defined.');
    }
});
Tip: To find the field key, navigate to the ACF field group in the WordPress admin. Click on the Screen Options button at the top right corner of the page, then check the Field Keys option. Once enabled, the field keys will be displayed next to each field name in the group.
7.5) acf/save_post
The acf/save_post action is triggered when the current item (page/product/user) is saved. You can use it to perform any additional actions, e.g. updating related data.
add_action('acf/save_post', function ($post_id) {
    // Retrieve the relationship field value (replace with your actual relationship field key)
    $related_posts = get_field('related_posts', $post_id); // Field key for relationship field

    if (!$related_posts) {
        return;
    }

    // Loop through each related post and update the 'related_item' field
    foreach ($related_posts as $related_post_id) {
        update_field('related_item', $post_id, $related_post_id); // Replace 'related_item' with your actual field key
    }
});
Thank you for reading! to our monthly newsletter to stay updated on the latest WordPress news and useful tips.

Stuck with development or facing an issue?
WPLake offers affordable on-demand website development and design.
No matter the size of your project - contact us now, and we'll get it done for you!
Frequently Asked Questions Test Your Knowledge
FAQ mode
/
Learning mode
- Can I 'clone' an ACF Clone field?
Yes, you can clone a Clone field. While it might seem a bit unconventional, using a Clone field within another Clone field is possible and can be useful depending on your setup.
- Can I clone disabled field groups?
Yes, the Clone field can be used with disabled field groups, so even if a field group is disabled, you can still clone it.
Related articles

Time to read: 7 mins
Updated 27 Mar, 2026

Lesson #2
Time to read: 11 mins
Updated 25 Sep, 2024
Content links (64)
About the Author