Advanced Views plugin review
Key Points at a Glance
- Methods of Content Presentation: Content presentation in WordPress involves various methods, including coding from scratch, using page builders, and utilizing smart templates from plugins like Advanced Views.
- Advanced Views Framework Overview: The Advanced Views framework bridges the gap between coding and page builders, offering smart templates for content querying and display with flexibility beyond drag-and-drop builders.
- Use Cases for Displaying Content: Use cases include displaying post and custom fields, presenting related item details, and querying and displaying items based on custom criteria.
- Creating and Managing Views: Views are smart templates responsible for displaying content, created by selecting target fields, modifying templates, adding styling rules, and integrating them into target locations using shortcodes or Gutenberg blocks.
- Querying Content with Cards: Cards are components for querying content, utilizing WP_Query class under the hood, with settings for defining views, post types, sorting, and filtering.
- Pro Version Features: The Pro version of Advanced Views extends functionality with advanced querying capabilities, custom data integration, Gutenberg block support, Ajax pagination, and slider creation.
Table of Contents
Intro
WordPress is one of the most famous and popular CMS platforms, with over 46% of websites utilizing it, according to recent statistics. Its popularity stems from its simple and customizable approach to content management.
WordPress offers features like Custom Post Types (CPTs) and metafields, which are built-in and can be extended with great meta field plugins. These features allow users to create a structured data hierarchy tailored to their specific needs in minutes.
In comparison, achieving similar results on other platforms would require significantly more time and effort.
Once we have structured our data within WordPress, the next step is to display it on our website. In WordPress, themes handle primary layout elements like headers and footers, while the content of individual pages is fully customizable.
While the Gutenberg editor in WordPress facilitates the handling of simple content such as plain text or images, our focus is on presenting Custom Post Types and custom fields. Therefore, we need to query and display our content effectively.
Let's briefly explore the various methods we can use to achieve this:
1. Coding from scratch

This approach offers flexibility but requires PHP and WordPress coding knowledge. However, it also comes with several significant drawbacks.
The main drawback is that even experienced developers have to invest a lot of time in building things from scratch.
This is particularly challenging when strict timeframes are in place, as it can lead developers to sacrifice quality in favor of quick implementation. While this may save time initially, it often results in headaches down the line.
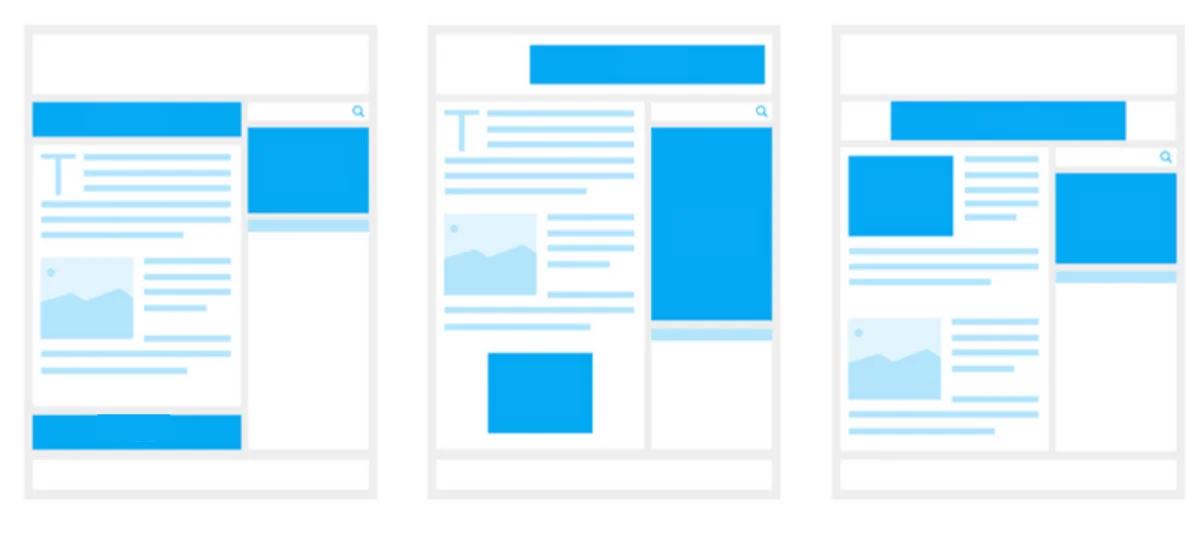
2. Using page builders

Page builders, available as plugins or built into themes, offer a simple, UI-driven approach suitable for beginners. However, they come with drawbacks such as lower quality of produced layouts, including non-human-readable markup, inefficient asset management, and related performance and SEO issues.
Additionally, the complexity of some page builders necessitates significant time investment in learning them, undermining their original purpose of simplifying website building.
3. Using smart templates from the Advanced Views framework

The Advanced Views framework bridges the gap between coding and page builders by providing smart templates. Unlike drag-and-drop builders, it isn't constrained to a rigid UI paradigm.
The Advanced Views framework resolves a variety of routine tasks and common issues, while ensuring that you retain full control over the process.
Instead of the pure UI paradigm, it streamlines routine tasks while offering a robust foundation for customization. These smart templates assist in both content querying and display, aiming to expedite the process while preserving creative freedom.
In this article, we will explore this approach in detail.
Use cases
Before diving into details, let's discuss use cases. It's impractical to cover each use case individually, so we've grouped them into categories:
1. Displaying post and custom fields of the current item
Whether you have a Page or Post item with custom fields, or a Custom Post Type (CPT) item, whether your own or provided by plugins like WooCommerce Product, retrieving and displaying fields is necessary to customize the appearance of the item.
The Advanced Views framework simplifies this task by handling field retrieval and format conversion. This means you only need to select which fields you want to display, and smart templates will automatically fetch them, convert them into the correct format, and pass them to the template.
This allows you to focus on the layout without worrying about specific functions or return formats. As mentioned earlier, the Advanced Views framework isn't a drag-and-drop builder, so you retain full control over the markup and CSS rules.
The plugin provides a default template that includes all selected items, and you can simply reorder or wrap fields to achieve the desired look.
2. Displaying related item details
The second use case encompasses various scenarios that involve displaying related item details on the current page. In WordPress, content can be related in numerous ways, including categories, authors, or meta fields.
With smart templates from Advanced Views, you can effortlessly display related items, whether they are taxonomies attached to the current item (page/post/CPT), information about the post author, or custom fields of another item chosen in the meta fields of the current item.
3. Querying items by custom criteria and displaying them
This use case covers examples where we need to retrieve and display items based on our own criteria. We can query posts using the same criteria mentioned above: by taxonomy, author, or meta fields. In addition to filtering options, we also have ordering options available.
Using Advanced Views, we can easily build queries and display the results. The plugin simplifies this task regardless of the query type.
Whether it's a straightforward query such as retrieving the 4 latest products in a specific category, or a more complex query like retrieving all Custom Post Type (CPT) items with a lower value in a meta field than defined in the URL argument (or in the meta of the current item), the plugin handles it efficiently.
Plugin basics
To get a comprehensive understanding of the plugin, you can refer to the key aspects page in the plugin's documentation.
As a minimum, you should understand the meaning of the two new terms introduced by the plugin: Layout and Post Selection.
- Layout
A Layout is a smart template responsible for displaying content. It contains all template-related information, including a list of selected fields, the template itself, and any associated CSS/JS code. - Post Selection
A Post Selection is an instance that handles database queries and the layout of result items. The Post Selection template is responsible solely for the layout of items, while the detailed appearance of each item is defined by the Layout chosen within the Post Selection.
We create and manage Layouts and Post Selections using the plugin's user interface. Additionally, you can activate the file system (FS) storage option to modify the code using your preferred IDE or utilize Git for version control.
While Layouts and Post Selections define rules, they do not specify where to apply them. To render a Layout template or perform a Post Selection query, you must call these instances in the target locations.
To achieve this, you can either paste the instance-related shortcode into the desired location or activate the Gutenberg block option and add the new Gutenberg block to the target place.
How to display content
The Layout is responsible for displaying items, and this chapter will cover its main aspects.
With the Layout, we can address all the display-related use cases described earlier.
To create a new Layout, click on the "Layouts" item in the plugin's menu and then click on the "Add New Layout" button.
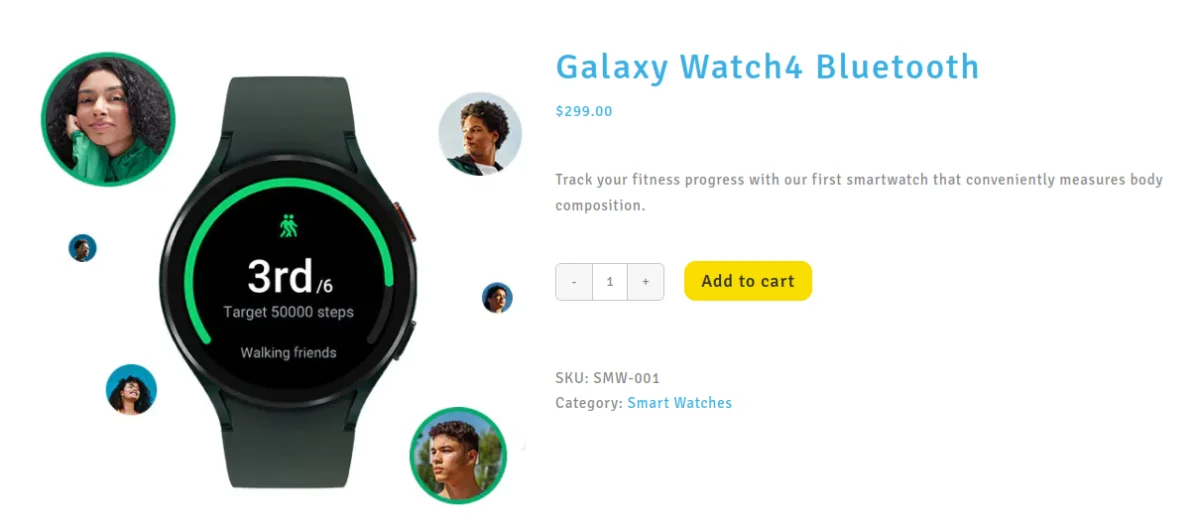
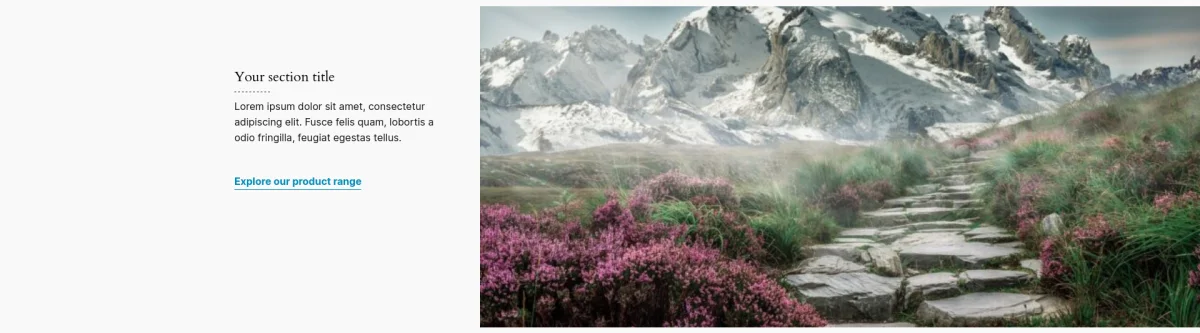
Let's review a simple case to become familiar with Layouts. Suppose we need to make a featured section element, which has several related meta fields: title, description, link, and image. We have already added the related custom fields (using ACF), attached to the target page or Custom Post Type (CPT) item, and now we want to display them.
1. Create a Layout
To achieve this, we'll add a new Layout. First, give it a name for navigation purposes.
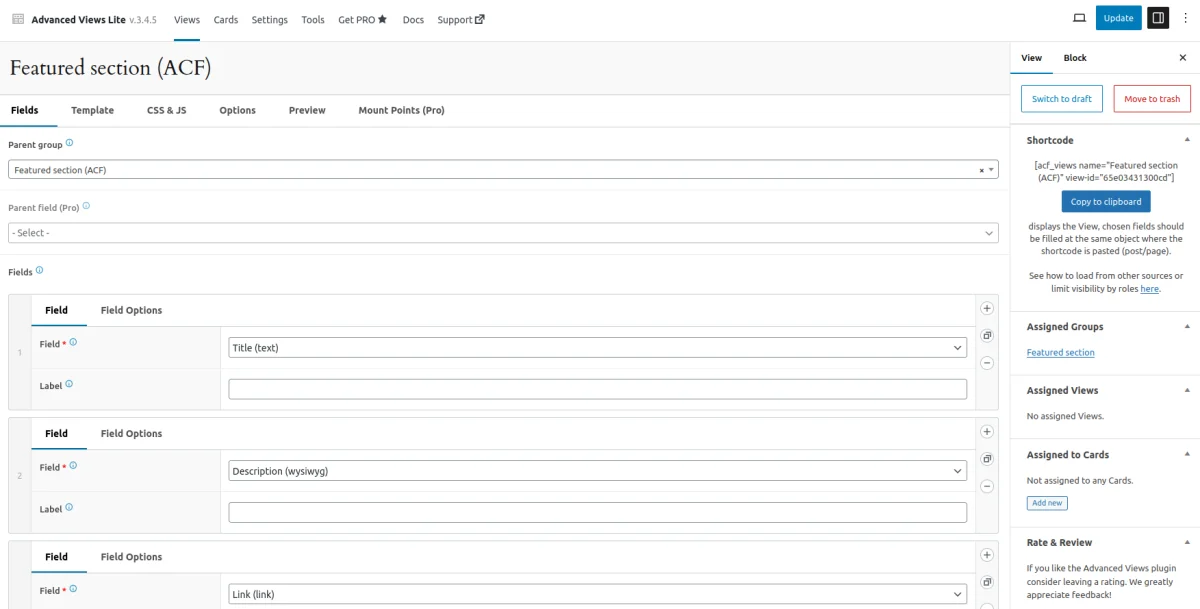
2. Add target fields
Next, let's add the fields to our Layout. In the Fields tab, choose your group, and then add the target fields. Besides native WordPress fields, Advanced Views supports WooCommerce Product fields and meta fields made by supported vendors out-of-the-box. Inside one Layout you can mix fields from different groups.
After adding fields, in our case ACF fields, press the "Publish" button.
Note: In the Fields tab, we declare fields explicitly, which is necessary for tracking relations and automatic template validation. These smart features distinguish the templates provided by Advanced Views from other template managers.
3. Amend the default template (optional)
Now, we may need to modify the template. That's modify, not create, because Advanced Views automatically generates the default template for us. This template includes the relevant markup for all the chosen fields and follows the BEM methodology in class naming out-of-the-box.
In some cases, the default markup may suffice, but since we're creating a new section (featured element), we need to make some modifications.

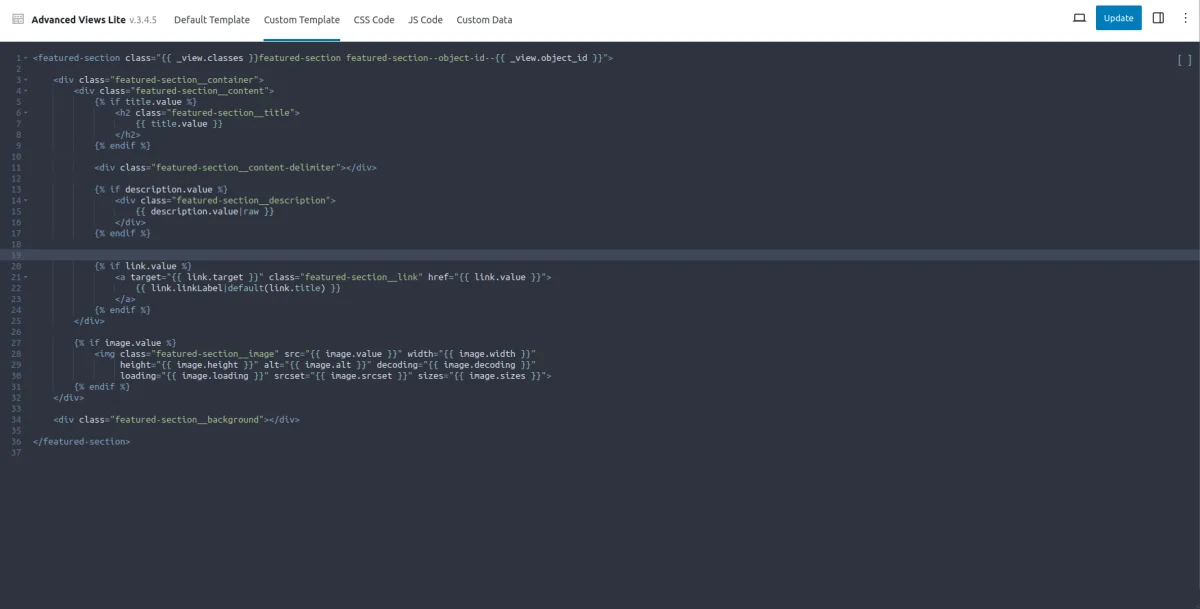
So, we copied the default template and made the necessary modifications. Now, we can switch to the CSS & JS tab to style it.
4. Add styling rules (optionally)
In this step, you may need to add CSS rules to achieve the desired look. It's case-dependent; in many simple cases, the built-in theme styles for your page will take care of the primary appearance.
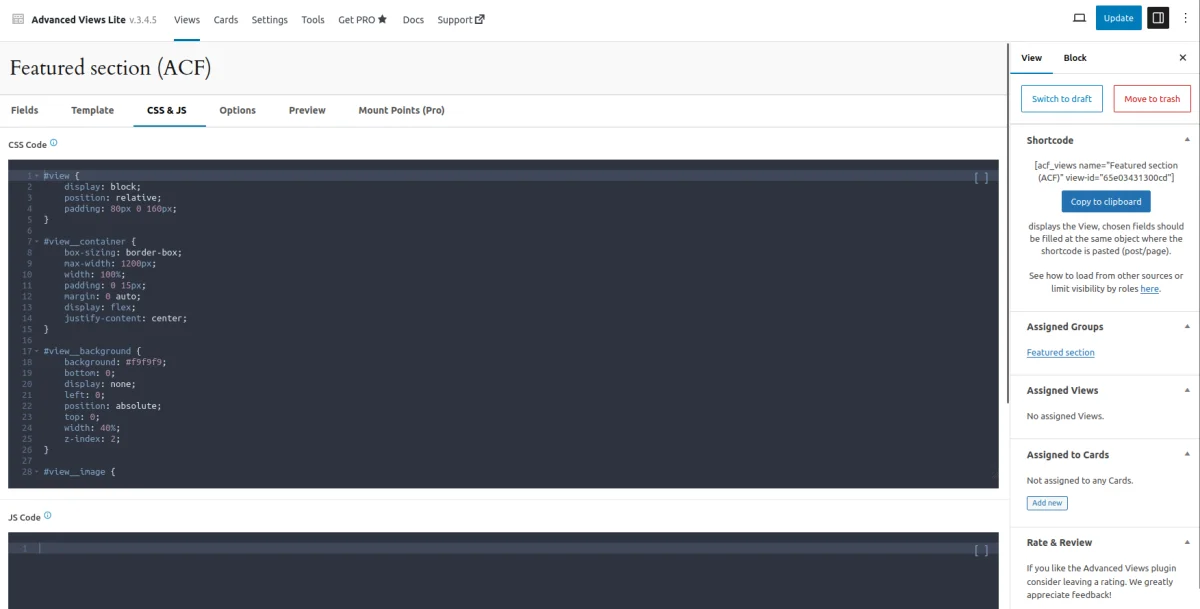
Note: We no longer need to worry about enqueuing the styles on the target pages. Advanced Views will automatically print the related CSS code on the pages where the Layout appears. It follows a modular approach out-of-the-box, so we don't need to worry about splitting our style.css into pieces anymore.
5. Add the Layout to the target place
The final step is to add the Layout to the target place. As mentioned earlier, this can be achieved in two ways: using a shortcode or by registering a Gutenberg block (Advanced Views Pro).
a) Using shortcode
Each Layout has a unique shortcode, which is available in the right area. Click on the copy button and paste it into any target place, then save to apply the changes. In our case, it's the page content of the same page that contains our custom meta fields.
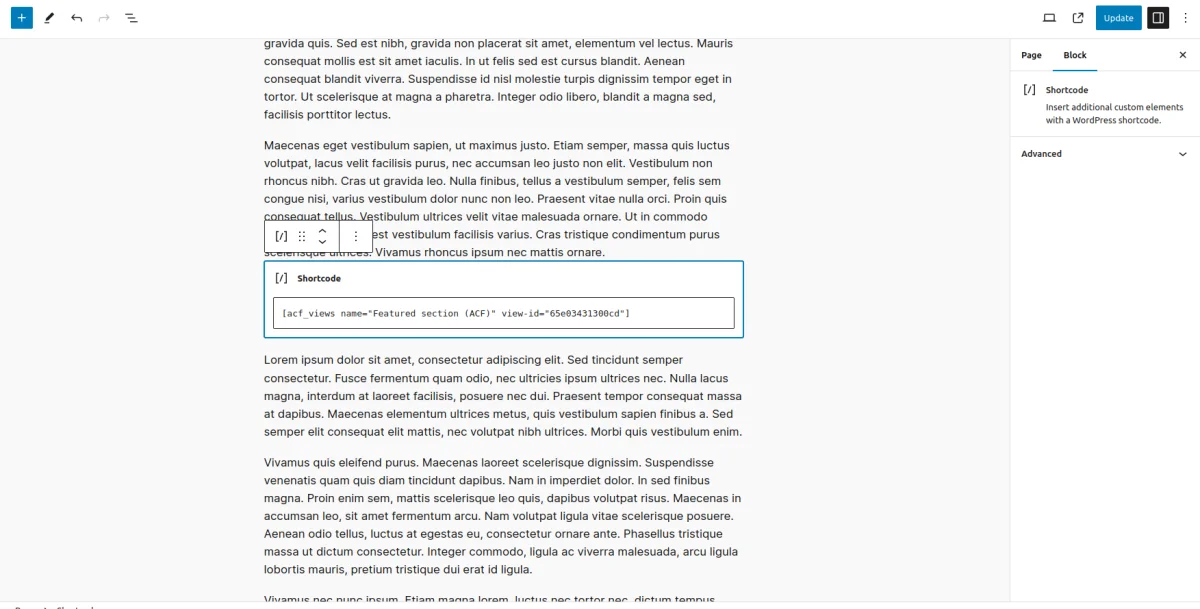
Note: The Layout shortcode arguments allow for managing data source and visibility. In this case, we need to load the fields from the same page where fields are stored, so we leave the arguments as is.
Make sure you've filled out the meta fields and saved the page. Now, you can visit the page to see our new section displaying data from our custom fields.
b) Using a custom Gutenberg block
Another way to integrate Layouts into your content is by registering a custom Gutenberg block. This approach surpasses using shortcodes and offers enhanced functionality.
However, it requires the Pro version of the Advanced Views framework and access to the Blocks feature from your data vendor, such as ACF Blocks. Compared to shortcodes, utilizing blocks presents several advantages, including improved performance and the ability to reuse the same block within a page.
We highly recommend employing this method whenever querying by field values isn't necessary, as field values are stored within the post_content, eliminating the need for additional database queries, unlike conventional custom fields.
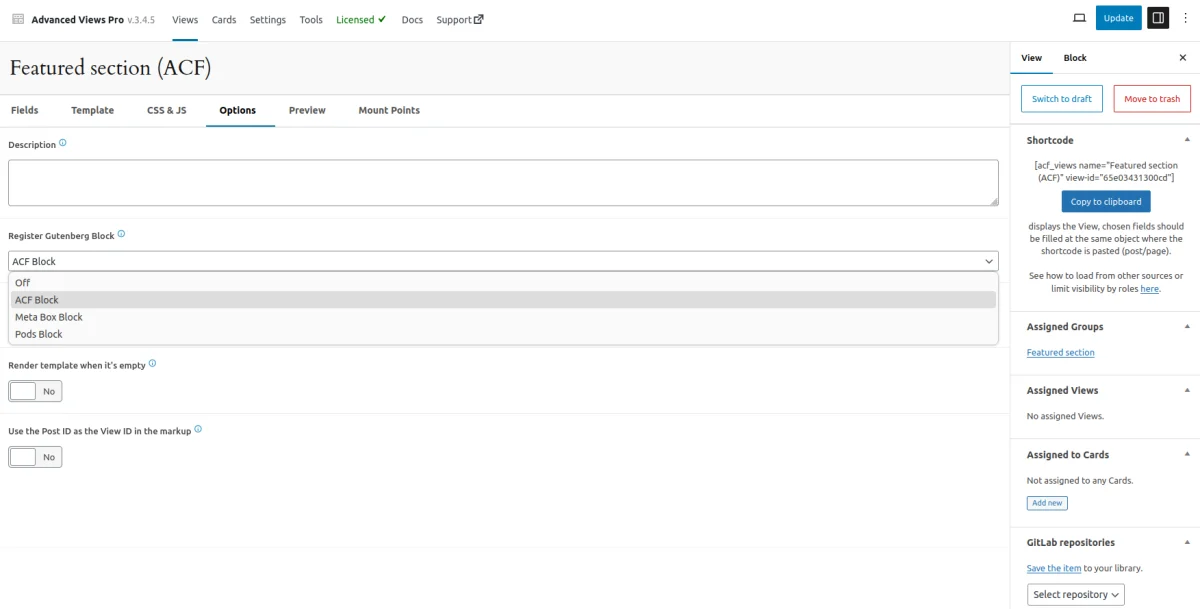
To register a block, navigate to the Options tab and select the Blocks vendor. In our case, we'll choose ACF.
Now, we need to open the target page and add the registered Gutenberg block to the page. The custom blocks are stored in your website library, so you can add them in the same way as other built-in Gutenberg blocks.
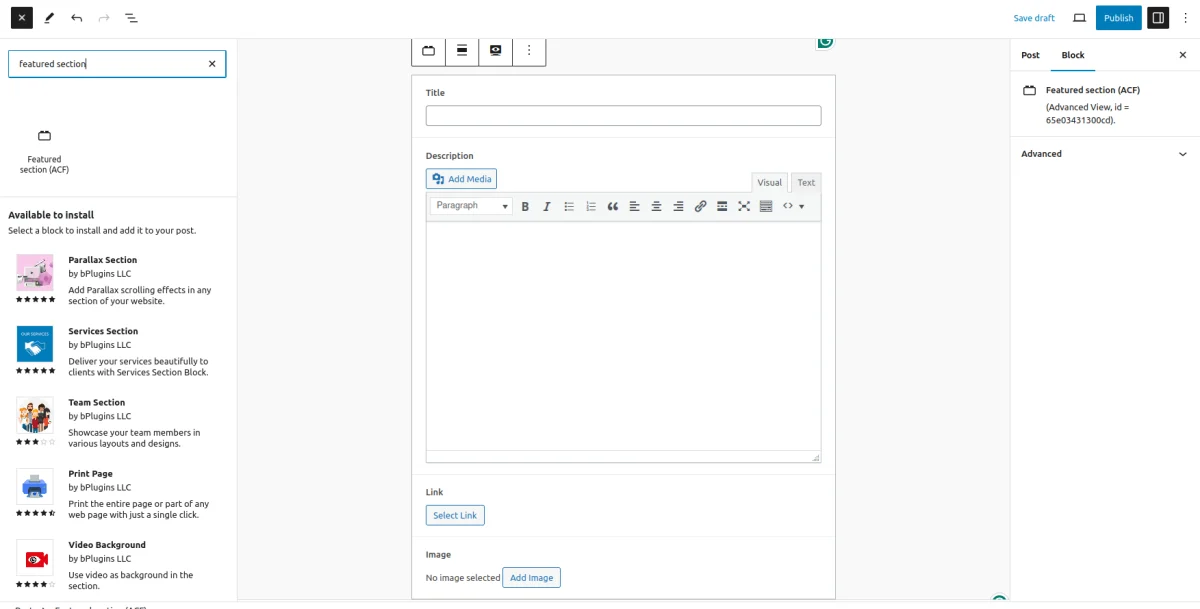
As you can see, the fields we've selected in the Layout have become the block fields. This means they're scoped to the current block, allowing us to reuse the same block multiple times on the same page, unlike traditional meta fields.
Fill out your fields, and click the Publish button. Now, we can visit the page to see the result.
Summary of Layout
We've reviewed the main principles of Layout based on a simple example. With this foundational knowledge, you can create and customize Layouts to suit your specific requirements.
With Advanced Views, you can concentrate on the layout design while the plugin handles the retrieval of fields, conversion of their formats, and passing them into the template. Customizing the auto-generated templates saves you time and prevents you from starting from scratch.
Additionally, Layouts have built-in template validation and track connections between fields and templates. This notifies you if a template needs attention after a Meta group update.
Layouts can be utilized to display various pieces of content, ranging from built-in WordPress fields to custom fields generated by meta plugins. You can explore the full list of supported data vendors here.
Regarding field types, it's important to note that the Lite version of Advanced Views supports all primary field types, including gallery and map fields.
The Pro version extends support to include Repeater fields and allows for fine-tuning the display of object fields, such as Post objects or relationships. Additionally, Pro includes a range of useful features like asset management, enabling you to transform gallery field items into Masonry layouts, meta filters and more.
How to query content
We have just reviewed the display tasks and the Layout component, which is responsible for that part. Now, let's move on to review the query task and the Post Selection component, which assists with it.
The Post Selection component enables us to query (filter) posts based on our custom criteria. It utilizes the WP_Query class under the hood but provides clear field names and descriptions, eliminating the need to search for the correct names and formats.
Let's explore the main Post Selection settings using a simple example. Suppose we need to display the four latest articles on our website.
1. Create a new Post Selection
Like Layout, Post Selection extends the default Gutenberg editor, offering a familiar but enhanced experience. Once we become familiar with Layout, Post Selection looks the same.
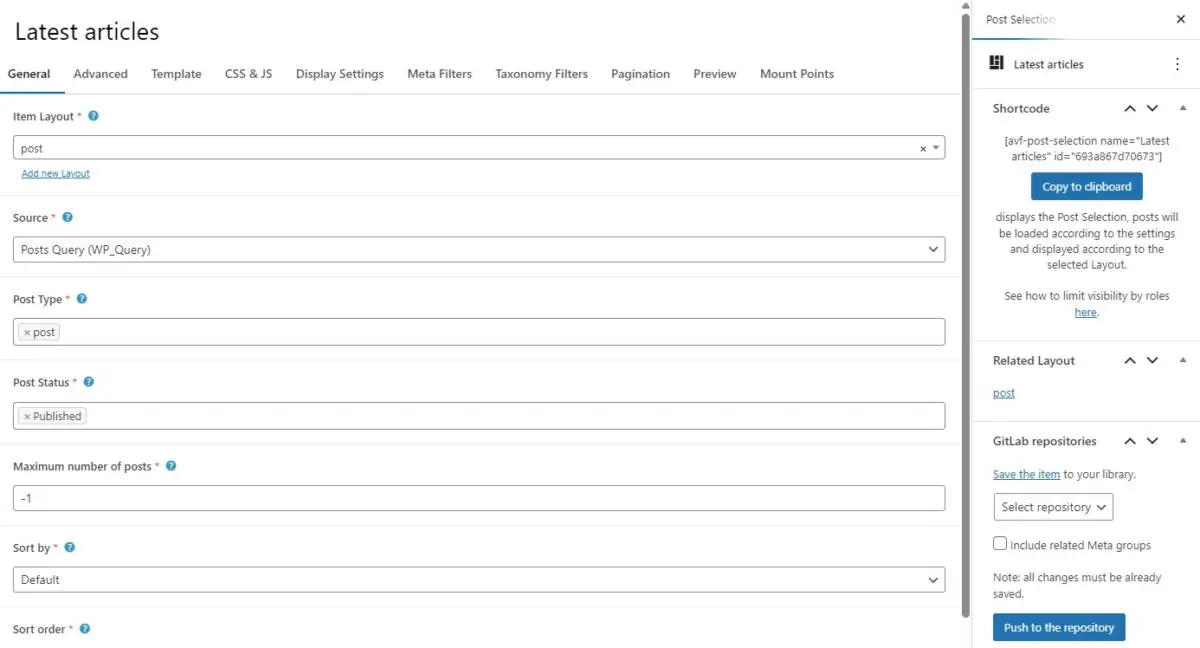
In essence, we need to complete two primary settings: Item Layout and Post Type. First, select the Layout that will be used to display each item in the result, or click 'Add new Layout' if it hasn't been created yet. Then, we must select the Post Type that we want to query.
Other fields have default values, so we can leave them unchanged if they suit our needs. However, in our case, we need to query only the four latest articles. Therefore, we have adjusted the Maximum number of posts and Sort settings to the desired values.
In our case, we do not need to use any other filters. Therefore, we can simply press the Publish button and switch to the Template tab.
2. Amend the default template (optionally)
Similar to the Layout, the Post Selection contains an auto-generated display template. This template primarily defines the layout of items, so in most cases, there's no need to modify the default template. In our 'latest articles' scenario, we will copy and amend the default template to add the h2 title.
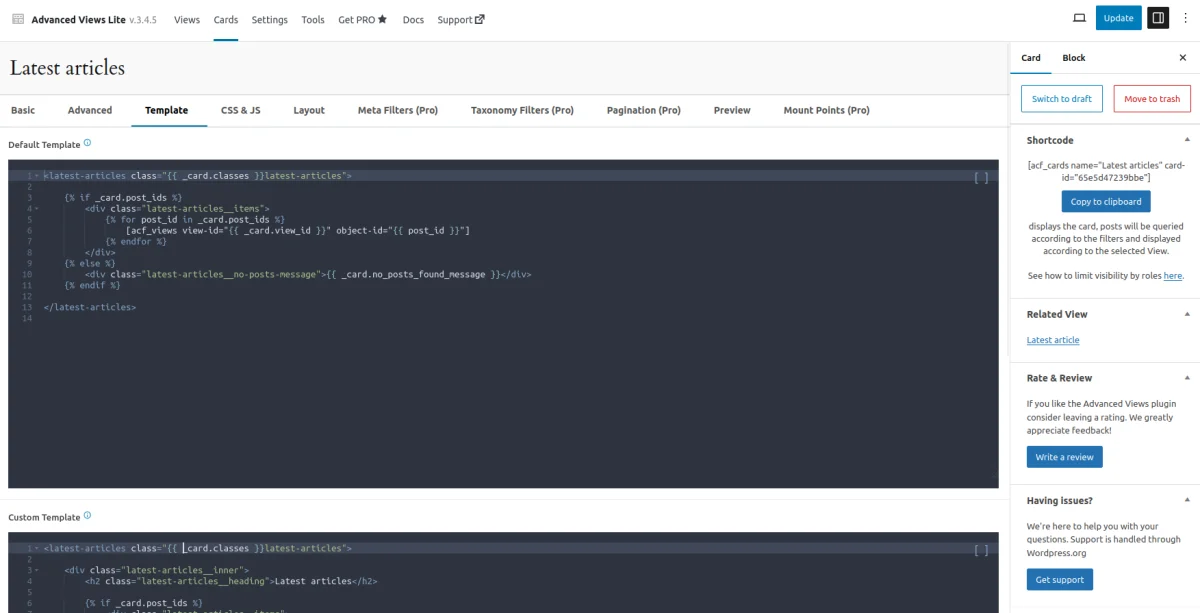
3. Add styling rules (optional)
The Post Selection, like the Layout, enables the addition of CSS rules to style the layout of items. Click on the CSS & JS tab if you need to define styling rules and press Update after to save the changes.
4. Add the Post Selection to the target place
To add our Post Selection to the desired location, we also need to utilize shortcodes. Copy the shortcode from the designated area on your Post Selection and paste it into the desired location. You can employ shortcode arguments to restrict access by roles and other criteria.
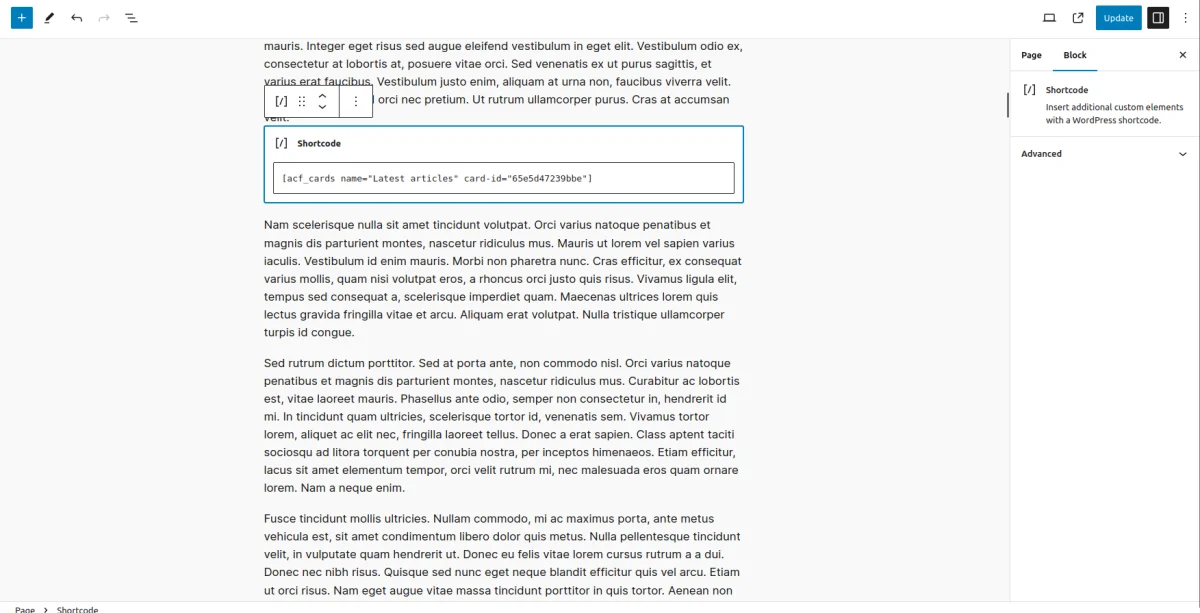
Now we can visit the page to see the result.
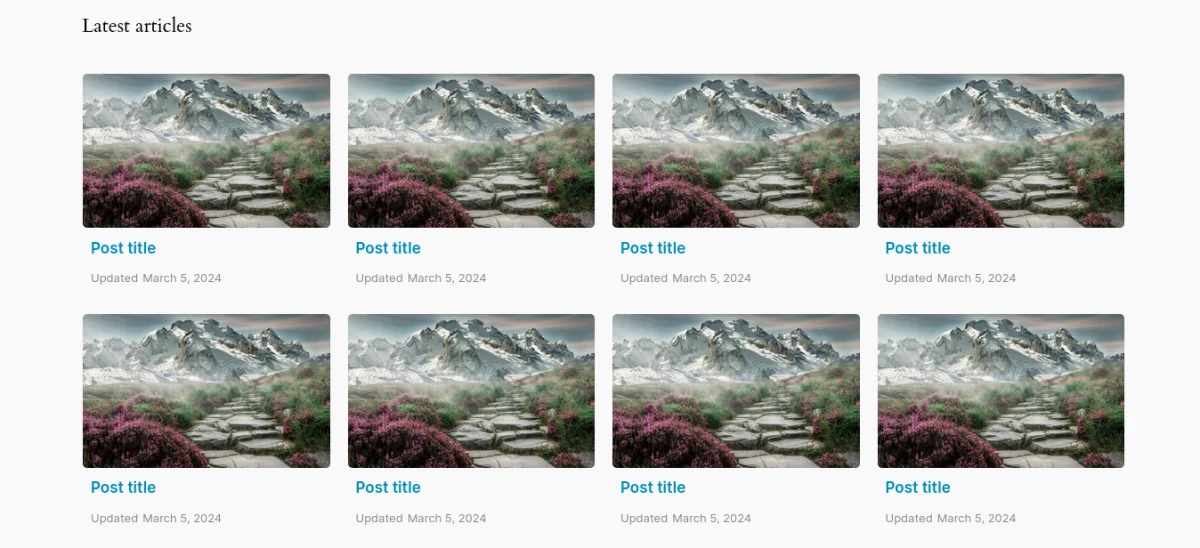
Your result element will display the items that were queried and sorted according to your filters.
While the Post Selection styles handle the layout of items, such as arranging them in a row or column stack and determining the spacing between items, the selected Layout defines the fields and their appearance for each specific item.
Summary of Post Selection
We've discussed the core principles of Post Selections using a straightforward example. Armed with this foundational understanding, you can craft and tailor Post Selections to meet your specific needs.
The Lite version allows you to query items by post type and define their sorting. Alternatively, you can manually list posts or exclude certain ones (accessible via the Advanced tab).
The Pro version enhances functionality with Meta filters, enabling you to master complex queries effortlessly. Additionally, it features Ajax pagination and slider capabilities, which are customizable to your preferences. This streamlines development while maintaining control over the process.
Furthermore, in the Pro version, you have access to a range of arguments within the UI, and you can incorporate any supported arguments from WP_Query using the Custom Data feature.
Summary
We've explored the essential features of Advanced Views, the Smart Templates that allow us to display content in WordPress easily.
These templates consist of two primary elements: Layout and Post Selection.
The Layout empowers you to focus on layout design while it takes care of field retrieval, format conversion, and passing them into the template. Customizing the auto-generated templates saves time and avoids starting from scratch.
In the Pro version, Layout capabilities expand further, allowing you to integrate Gutenberg blocks or manage front-end assets such as Slider or Masonry libraries seamlessly.
The Post Selection component aids in querying from the database, providing a user-friendly interface for the WordPress WP_Query class, which manages querying and sorting at the core level.
In the Pro version, Post Selection enables effortless mastery of Meta queries and facilitates tasks such as Ajax pagination and slider creation.
The Advanced Views framework is a tool designed to expedite the development process for developers. It provides a robust foundation and handles routine aspects, allowing developers to focus on more intricate tasks.
Additionally, the plugin includes a set of best practices out of the box, ensuring the quality of the final result. It's especially beneficial when working on projects with tight deadlines, as developers can rely on the plugin to maintain high standards regardless of time constraints.
Thank you for reading! to our monthly newsletter to stay updated on the latest WordPress news and useful tips.

Stuck with development or facing an issue?
WPLake offers affordable on-demand website development and design.
No matter the size of your project - contact us now, and we'll get it done for you!
Frequently Asked Questions Test Your Knowledge
FAQ mode
/
Learning mode
- What are the drawbacks of coding from scratch?
Coding from scratch offers flexibility but requires PHP and WordPress coding knowledge, and can lead to significant time investment and quality compromises.
- What are the benefits of using smart templates from the Advanced Views plugin?
Smart templates from the Advanced Views plugin offer a balance between coding and page builders, providing flexibility, efficient content querying, and full control over layout customization.
- What are some common use cases for the Advanced Views plugin?
Common use cases include displaying post and custom fields, presenting related item details, and querying and displaying items based on custom criteria.
- What features does the Pro version of Advanced Views offer?
The Pro version extends functionality with advanced querying capabilities, custom data integration, Gutenberg block support, Ajax pagination, and slider creation.
Related articles
Time to read: 7 mins
Updated 27 Mar, 2026
Content links (52)
About the Author